Updating Task Progress
So the resources are digging into their assignments and progress is being made. At regular intervals, you want to record their progress in Microsoft Project. Depending on how much time you want to spend entering progress information (and how much time you want your team members to spend doing that), you can choose a simple, high-level method; a comprehensive, detailed method; or something in-between.
Entering actual progress information into Microsoft Project ensures that you'll always know how the project's going. You can keep an eye on the critical path and your budget. You can monitor key tasks and know exactly when you'll be handing off an important deliverable . With actual information coming into your project plan, you can also anticipate potential problems and take corrective actions as necessary.
If you're using Microsoft Office Project Server 2003 with Microsoft Office Project Web Access 2003, updating task progress can become highly automated. You set up the types of progress information you want to receive from your team members, and that information is integrated with the assignments in the timesheet that team members use in Project Web Access 2003. Every week (or however often you specify), team members send you an update regarding their actual progress toward completing tasks. You can have the progress information automatically integrated into your project plan or you can review the information before incorporating it.
| Cross-References | For more information about exchanging task updates using Project Web Access, see Chapter 22, "Managing with Project Professional and Project Server." |
| |
As you meet milestones in your project and hand off deliverables, be sure to obtain formal acceptance of the project scope from the appropriate stakeholders; for example, the sponsor or customer. The sponsor reviews the deliverables and signs off that they're completed to his or her satisfaction.
At the same time, the sponsor should also check the correctness, or quality standards, of the work results.
It's important to have this acceptance process at various interim stages throughout the project ”for each deliverable or at the end of each major phase, for example, rather than waiting until the end of the project.
| |
You can also exchange task update messages with your team members through e-mail, although the features are more limited.
| Cross-References | For more information about using e-mail for team collaboration, see Chapter 19, "Collaborating Using E-Mail." |
Whether you're exchanging updates electronically , getting a status update in a weekly meeting, using paper timesheets, or making the rounds to hear team members' progress, you can enter the following actual progress information in your project plan:
-
Percent complete
-
Actual duration and remaining duration
-
Actual start and actual finish
-
Percent work complete
-
Actual work complete and remaining work
-
Actual work complete by time period
Tip Collect progress information to set future benchmarks When you enter actuals in your project plan, you're not just keeping your project on track. You're also building historical information that you can use as metrics for other similar project plans. You're tracking solid, tested data about how long these tasks actually take.
When you enter one piece of status information, often other pieces of information are calculated by Microsoft Project. Certainly the schedule and costs are automatically recalculated.
| |
By default, Microsoft Project recalculates information in your project plan as soon as you make a change that warrants recalculation. Such changes include assigning a resource, linking tasks, adding a cost, and so on.
If your project plan is very large or complex, you might find that constant recalculation slows down system performance. You can have Microsoft Project calculate your changes only when you give the command. To do this, click Tools, Options and then click the Calculation tab. Next to Calculation Mode, select the Manual option.
Whenever you make a change that requires a calculation, the word Calculate appears in the status bar. Press F9 to calculate all open projects. Press Shift+F9 to calculate just the active project.
| |
Choosing the Best Method for Entering Actuals
There are several methods of tracking actual progress information in your project plan. How do you decide which method to use?
The first consideration is the level of detail you need. Your managing stakeholders might expect you to report at a certain level of detail at the weekly status meetings. Or you might need reliable historical information from this project because it's serving as a benchmark for similar future projects.
The second consideration is time. Will you have time to enter detailed progress information, or will you be so busy managing the project and perhaps working on your own assigned tasks that you won't be able to keep track of everything with an adequate amount of detail? What about your team members? Are they going to be too stretched to complete an electronic or paper timesheet? If you're using Project Server and Project Web Access, certain processes are automated for you, but they might still take time for your team members.
The third consideration is whether you've assigned resources to tasks in your project plan. Obviously, resources will carry out the tasks one way or the other. But if you've chosen not to include resources in your project plan, you have fewer available tracking methods.
| |
If you're collaborating with your team members using Project Server and Project Web Access, you can tailor the fields shown in the team members' electronic timesheet. Depending on the progress information you want to track, you might want to add any of the following fields to the team members' timesheet:
-
% Work Complete
-
Actual Work Complete
-
Actual Duration
-
Remaining Duration
-
Actual Finish
-
Remaining Work
-
Actual Start
These fields are task progress fields, so they can be most useful in a team member's timesheet. However, you can add any task or assignment field available in Microsoft Project. The timesheet becomes part of the periodic task update that the team members send you.
| Cross-References | For more information about setting up Project Web Access options, see Chapter 21, "Adminstering Project Server and Project Web Access for Your Enterprise." |
| Cross-References | There's also a simplistic e-mail collaboration method. For more information, see Chapter 19, "Collaborating Using E-Mail." |
| |
Using one primary method of tracking actuals does not prevent you from using other methods for other tasks. Although you might achieve more consistent results if you stick to one method, sometimes other tasks simply lend themselves to a different type of progress information. Certain tasks are so important that you want to track them very closely. You can do that ”you're never locked into a single tracking method.
| |
Many of your tracking functions are available on the Tracking toolbar (see Figure 10-7). To display the Tracking toolbar, click View, Toolbars, Tracking. You can also right-click an empty spot in the toolbars area and then click Tracking.
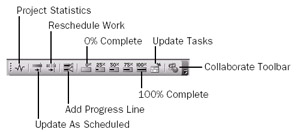
Figure 10-7: The Tracking toolbar includes buttons for setting percent complete, updating multiple tasks at once, and more.
As soon as you enter the tracking and monitoring phase of your project, it's a great idea to continuously display the Tracking toolbar, which contains many of the tools you need to quickly review and update task status throughout the life of the project.
The following list describes the functions available on the Tracking toolbar:
Project Statistics. Opens the Project Statistics dialog box, which shows the current, baseline, actual, variance, and remaining information for overall project start, finish, duration, work, and cost.
Update As Scheduled. Enters actual information to show that the selected tasks are proceeding exactly as planned. This is a shortcut to using the Update Project dialog box with the default settings.
Reschedule Work. Reschedules the entire project to start any uncompleted work after the current date. This is a shortcut to using the Update Project dialog box to reschedule uncompleted work.
Add Progress Line. Changes your cursor to a selection tool for you to select the status date for the progress line. Click the date in the chart portion of the Gantt Chart, and the progress line is drawn according to that date. This is a shortcut to using the Progress Lines dialog box.
0% Complete through 100% Complete. Enters actual progress for the selected tasks to the selected percent complete. This is a shortcut to using the Update Tasks dialog box.
Update Tasks. Opens the Update Tasks dialog box.
Collaborate Toolbar. Displays the Collaborate toolbar, which you can use to publish assignments, update project progress, request progress information, and use various features associated with Project Server, Project Web Access, and enterprise project management.
| |
Updating Progress Using Task Scheduling Controls
You can update progress by entering actual information from task scheduling controls such as percent complete, duration, start date, and finish date. You can use these methods whether or not resources are assigned in Microsoft Project.
Updating the Project as Scheduled
Probably the easiest method of entering tracking information is to provide information to Microsoft Project that shows that your project is going exactly according to plan. You can use today's date or another date as the reference complete through date. With this method, tasks are updated as follows :
-
Any tasks with a scheduled finish date before your complete through date are shown as completed on that scheduled date. In other words, your scheduled finish dates become your actual finish dates up to today's date or whichever date you specify.
-
Any tasks with a scheduled start date before your complete through date (and a finish date after your date) are shown to be in progress through that date.
-
Any tasks with a scheduled start date after your complete through date are untouched.
To update the project as scheduled, follow these steps:
-
Click Tools, Tracking, Update Project.
The Update Project dialog box appears (see Figure 10-8).
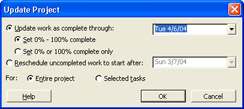
Figure 10-8: Update your project as scheduled through a specified date. -
Make sure that the Update Work As Complete Through option is selected.
-
Enter the complete through date in the box. By default, today's date appears.
-
Select the Set 0% - 100% Complete option if you want Microsoft Project to calculate whether the task is not started, 100% complete, or in progress.
If a task's scheduled start date is after your complete through date, the task remains 0% complete.
If a task's scheduled finish date is before your complete through date, the task is set to 100% complete.
If a task's scheduled start date is before your complete through date, and the scheduled finish date is after your complete through date, Microsoft Project calculates a percent complete value (see Figure 10-9).

Figure 10-9: If your complete through date is April 8 and you want the Update Project function to calculate current progress of completed and in-progress tasks, your Gantt Chart shows progress bars looking like this. -
Select the Set 0% or 100% Complete Only option if you want in-progress tasks to remain at 0% (see Figure 10-10). That is, any tasks whose scheduled finish date is after your complete through date do not have any progress entered for them.
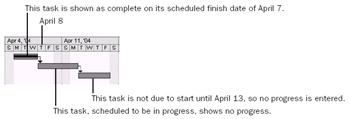
Figure 10-10: If you want the Update Project function to display in-progress tasks as 0% complete, this is the result when your complete through date is April 8.
You can use this method to update the entire project or selected tasks. Select the Entire Project or Selected Tasks option to specify your choice.
Entering Percent Complete
Another relatively simple method of tracking task progress is to specify percent complete. When you enter percent complete, Microsoft Project calculates actual duration and remaining duration.
To enter percent complete for one or more tasks, do the following:
-
In a task sheet view, such as the Gantt Chart or Tracking Gantt, select the task(s) whose percent complete you want to update.
-
 On the Standard toolbar, click Task Information and then click the General tab.
 -
In the Percent Complete box, enter the percent complete that applies to all selected tasks.
The tasks are updated to reflect the percent complete. In the Gantt Chart, the percent complete is represented as a thin black line within Gantt bars (see Figure 10-11).
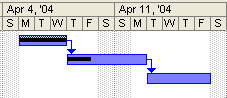
Figure 10-11: Gantt bars display how much of the task has been completed.
| Tip | |
| Note | By default, when you enter percent complete for a task, this percentage is distributed evenly across the actual duration of the task. You can change this to distribute to the status date instead. Click Tools, Options and then click the Calculation tab. Select the Edits To Total Task % Complete Will Be Spread To The Status Date check box. |
Entering Actual Duration
If you enter the actual duration of a task, Microsoft Project calculates the percent complete. You can change remaining duration, if necessary.
To enter actual duration of one or more tasks, do the following:
-
In a task sheet view, such as the Gantt Chart or Tracking Gantt, select the task(s) whose actual duration you want to update.
-
Click Tools, Tracking, Update Tasks. The Update Tasks dialog box appears (see Figure 10-12).
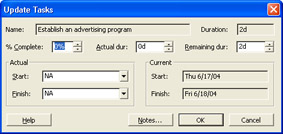
Figure 10-12: Use the Update Tasks dialog box to enter different types of progress information for one or more selected tasks. -
In the Actual Dur box, enter the actual duration value.
-
If you expect the task to take more or less time than currently scheduled, update the remaining duration in the Remaining Dur box.
Note By default, when you enter progress information for tasks, Microsoft Project automatically calculates the actual and remaining work and cost for assigned resources. This is the case when you update Percent Complete, Actual Duration, or Remaining Duration of tasks or assignments.
If you prefer to enter values for actual and remaining work and cost yourself rather than have Microsoft Project calculate it for you based on entered task progress, you can turn this option off. Click Tools, Options and then click the Calculation tab. Clear the Updating Task Status Updates Resource Status check box.
Entering Actual Start and Actual Finish
When you enter actual start and finish dates for tasks, you can better monitor the finish date of the project as whole, especially when working with critical tasks. When you enter an actual start date, the scheduled start date changes to match the actual start date. Likewise, when you enter an actual finish date, the scheduled finish date changes to match the actual finish date. Any successor tasks are rescheduled as needed.
To enter an actual start or finish for one or more tasks, do the following:
-
In a task sheet view, such as the Gantt Chart or Tracking Gantt, select the task(s) whose actual start or finish you want to update.
-
Click Tools, Tracking, Update Tasks.
-
Under Actual, enter the actual start date in the Start box or the actual finish date in the Finish box.
The scheduled start and finish dates are shown under Current.
| |
When you enter actual start or actual finish dates, your scheduled (current) start or finish dates change to match. Microsoft Project recalculates the scheduled dates so that you can see any effects the change might have on the rest of your schedule. For example, if Task A was scheduled to finish on May 15 but it finished on May 20 instead, you'd need to know how its successor Task B is now scheduled. This update is especially important when critical tasks are involved.
If you want to keep your scheduled start and finish dates for comparison purposes, save a baseline or interim plan before you enter the actuals. With a baseline, not only can Microsoft Project remember the original start and finish dates; it can also calculate the differences between the original and scheduled information. These differences are stored in the Variance fields, which are empty until you save a baseline and start entering progress information.
| |
| |
Use the Tracking Setup Wizard in the Project Guide to help you set up a custom tracking view tailored to work-related progress information and how you're receiving it. The Tracking Setup Wizard facilitates your tracking efforts, whether progress information comes in automatically through Project Server and Project Web Access or you're entering information manually. Either way, the Tracking Setup Wizard helps you set up the tracking of work- related progress information.
![]() To start the Tracking Setup Wizard, click Track on the Project Guide toolbar and then click the Prepare To Track The Progress Of Your Project link. Read the information in the Project Guide side pane and work through the steps, clicking the Save And Go To link at the bottom of the page when you're ready to move to the next step (see Figure 10-13). When finished, click the Save And Finish link.
To start the Tracking Setup Wizard, click Track on the Project Guide toolbar and then click the Prepare To Track The Progress Of Your Project link. Read the information in the Project Guide side pane and work through the steps, clicking the Save And Go To link at the bottom of the page when you're ready to move to the next step (see Figure 10-13). When finished, click the Save And Finish link.
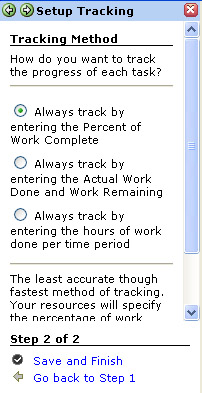
Figure 10-13: The Project Guide walks you through the steps for setting up a custom tracking view.
When you want to enter progress information, click Track on the Project Guide toolbar. Click the Incorporate Progress Information Into The Project link. Your custom view appears, and the Project Guide side pane provides guidelines and controls to help you through the process.
You can also access your custom tracking view on the View menu.
| |
Updating Progress Using Resource Work
If resources are assigned in Microsoft Project, you can update progress information based on work for the task or the assignment. Work doesn't exist in your project plan unless you assign resources, at which time task duration is translated into assignment work time. Work can be further divided among multiple assigned resources, depending on the task type. Updating progress using work can be more precise than updating with percent complete or actual duration.
The following work tracking methods are listed in order from the quickest and simplest to the most sophisticated.
| |
As you enter actual progress, you can choose the status date to be the reference point for actual and remaining portions of the task. Changing the status date can be helpful if you received actuals on Friday, but you don't enter them into the project plan until the next Wednesday. If you were to use Wednesday's date as the status date, some of your actuals could be skewed. By default, the status date is the current date; that is, today. To set the status date, do the following:
-
Click Project, Project Information.
-
In the Status Date box, enter the status date you want to use for the actual progress information you're about to enter.
You have additional options about how actual progress is to be entered in your project plan. Click Tools, Options and then click the Calculation tab. Under Calculation Options for your project file, a series of four check boxes provides options for handling actual and remaining task information in your schedule in relation to the status date. These options are as follows:
-
Move End Of Completed Parts After Status Date Back To Status Date
-
And Move Start Of Remaining Parts Back To Status Date
-
Move Start Of Remaining Parts Before Status Date Forward To Status Date
-
And Move End Of Completed Parts Forward To Status Date
| |
Entering Percent Work Complete
If resources are assigned in Microsoft Project, you can enter their reports of what percentage of work they've completed so far. Remember, work comes into existence only when resources are assigned to tasks. To enter percent work complete for a task (as contrasted with an assignment), follow these steps:
-
Display a task sheet view, such as the Tracking Gantt or Task Usage view.
-
Apply the Work table. Click View, Table, Work.
-
In the % W. Comp. field of the task you want to update, enter the value of percent work complete.
Follow these steps to enter percent work complete for an assignment (as contrasted with a task):
-
Display the Task Usage view.
-
Select the assignment (the resource name beneath the task) whose percent work complete you want to update.
If you want to update several assignments at once with the same percent work complete, select them all.
-
 On the Standard toolbar, click Assignment Information and then click the Tracking tab (see Figure 10-14).
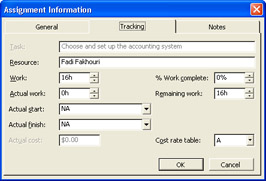
Figure 10-14: Use the Tracking tab in the Assignment Information dialog box to update progress for an assignment. -
In the % Work Complete box, enter the value.
If entering percent work complete will be your primary method of updating progress information, use the Project Guide to create a custom tracking view. A view similar to the Tracking Gantt is created with the % Work Complete field added as a column in the sheet portion of the view (see Figure 10-15).

Figure 10-15: The Project Guide can create a custom view for updating percent work complete, which is considered the quickest method of entering work-related actuals.
Entering Actual Work Complete and Remaining Work
If resources are assigned in Microsoft Project, you can enter their reports of actual work completed. If they believe that there is more or less work (than originally scheduled) remaining to be done, you can adjust remaining work as well.
If you have multiple resources assigned to a task, and you enter actual work completed for the task, the work amounts are evenly distributed among the assigned resources. To enter total amounts for actual work completed on a task (as contrasted with an assignment), do the following:
-
Display a task sheet, such as the Task Usage view or Tracking Gantt.
-
Click View, Table, Work.
-
If necessary, drag the divider bar to see the Actual (work) field (see Figure 10-16).
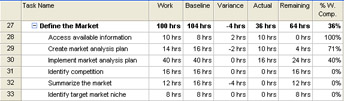
Figure 10-16: Use the Work table to update actual work on a task. -
In the Actual (work) field of the task you want to update, enter the actual work value.
The values in the Remaining (work) and % W. Comp fields are recalculated.
To enter total amounts of actual work completed on an assignment (as contrasted with a task), do the following:
-
Display the Task Usage view.
-
Click View, Table, Work.
-
If necessary, drag the divider bar to see the Actual (work) field.
-
In the Actual (work) field of the assignment (the resource name under the task) you want to update, enter the actual work value.
The values in the Remaining (work) and % W. Comp fields for the assignment are recalculated.
Tip Update actual work in the Assignment Information dialog box You can also double-click the assignment to open the Assignment Information dialog box. Click the Tracking tab. Update the value in the Actual Work box. This is also a good method of updating actual work for multiple assignments if they all have the same value.
If entering actual work will be your primary method of updating progress information, use the Project Guide to create a custom tracking view. A view similar to the Tracking Gantt is created with the Tracking table applied. This method is considered a happy medium ”moderately detailed and moderately time-consuming .
| |
If you use Project Professional 2003 with Project Server and Project Web Access, you can automate the gathering and entry of actuals so you don't have to enter actuals on assignments yourself. With the help of your project server administrator, you can set up your team members' timesheets in Project Web Access to enter and submit their actuals on a periodic basis.
You can then review these actuals and accept them for incorporation into the project plan. If you prefer, you can set a rule to have these actuals automatically accepted and incorporated. You can also use the Project Guide to set up the timesheet and options.
| Cross-References | For more information about setting up team member timesheets for progress tracking in Project Web Access, see "Setting Up Team Member Timesheets". |
| |
Entering Actual Work Complete by Time Period
The most comprehensive method of updating actual progress information is to enter actual work on assignments by time period. This is the smallest unit of information you can enter because you're entering information about the assignment, and you're probably entering hours worked in a day.
With this method, you're using the timesheet portion of the Task Usage view to enter actuals. To do this, follow these steps:
-
Display the Task Usage view.
-
Click Format, Details, Actual Work.
The timesheet portion of the view changes to include Act. Work as a row under (scheduled) Work.
-
If you want to show rolled-up actual work totals for assignments, apply the Work table to the sheet portion of the view. Click View, Table, Work (see Figure 10-17).
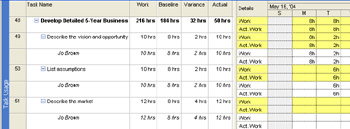
Figure 10-17: Use the Task Usage view to enter daily values of actual work on assignments. -
In the Act. Work field for the assignment and the day, enter the actual work value.
-
 If you want to enter actual work for different time periods, click Zoom Out or Zoom In on the Standard toolbar.
![]() If entering actual work by time period will be your primary method of updating progress information, use the Project Guide to create a custom tracking view. A view similar to the Task Usage view is created with the Act. Work field added as a row in the timesheet portion of the view and the Work and Actual Work fields added as columns in the sheet portion of the view.
If entering actual work by time period will be your primary method of updating progress information, use the Project Guide to create a custom tracking view. A view similar to the Task Usage view is created with the Act. Work field added as a row in the timesheet portion of the view and the Work and Actual Work fields added as columns in the sheet portion of the view.
| |
New Feature Using Project Professional, Project Server, and Project Web Access to automatically gather and enter actuals, you can protect the integrity of actuals submitted by team members. Maintaining true actuals can be crucial if those actuals are directly submitted to your organization's general ledger system to produce customer invoices.
Your project server administrator first sets up the Project Web Access progress method to track hours of work per day or per week. Then the administrator sets the open reporting time period. Team members can enter actuals only during the open reporting period, not long after the period is past.
Furthermore, options can be set so that if the project manager or another user changes actual hours that have been submitted and incorporated into the project plan, those changes can be audited against what was originally submitted by the team member.
You can review the protected actuals submitted by the team member by adding the Actual Work Protected and Actuals Overtime Work Protected fields to a task sheet. You can also return actuals edited in the project plan back to their value as submitted and stored on Project Server. Click Tools, Tracking, Sync To Protected Actuals.
| Cross-References | For more information about setting up team member timesheets for progress tracking in Project Web Access, see "Setting Up Team Member Timesheets". |
| |
Rescheduling the Project
Suppose that you and your team started executing a project a few months ago. Some tasks were completed and some were in progress when your team's efforts were redirected onto a different urgent priority. Now, you're all back to work on this project again, ready to pick up where you left off.
What do you do with your project plan? The scheduled dates of tasks you need to work on now are two months old. Do you have to readjust all the tasks to align them with the current calendar?
No, you just need to reschedule incomplete tasks for the current date. Microsoft Project will shift any incomplete tasks forward to a date you specify, and you can continue forward from there (see Figure 10-18).
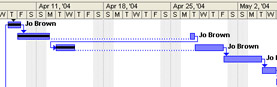
Figure 10-18: This project stalled in early April, and then was rescheduled to continue about two weeks later.
| Note | In a situation like this, it might be a good idea to save a new baseline. Keep the old one, but use the new baseline for your everyday variance measurements. |
To reschedule uncompleted tasks, follow these steps:
-
Click Tools, Tracking, Update Project.
-
Select the Reschedule Uncompleted Work To Start After option.
-
Enter the start after date in the box.
By default, today's date appears.
You can use this method to reschedule the entire project or just selected tasks. Select either the Entire Project or the Selected Tasks option to specify your choice.
By default, any tasks that were in progress are split so that remaining work is scheduled after the date you specify. If you don't want in-progress tasks to be split, click Tools, Options and then click the Schedule tab. Clear the Split In-Progress Tasks check box.
When you rescheduled uncompleted work in Microsoft Project 2000 and earlier, date constraints were removed and changed to As Soon As Possible or As Late As Possible. Starting with Microsoft Project 2002, uncompleted tasks that have a date constraint (such as Must Start On or Finish No Earlier Than) are not rescheduled, which preserves the constraint and gives you the option of deciding how to handle it.
Also in previous versions of Microsoft Project, when you rescheduled uncompleted work, you could not enter a date in the past; you could only enter the current or future date. As of Microsoft Project 2002, you can enter any reschedule date you want, even one in the past. If a task is in progress, the date does need to be after the task's existing stop date or actual start date.
Manually Updating Project Costs
If resources are assigned to tasks in your project plan and those resources also have their costs entered in Microsoft Project, costs are updated whenever you enter actual progress information. For example, suppose that a $25/ hour resource is assigned to 8 hours of work on a task. When you enter that the task is 50 percent complete, $100 of actual cost is recorded for this task.
If you do not want Microsoft Project to calculate costs for you in this manner, you can turn off this option and enter costs yourself. To turn off automatic cost calculation, follow these steps:
-
Click Tools, Options and then click the Calculation tab.
-
Clear the Actual Costs Are Always Calculated By Microsoft Office Project check box.
-
By default, any edits you make to cost will be distributed evenly across the actual duration of a task.
If you would rather distribute the costs to the status date, select the Edits To Total Actual Cost Will Be Spread To The Status Date check box.
To enter task costs manually, display a task sheet and click View, Table, Cost to apply the Cost table. Enter total actual costs in the Actual field for the task.
To manually enter timephased costs for tasks or assignments, display the Task Usage view. Click Format, Details, Actual Cost to add the Actual Cost field to the timesheet portion of the view.
| Tip | Don't enter costs manually It can be very cumbersome and tricky to update costs manually. You'll experience more accurate results if you enter resources and their costs in your project plan, along with any fixed costs of tasks. When you assign those resources to tasks, costs are forecasted. When you enter progress on tasks, actual costs are calculated. |
EAN: 2147483647
Pages: 268