Customizing Groups
You can group tasks, resources, or assignments that meet a set of conditions. For example, you might group tasks by their schedule variance so you can concentrate on the ones furthest behind schedule. You might group resources by their level of availability so you can assign the resources who have the most free time. You can also choose to group assignments instead of tasks or resources; for example, to see which assignments are running over budget on hours. Group headings show subtotals for the values in the numeric fields for the group . For example, you might display assignments grouped by salaried and hourly employees and contractors, so you can see the total hours of work performed by each group. When you group these elements, subtotals for the groups appear in the Task and Resource Sheet as well as in the timesheet in Usage views.
| Cross-References | For more information about applying existing groups, see "Grouping Project Information". |
Modifying a Group
If one of the existing groups doesn't meet your needs, you can modify it. If you want to keep the original group definition intact, you can instead copy an existing group and then modify it to create a completely new group. Do the following to customize a group:
-
Click Project, Group by, More Groups.
-
In the More Groups dialog box, click either the Task or Resource option to display the task or resource groups.
-
Click the group you want to modify in the list, and then click Edit or Copy.
The Group Definition dialog box appears (see Figure 25-18).
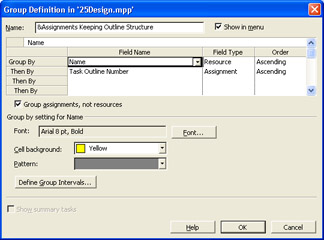
Figure 25-18: Group tasks, resources, or assignments by one or more fields. -
If necessary, change the name of the group in the Name box.
-
Click the first empty cell in the Field Name column, click the down arrow, and then click the name of the field by which you want to group.
The category for the field (Task, Resource, or Assignment) appears in the Field Type cell.
-
If necessary, change the grouping order.
For example, you might want to use descending order to locate the resources with the most availability more easily.
-
To group assignments instead of tasks or resources, select the Group Assignments, Not Tasks check box for a task group or Group Assignments, Not Resources check box for a resource group.
-
To change the font, click Font. In the Font dialog box, choose a font, font style, font size , and color .
-
To change the background color, click a color in the Cell Background box.
-
To change the pattern for the group headings, click a pattern in the Pattern box.
| |
The group heading rows for standard fields display the sum of the values for the entries in the group. However, you might want to use a different calculation for the group heading row, such as the largest value or the average.
Although you can't change the calculation for a standard field group summary, you can create a custom field equal to the standard field. Then you can calculate the group summary for the custom field using the other summary calculations. To do this, first create a calculated custom field. Then set the custom field equal to the standard field. Select the Rollup option and choose the calculation you want to use for the rolled-up value.
| |
Groups often display elements in small sets, one set for each discrete value that exists in the field that you grouped. This process works well for fields such as Milestones that have only two values. For groups based on cost or work, the number of discrete values can seem endless. However, you can define intervals for groups. To do this, follow these steps:
-
In the Group Definition dialog box, click the field for which you want to define intervals.
-
Click Define Group Intervals. The Define Group Interval dialog box appears (see Figure 25-19).
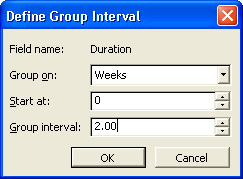
Figure 25-19: Set the starting value and size for group intervals.The default selection for Group On is Each Value.
-
Click the down arrow in the Group On box and then click the interval you want to use in the list.
The intervals listed depend on the type of field. For example, the intervals for a field that represents work include units in which work is measured, such as hours, days, weeks, and months.
-
To start the interval at a specific number, type the number in the Start At box.
-
To define the interval size, type the number in the Group Interval box. To group assignments in intervals of two weeks worth of work, type 2.
Creating a New Group
When no groups exist that are similar to what you want, you can create a new group. To create a new group, do the following:
-
Click Project, Group By, More Groups.
-
In the More Groups dialog box, select the Task or Resource option to specify whether you're creating a task or resource group and then click New.
-
In the Name box, type a descriptive name for the new group.
-
Click in the first empty cell in the Field Name column, click the down arrow, and then click the name of the field by which you want to group.
The category for the field (Task, Resource, or Assignment) appears in the Field Type cell.
-
To group assignments instead of tasks or resources, select the Group Assignments, Not Tasks check box for a task group or the Group Assignments, Not Resources check box for a resource group.
-
Change the order of the grouping to Descending, if necessary.
| |
You can create and apply a custom group that shows which tasks have overallocated resources assigned. This can help you determine which tasks are more at risk of missing their dates or generating overtime costs.
-
Click Project, Group By, More Groups.
-
In the More Groups dialog box, select the Task option and then click New.
-
In the Name box, type Overallocated.
-
Select the Show In Menu check box.
-
Click in the Group By row in the Field Name column, click the down arrow, and then type ov to scroll quickly through the list of fields. Click Overallocated.
-
Click OK.
Your new group appears in the More Groups dialog box.
-
Click Apply to initiate the Overallocated grouping to the current view. Click Close to close the dialog box without grouping.
Any time you want to apply the Overallocated grouping to a task view, click Group By on the Standard toolbar, and then click Overallocated. The view is grouped between those tasks that have overallocated resources assigned and those that do not.
| |
| |
There are several types of groups in Microsoft Project. Each one serves a different purpose, so it's important to choose the correct one. A group resource represents several interchangeable resources. For example, you might define a resource called Carpenters, which represents five carpenters who can do basic carpentry. The Maximum Units for this resource would be the sum of the maximum units for each individual in the group resource, or 500 percent in this example.
A resource group represents a category of individual resources. You might define a resource group for employees and another for contractors so you can sort , filter, and view assignments using these categories.
Finally, a group that you apply using the Group By command on the Project menu categorizes and sorts tasks, resources, or assignments based on the values in any field in Microsoft Project.
| |
EAN: 2147483647
Pages: 268