Customizing Tables
Sheet views, such as the Task Sheet and Resource Sheet, and Gantt Chart, display a table of data. If the information you want doesn't appear in the current table, you can switch tables or modify the table contents. You can customize the contents of a table directly in the view or through the Table Definition dialog box.
| Cross-References | For information on switching the table applied to a sheet view, as well as working tables in general, see "Using Tables". |
| |
Table changes you make in the view change the table definition. If you insert or remove columns , modify the column attributes in the Column Definition dialog box, or adjust the column width using the mouse, the table definition changes to reflect those modifications.
Because it is so easy to make changes to a table in a view, it's important to remember that those changes become a permanent part of that table's definition. If you want to keep the current table the way it is, make a copy of it and then make your modifications to the copy.
| |
Modifying the Columns in a Table
You can add, move, remove, or modify columns in any table. To modify the definition of an existing table, follow these steps:
-
Right-click the Select All cell in the upper-left corner of the sheet above row 1; then click More Tables on the shortcut menu.
The More Tables dialog box appears with the current table selected.
-
Click the Edit button.
Tip Create a table quickly To use the current table as a template for a new table, click Copy instead of Edit. To use a different table as a template, click that table's name and then click Copy.
-
The Table Definition dialog box shown in Figure 25-13 appears. If necessary, type a descriptive name in the Name box.
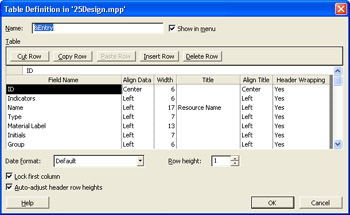
Figure 25-13: Customize the columns for a table in the Table Definition dialog box.If you want this table to appear on the Table menu, select the Show In Menu check box.
To move a column in the table, move fields in the rows in the Table Definition grid by doing the following:
-
Click the field name you want to move and then click Cut Row.
-
Click the row above where you want to insert the field.
-
Click Paste Row to insert the field at the new location.
You can add columns to the end of the table definition grid or insert them where you want. To insert a column into the table, follow these steps:
-
In the Table Definition dialog box, click the row in the grid above where you want to insert the field.
-
Click Insert Row to insert a blank row in the list.
-
Click the Field Name cell, and click the field name you want in the list.
Caution Pressing Enter is the same as clicking OK; either action closes the Table Definition dialog box. To complete the row with default entries, press Tab or click another cell in the list.
-
Specify the alignment of the data and the column heading as well as the width of the column.
If you want the column heading text to wrap, click Yes in the Header Wrapping cell.
-
To display text other than the field name in the column header, type the text you want to appear in the column header in the Title cell.
| |
When you're editing a task table, only task fields appear in the Field Name list. Likewise, when you edit a resource table, you can add only resource fields. Assignment fields appear only when you edit Usage views.
Similarly, if you can't find the table you want to modify, you might have the wrong type of view displayed. In the More Tables dialog box, select the Task or Resource option to display the list of task or resource tables.
| |
To remove a column from a table, follow these steps:
-
In the Table Definition dialog box, click the field name for the column you want to remove.
-
Click Delete Row.
Modifying Other Table Options
You can customize other properties of a table in the Table Definition dialog box. For example, you can specify the format of dates or set a row height for all rows.
To set other table options, do the following:
-
In the Table Definition dialog box, click the format you want for any date fields in the table in the Date Format box.
If you don't change this setting, the table uses the default date format for the entire project.
-
To change the height of the rows in the table, click a number in the Row Height box.
This number represents a multiple of the standard row height.
-
To adjust the height of the header row to make room for the full column title, select the Auto-Adjust Header Row Heights check box.
| |
If a table includes numerous columns, you might have to scroll in the sheet portion of the view to see them. But it's difficult to enter data in the correct cells when you can't see the task name column. You can keep a column in view by moving it to the first column and then selecting the Lock First Column option in the Table Definition dialog box.
To lock the Task Name column, in the Table Definition dialog box, click Name in the Field Name column and then click Cut Row. Click the first row in the Field Name list and then click Paste Row to insert the Name field in the first row in the list. Select the Lock First Column check box. The Task Name appears in the first column and does not disappear as you scroll.
| |
Creating a New Table
If none of the existing tables even come close to meeting your needs, you can create a completely new table. To do this, follow these steps:
-
Click View, Table and then click More Tables.
-
In the More Tables dialog box, select the Task or Resource option to create a task or resource table, respectively.
-
Click New.
The Table Definition dialog box appears with a default name in the Name box.
-
Enter a new descriptive name in the Name box.
-
If you want this table to appear in the View menu and View bar, select the Show In Menu check box.
-
Continue by adding the fields you want to appear in the table.
Cross-References For information about how to add fields to a table, see "Modifying the Columns in a Table," earlier in this chapter.
EAN: 2147483647
Pages: 268