Reviewing Task and Project Information
In your Timesheet and Gantt Chart view, you can review your assignment information in a variety of ways. You can filter and group them; you can even hide assignments temporarily.
When you need to see the big picture of the project schedule as a whole, you can review it in the Project Center.
Working with the Timesheet and Gantt Chart
You have two basic views for working with your own assignments: the Timesheet and the Gantt Chart. They both use the same table with the same set of fields on the left side of the view.
On the right side of the Timesheet, however, is the timephased portion of the view. This view shows work per days or weeks, and is instrumental when your project tracks work closely. Click the blue arrows above the timephased portion of the view to move back or forward in time.
By contrast, on the right side of the Gantt Chart are the Gantt bars showing the start, duration, and finish of each task across the timescale . The current date is shown as a dashed vertical line. Click the Zoom In or Zoom Out buttons to see more or less detail in the time span shown in the chart area.
Use whichever view you prefer for your work. To switch from one to the other, in the left pane of the Tasks area, make your selection under Show Tasks Using.
Working with the Table Fields
You can have either read-write or read-only access for the table fields in the Timesheet or Gantt Chart, which is set by the project server administrator and project manager. At the very least, you have read-write permission for the fields in which you need to enter progress tracking information, for example, % Work Complete or Remaining Work.
If you also have read-write access to other fields that are not necessarily related to progress tracking ”for example, Task Name , Duration, or Deadline ”it means you have been granted the ability to modify task information. When you submit task updates to the project server and your project manager, these updates can modify tasks in the project plan.
New Feature Certain types of custom fields might have been created and added to your Tasks list by the project manager or project server administrator. Some of these custom fields can contain a value list from which you can choose an appropriate option. If such a custom field is part of your Tasks list and if you have read-write permission, click in the field. A drop-down list shows all the choices. Click a choice, and that value now appears in the field. This procedure makes it easy for you to enter the correct form of information while maintaining project data integrity.
Showing and Hiding Information in a View
Whether you're using the Timesheet or Gantt Chart, you can customize your view of assignments to show or hide the information you want, as follows :
-
To show only tasks for the current time period in your Tasks list, click Current Tasks in the side pane. This is the default.
-
To show all tasks to which you are assigned, click All Tasks in the side pane.
-
To hide a selected task, select the task in the table and then click the Hide button above the table, which is useful for moving completed tasks out of the way. When the project manager updates the task, it appears in your list again.
-
To specify whether you want to show or hide different types of tasks such as To-Do List tasks or Outlook tasks, or certain types of information with your tasks such as time or scheduled work, click View Options above the table. The View Options section expands to show your choices. Select or clear the check boxes for the items you want to show or hide (see Figure 23-9).
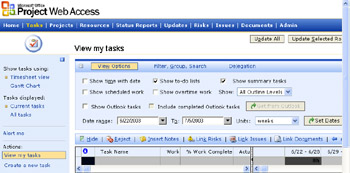
Figure 23-9: Select the items you want to show and clear the items you want to hide.Tip Search for task information You can search for information in your Tasks list. In the Timesheet or Gantt Chart, click Filter, Group Search. In the expanded section that appears, enter the series of characters you're searching for in the Search For box. If you want to specify the search in a particular field, click the arrow in the In box and click the field. Click Find Next.
Rearranging Your Assignments
In either the Timesheet or Gantt Chart, you can sort , group, or filter your assignments by criteria you choose.
To sort assignments by a field in the Tasks table ”for example, by Task Name or Finish Date ”follow these steps:
-
In the Timesheet or Gantt Chart, click the heading of the field column you want to sort by.
The field is sorted in either ascending or descending order.
-
To sort in the other direction, click the column heading a second time.
To group assignments by a particular field, follow these steps:
-
Display the Timesheet or Gantt Chart.
-
Above the table, click Filter, Group, Search.
-
In the expanded section that appears, click the arrow in the Group By box to see your grouping choices in the dropdown (see Figure 23-10).
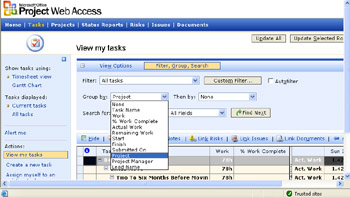
Figure 23-10: Click the field by which you want to group your assignments. -
Click the field you want to group by.
The task list changes to reflect your grouping.
-
If you want a subgroup within the group, click the second field in the Then By box.
-
When you want to return to the original nongrouped order, click None in the Group By box.
To filter assignments by a built-in filter, follow these steps:
-
Display the Timesheet or Gantt Chart.
-
Above the table, click Filter, Group, Search.
-
In the expanded section that appears, click the arrow in the Filter box to see your filter choices.
-
Click the filter you want to use; for example, Overdue Tasks or New Tasks Added By Me.
The task list changes immediately to show only those tasks that meet your filter criteria.
-
To see all tasks again, click All Tasks in the Filter box.
To create a custom filter, follow these steps:
-
Display the Timesheet or Gantt Chart.
-
Above the table, click Filter, Group, Search.
-
In the expanded section that appears, click Custom Filter.
-
In the More Filters dialog box, enter the field you want to filter by in the Field Name box (see Figure 23-11).

Figure 23-11: Click the field by which you want to filter your assignments. -
In the Test field, enter the test criteria; for example, Equals or Contains.
-
In the Value field, enter the value for the field and then click OK.
The task list changes immediately to show only those tasks that meet your filter criteria.
-
To see all tasks again, click All Tasks in the Filter box.
You can also select the AutoFilter check box to add the AutoFilter arrows to each column in the Tasks table.
To collapse the Filter, Group, Search section, click the “ (minus) button in the upper-left corner of the section.
Printing or Exporting a Table
New Feature In Project Web Access 2003, you can now print a table on the following pages:
-
Tasks
-
Projects
-
Resources
-
Updates
-
Risks
-
Issues
-
Documents
You can also use this function to export the contents of the table to a Microsoft Office Excel 2003 workbook. To print or export a Project Web Access table, follow these steps:
-
Display the view containing the table you want to print.
-
Below the table, click Print Grid on the left or Export Grid To Excel on the right.
The grid setup page appears (see Figure 23-12).
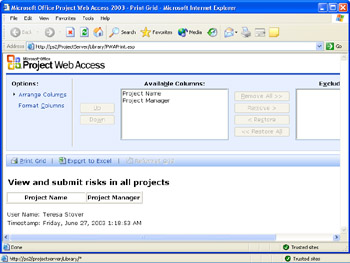
Figure 23-12: Set up the columns you want printed or exported. -
Select field names in the Available Columns box and use the Up and Down buttons to rearrange the order of the columns as it will be printed or exported.
-
If you want to exclude any fields from the print or export operation, click its name in the Available Columns box and then click the Remove button.
This removes the column only for the print or export operation. The field is still present in the view itself.
A preview of the printed report or exported workbook appears in the lower half of the view.
-
Click Print Grid to send the report to the printer. Click Export To Excel to send the report to an Excel workbook.
Glimpsing the Big Project Picture
By default, you can review a list of any published projects in which you're a resource. To do this, follow these steps:
-
In the Project Web Access navigation bar, click Projects.
The Project Center appears. If you are working with more than one project, the projects are listed in a summary project Gantt Chart (see Figure 23-13).
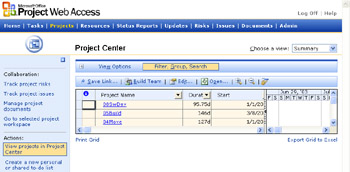
Figure 23-13: Go to the Project Center to review your current projects. -
Click the link for the project whose tasks you want to review.
The project view appears (see Figure 23-14).
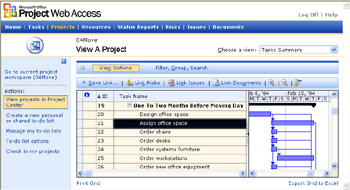
Figure 23-14: View the entire project schedule in Project Web Access.If you are working with just a single project, the tasks in the project appear as soon as you go to the Project Center.
Tip Set options and rearrange projects or tasks Whether you're reviewing a project summary or all the tasks within a project, you can set view options, sort, filter, group, and search, just as you can with your assignments. Click View Options or Filter, Group, Search above the table to see your options.
Depending on your user permissions and how your project server administrator has set up views, you might be able to review the project by different sets of information. In the upper-right corner of the Project Center or View A Project page, click the Choose A View box and review your choices.
EAN: 2147483647
Pages: 268