Setting Up Team Member Timesheets
Whether you're working with enterprise project management or workgroup features only, you need to set up the default team member Timesheets. The Timesheet is the primary view that team members work with to track and update their tasks assigned from one, two, or more projects (see Figure 21-30).
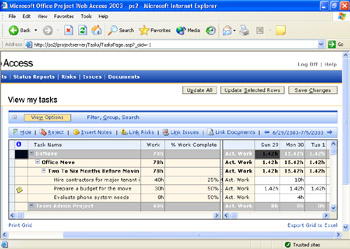
Figure 21-30: Design the Timesheet to fit the needs of the organization and the projects.
Establishing the Update Method and Restrictions
You establish the assignment progress tracking method that is then reflected in the Timesheet. The tracking method can be as simple as noting whether an assignment is not started, in progress, or completed. It can also be as sophisticated as tracking every hour devoted to each assignment.
Depending on the level of project management control that your organization needs, you can set up a number of assignment update restrictions. You can specify an open time period within which assignment updates can be made. You can also specify whether project managers can edit updates submitted by team members.
Work with the project managers and the requirements of the organization to decide on the most appropriate default tracking method. After setting the default, project managers might still be able to switch to a different tracking method, but only if you allow that possibility in your project server configuration.
The three tracking methods are as follows :
Percent of work complete This is the least restrictive and least time-consuming tracking method. The Timesheet includes a field that team members use to update how far along they are with their assignments.
Actual work done and remaining work This tracking method provides a medium level of detail. The Timesheet includes fields for total actual work and remaining work for each assignment. Team members enter those total amounts for each progress update requested .
Hours of work done This is the most detailed tracking method. The Timesheet includes a field for each time period, either days or weeks, for the duration of the project. Team members enter the number of hours worked per day or per week and submit those with each progress update.
In addition to the default tracking method, you can also control when actuals are accepted and whether they can be changed after they've been submitted to the project server.
Use the Customize Project Web Access options on the Admin page to set the default tracking method and any update restrictions, as follows:
-
In the Admin page of Project Web Access, click Customize Project Web Access in the left pane.
-
In the left pane, under Customization Options, make sure that Tracking Settings is selected.
The Tracking Settings page appears (see Figure 21-31).
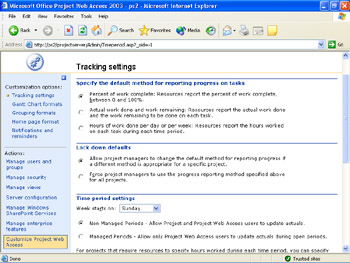
Figure 21-31: Use the Tracking Settings page to specify the default tracking method to be used in the Timesheet. -
Under Specify The Default Method For Reporting Progress On Tasks, select the option for the tracking method you want to use: Percent Of Work Complete, Actual Work Done And Work Remaining, or Hours Of Work Done Per Day Or Per Week.
-
Under Lock Down Defaults, specify whether you are allowing project managers to change the tracking method in their individual projects, or whether they must always use the default method you selected.
If you allow project managers to change the default tracking method, they can do so using the Customize Published Fields dialog box in Project Professional.
-
Under Time Period Settings, specify when your work week begins.
-
New Feature If projects are to be tracked by hours of work per time period, you can lock the Timesheet periods.
Locking the Timesheet periods ensures that team members can report hours only for current time periods, not for time periods in the past or future. Locking the Timesheet period contributes to the integrity of progress information being submitted by team members.
Select the Non-Managed Periods option if you want to allow team members to enter actuals at any time, no matter how early or late.
Select the Managed Periods option if you want to allow actuals to update only during a specified open period of time.
-
Click the Save Changes button at the bottom of the page.
Cross-References For more information about tracking actual work in Microsoft Project, see "Updating Progress Using Resource Work".
| |
New Feature Using Project Professional, Project Server, and Project Web Access to automatically gather and enter actuals, you can protect the integrity of actuals submitted by team members. This can be crucial if those actuals are directly submitted to your organization's general ledger system to produce customer invoices.
As the project server administrator, you first set up the Project Web Access progress method to track hours of work per day or per week. Then you set the open reporting time period. Team members can enter actuals only during the open reporting period, not long after the period is past.
Furthermore, you can set an option so that if the project manager or another user changes actual hours that have been submitted and incorporated into the project plan, those changes can be audited against what was originally submitted by the team member.
Only actuals for enterprise resource assignments can be protected. Project managers can still edit actuals for tasks that have local or no resources assigned.
You can review the protected actuals submitted by the team member by adding the Actual Work Protected and Actuals Overtime Work Protected fields to a task sheet. You can also return actuals edited in the project plan back to their value as submitted and stored on the project server. Click Tools, Tracking, Sync To Protected Actuals.
| |
Establishing the Default Timesheet Fields
The Timesheet view is set up with a standard set of task and assignment fields. That set of fields changes according to the tracking method chosen . You or the project manager can change the fields that the team members see in their Timesheets. As the project server administrator, you can choose from the full set of Microsoft Project fields to dictate the set of available Timesheet fields. In turn , project managers start with your selected set of fields to tailor the Timesheets for their individual projects.
New Feature If you have defined any custom fields, including custom outline codes, you can include those in the set of default Timesheet fields as well. In fact, as of Project Web Access 2003, outline codes with drop-down value lists (or "pick lists") can be used and displayed as such in the team members' Timesheets.
| Cross-References | For more information about defining custom enterprise task fields and task outline codes, see "Customizing Enterprise Project Fields" earlier in this chapter. For detailed information about defining drop-down value lists, see "Customizing Fields". |
To modify the set of default Timesheet fields, follow these steps:
-
In the Admin page of Project Web Access, click Manage Views in the left pane.
The Specify Views page appears (see Figure 21-32).
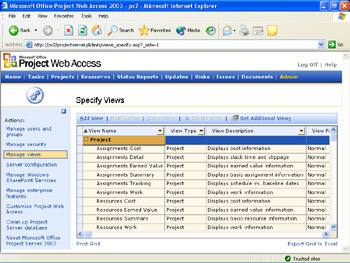
Figure 21-32: Use the Specify Views page to modify, add, or remove views in Project Web Access. -
Scroll down the table, almost to the bottom, to find and click the Timesheet view under the Timesheet category.
The Timesheet view definition appears below the table (see Figure 21-33).
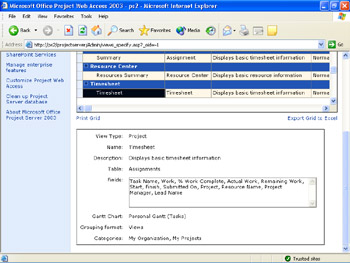
Figure 21-33: The definition for the selected view appears at the bottom of the page. -
With the Timesheet view selected, scroll all the way back up the page again and then click Modify View.
The Modify Timesheet View page appears (see Figure 21-34).
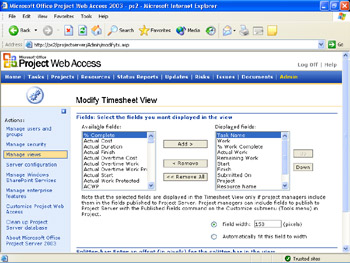
Figure 21-34: Specify the default set of fields from which project managers can choose for their team members' Timesheets. -
Select one or more fields in the Available Fields box on the left and then click Add to add them to the Displayed Fields box on the right.
This process adds the selected fields to the default set of available Timesheet fields.
If you have defined any custom fields in the enterprise global, they are also part of the list of Available Fields.
-
Select one or more fields in the Displayed Fields box on the right, and click Remove to delete them from the default set of available Timesheet fields.
-
When you're finished defining the fields you want in the Displayed Fields box, click the Save Changes button at the bottom of the page.
Project managers setting up their timesheet options using the Customize Published Fields dialog box in Project Professional will see this set as the default Timesheet fields.
| Tip |
| Cross-References | For information about the new APIs, refer to the Microsoft Project Software Development Kit (SDK) and search for "API". To access the SDK, go to http://msdn.microsoft.com/project , click Microsoft Project 2003, and then click SDK Documentation. |
| |
You can focus the behavior, content, and look of Project Web Access in a wide variety of ways to fit the needs of the entire enterprise as well as those of individual project workgroups. The following list is an overview of Project Web Access customization opportunities:
Home page content Specify any additional links or custom content that should be added to the Project Web Access Home page for all users. In the Admin page, click Customize Project Web Access. Under Customization Options, also in the left pane, click Home Page Format.
Views You can define and customize Project Web Access views, including the Timesheet, Project Center, Resource Center, and Portfolio Analyzer. In the Admin page, click Manage Views in the left pane. In the Specify Views page, scroll through the table to find the views you want to work with. Click Modify View or Copy View to work with the view in more detail.
Gantt bars and grouping formats Customize the look of Gantt bars representing different types of tasks. Make choices about the look of the Gantt Chart timescale . Specify how grouped tasks or resources should appear. In the Admin page, click Customize Project Web Access. Under Customization Options, also in the left pane, click Gantt Chart Formats or Grouping Formats.
Menus You can specify which menus should be displayed or hidden to users in Project Web Access. By customizing menu displays, you can be sure that only the commands needed by the users are present, and you can remove the rest of the clutter. In the Admin page, click Server Configuration in the left pane. Under Configuration Options, also in the left pane, click Menus.
E-mail notification and reminders Set up conditions for when team members and project managers should be alerted via e-mail about changes in task or resource information in Project Web Access. You can set up user's e-mail addresses, if necessary, along with a default e-mail message to accompany any periodic reminders about upcoming tasks, overdue tasks, or status report requests . In the Admin page, click Customize Project Web Access. Under Customization Options also in the left pane, click Notifications And Reminders.
Consider this your invitation to poke around these pages in Project Web Access, armed with your hefty project server administrator permissions. Explore the available functionality, and implement other changes based on the preferences and needs of the organization.
| |
EAN: 2147483647
Pages: 268