Importing and Exporting Information
When you import or export information between Microsoft Project and other applications, you're transferring information so that it appears as if the source information were originally created in the target application. Importing and exporting essentially converts the information from the file format of the source application to that of the target application.
Microsoft Project supports importing and exporting with the file formats shown in Table 16-2.
| File Format | Filename Extension |
|---|---|
| Microsoft Project files | .mpp |
| Microsoft Project templates | .mpt |
| Microsoft Project databases | .mpd |
| Web pages | .html or .htm |
| Microsoft Access databases | .mdb |
| Microsoft Excel workbooks | .xls |
| Microsoft Excel PivotTables | .xls |
| Text files (tab delimited) | .txt |
| CSV Text files (comma delimited) | .csv |
| XML format files | .xml |
Information can also be exported to or imported from an ODBC ( Open Database Connectivity) database, which is a protocol used to access data in SQL database servers. With ODBC drivers installed, it is possible to connect a Microsoft Project database to SQL databases.
Importing Information into Microsoft Project
You can bring information into Microsoft Project from another application and another file format by importing it. Importing converts another application's file format into the Microsoft Project file format. You start an import process by simply using the File, Open command.
To import data to Microsoft Project, follow these steps:
-
In Microsoft Project, click File, Open.
-
In the Files of Type list of the Open dialog box, click the file format of the file you are importing; for example, Microsoft Access Databases (*.mdb), or Text (tab delimited) (*.txt).
-
Browse to the drive and folder that contain the file you want to import.
-
Click the filename of the file you are importing and then click the Open button.
-
Read the Import Wizard welcome page and then click Next.
-
On the Map page, select the New Map option. Click Next.
-
On the Import Mode page, select how you want to import the data (see Figure 16-21). Click Next.

Figure 16-21: Select how you want the imported data to be brought into Microsoft Project. -
On the Map Options page, under Select The Types Of Data You Want To Import, click the Tasks, Resources, or Assignments check box as appropriate. Click Next.
You see separate Mapping pages for each data type you select on this page.
-
On the Mapping page, complete the fields to specify the information to be imported. In the To: Microsoft Office Project Field column of the table, specify how fields from the source application are to map to specific Microsoft Project fields (see Figure 16-22). Any unmapped data appears in red and will not be imported. Click Next.
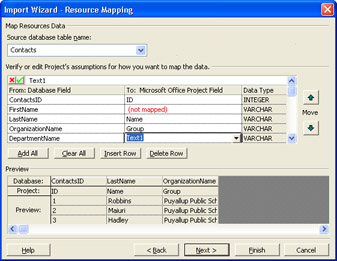
Figure 16-22: Specify how fields from the source application are to be mapped to Microsoft Project fields. -
On the End of Map Definition page, click Finish.
The imported data appears in your project plan as you specified. This process might take a few minutes, depending on the source of the information and the speed of your computer. However, after the information is imported, it's set in your project plan. Save the project and the information is there for you to work with instantly, as if you had originally created it in Microsoft Project.
Cross-References For information about importing information from Excel to Microsoft Project, see "Importing and Exporting with Excel".
Exporting Information from Microsoft Project
You can use information from Microsoft Project in another application and another file format by exporting it. Exporting converts your Microsoft Project information into the file format of another application. You start an export process by simply using the File, Save As command.
To export data from Microsoft Project, follow these steps:
-
In Microsoft Project, open the project that contains the information you want to export.
-
Click File, Save As.
-
In the Save In list, select the drive and folder where you want to save the new exported file.
-
In the File Name box, enter the name for the new exported file.
By default, the name of the project is adopted, and the extension representing the new file format will be added.
-
In the Save As Type list, click the file format to which you want to export your project information. For example, if you want to export your project information to XML, click XML Format (*.xml).
If you want to export your data to a Microsoft SQL Server or an Oracle Server, click the ODBC button and then skip to Step 6.
-
Click the Save button.
The Export Wizard opens and guides you step by step through selecting the specifics of data mapping what you want from Microsoft Project to the target file. Some of the specific steps and choices of the Export Wizard vary depending on the file type you are exporting to.
-
Work through each page of the Export Wizard, clicking Next after making your selections on each page.
-
On the final page, click Finish. Microsoft Project exports your project information to the selected file format.
Tip Use the Export table If you want to export a wide and representative range of fields, click in the Export Wizard Task Mapping or Resource Mapping page, click the Base On Table button, and then click Export. The task Export table contains more than 70 task fields. The resource Export table contains more than 20 resource fields.
Cross-References For information about exporting information from Microsoft Project to Excel, see "Importing and Exporting with Excel".
EAN: 2147483647
Pages: 268