| After you have planned and implemented your backup strategy, you must begin to look at how you will plan for restoration should the dark day come that you will need it. There are two popular strategies used to perform Exchange restorations: the recovery storage group and the alternate recovery forest. Recovery Storage Group The recovery storage group is a new feature in Exchange Server 2003 that provides a special storage group for the purpose of performing restorations even if the server currently has four storage groups on it. Mailbox stores that meet the following requirements can be restored to the recovery storage group: The storage group was originally located on an Exchange Server 2003 or Exchange 2000 Server SP3 or higher server. Only one storage group can be restored at a time, but any number of mailbox stores within that group can be selected. Only one backup set can be used. The storage group was originally located on an Exchange server in the same administrative group as the server hosting the recovery storage group.
The recovery storage group method provides you with the advantage of reduced storage group downtime the only time users will be impacted is during the actual moving of data into place. However, some limitations and restrictions you must know about when planning to use the recovery storage group method are as follows: There must be enough disk space available on the recovery storage group server to temporarily hold the restored data. The version of Exchange running on the recovery group server must match exactly the version of Exchange running on the server from where the storage group was originally backed up. This requirement is due to changes in the log file formats across different versions of Exchange. As an example, data backed up from an Exchange Server 2003 server could not be restored to an Exchange 2000 Server SP3 server and then moved to the server running Exchange Server 2003. Public folders cannot be restored using the recovery storage group only mailbox stores. In addition, shadow copy backups cannot be restored using the recovery storage group method. If using the recovery storage group to recover a specific mailbox, the user account for the mailbox owner must still be in Active Directory and must have a mailbox.
Alternate Recovery Forest The second restoration method, the alternate recovery forest, is created by establishing another Active Directory forest that supports an Exchange installation. You use the same names in the alternate recovery forest as in the real production forest from which you are looking to restore data. A single Exchange server is adequate for this method and, thus, becomes a dedicated restoration server. You should be aware of the following advantages to using the alternate recovery forest method: Provides a nonproduction environment to test your backup and restoration plans Supports restoration from volume shadow copies Supports the restoration of public folders Provides a means to recover purged mailboxes after the mailbox deletion retention period has expired
The only major drawback to the alternate recovery forest method is that you must invest in the additional server and network hardware required to implement it. You only require one well-equipped server to create the forest, having it act as the domain controller and Exchange server. When using the alternate recovery forest method, you must also pay special attention to the LegacyExchangeDN attribute of the administrative group that contains the mailbox stores to be restored. This attribute is used to identify Exchange objects in a way that is compatible with Exchange 5.5 naming and looks similar to this: /O=<Organization name>/OU=<Site name>/CN=<Container name>/CN=<Object name>
For more information on this, see Microsoft Knowledge Base Article 324606, located at http://support.microsoft.com/?kbid=324606.  | Although we're not going to examine it here, you should become familiar with using Windows Backup to back up the system state information as well as entire servers. |
Restoring a Mailbox Store Should the day ever come that you need to restore a backed up mailbox store, you can use the procedure that follows. We do, however, recommend that you practice before disaster strikes to make sure you're both familiar and comfortable with doing it. Nothing makes a bad day worse than not knowing what you're doing!  | If you opt to use this restoration method, you will have a period of time during which the mailbox store will be unavailable to clients for access. To dramatically reduce this downtime, see the next section "Restoring a Mailbox Store Using the Recovery Storage Group." |
- Open the Exchange System Manager.
- Expand the nodes to locate the mailbox store you will be restoring. Right-click the mailbox store and select Properties from the context menu.
- Switch to the Database tab. Select the This Database Can Be Overwritten By a Restore check box, as shown in Figure 7.15. Click OK to close the Properties dialog box.
Figure 7.15. You need to allow the database to be overwritten during the restore process. 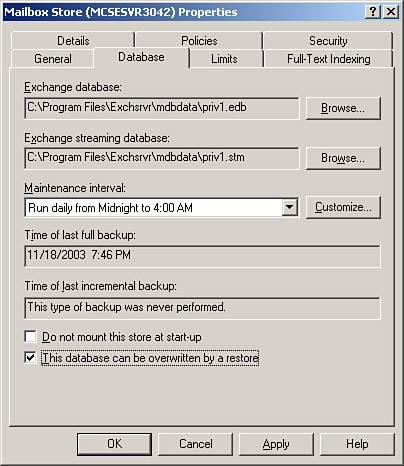
- Right-click this same mailbox store, and select Dismount Store from the context menu. When prompted, click Yes to continue.
- Open the Windows Backup utility.
- The Backup or Restore Wizard opens. Click Next to continue.
- In the Backup or Restore dialog box, select Restore Files and Settings, and click Next.
- In the What to Restore dialog box, shown in Figure 7.16, locate the backup set with which you want to work, and expand it to locate the mailbox store you are restoring. Select the applicable mailbox store, and click Next to continue.
Figure 7.16. You need to locate the correct mailbox store to perform the restoration. 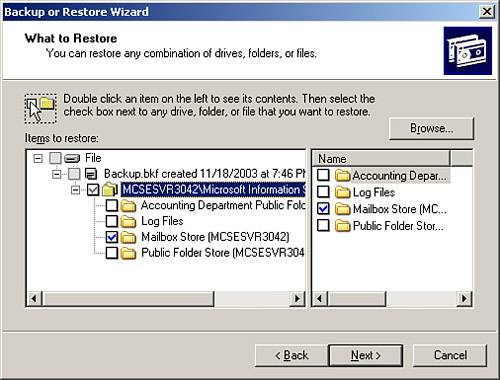
- In the Restore Database Server dialog box, shown in Figure 7.17, you need to enter a temporary path to hold the transaction logs during the restoration. You should also select the Last Restore Set (Log File Replay Will Start After This Restore Completes) check box. You might optionally want to configure the database to automatically mount itself after the restoration has been completed. Click Next to continue.
Figure 7.17. You must specify a log path to perform the restoration. 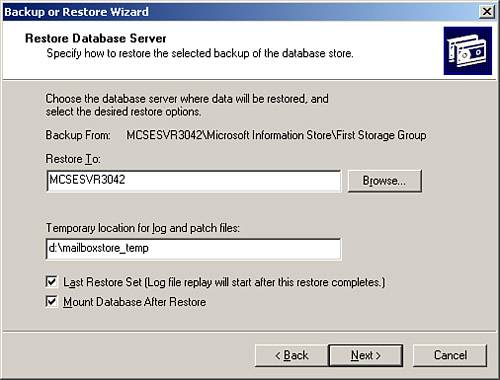
- Click Finish to perform the restoration.
- When the restoration has finished, click the Close button.
- If you didn't select to have the database mount automatically after the restoration, mount the database to make the mailbox store available to clients again.
- Clear the This Database Can Be Overwritten By a Restore check box from the Database tab of the mailbox store Properties dialog box.
Restoring a Mailbox Store Using the Recovery Storage Group If mailbox store unavailability is not acceptable, you should seriously consider using the recovery storage group method to restore the mailbox store. Perform the following steps to restore a mailbox store using the recovery storage group: - Open the Exchange System Manager.
- Locate the Exchange server that contains the mailbox store you need to restore. Right-click the server object and select New, Recovery Storage Group to create the recovery storage group.
- Click OK to close the recovery storage group Properties dialog box.
- Right-click the new recovery storage group, and select Add Database to Restore from the context menu. Select the appropriate mailbox store from the Select Database to Recover dialog box, and click OK.
- Open the Windows Backup utility.
- The Backup or Restore Wizard opens. Click Next to continue.
- In the Backup or Restore dialog box, select Restore Files and Settings, and click Next.
- In the What to Restore dialog box, shown previously in Figure 7.16, locate the backup set with which you want to work, and expand it to locate the mailbox store you are restoring. Select the applicable mailbox store, and click Next to continue.
- In the Restore Database Server dialog box, shown previously in Figure 7.17, you need to enter a temporary path to hold the transaction logs during the restoration. You should also select the Last Restore Set (Log File Replay Will Start After This Restore Completes) check box. Do not configure the database to mount itself after the restoration has completed. Click Next to continue.
- Click Finish to perform the restoration.
- When the restoration has finished, click the Close button.
- In the Exchange System Manager, right-click the mailbox store under the Recovery Storage Group node and select Mount Store. If you receive an error, wait several minutes and try again the transaction logs might not have completed replaying.
- Click Yes to acknowledge the warning about performing the restoration before mounting the store.
- Click OK after the store has been mounted.
- You can now remove the mailbox store. You will be prompted about the need to manually remove the files created during the process.
- You can now remove the Recovery Storage Group node if desired.
Restoring Individual Mailboxes and Messages If you do not need to restore an entire mailbox store, but perhaps only a specific mailbox or even specific mailbox items, you need to use a personal storage (PST) file. Perform the restoration of the entire mailbox store into an alternate recovery forest, in which the LegacyExchangeDN attribute matches that of the administrative group from where the mailbox store was backed up. After you've completed this, you need to create a PST file and copy the applicable items into it. You then only need to import the data in the PST file back into the applicable mailbox on your production Exchange server that houses the mailbox of concern. |