3.1. Shooting Tips and Tricks: How Do I...
| < Day Day Up > |
3.1. Shooting Tips and Tricks: How Do I…How do I…? Those are the first three words in any photography question, aren't they? Most of the time you know what you want to do: capture that sunset, take a pretty portrait, preserve the memory of that monument. The trick is making the camera see your subject the way you do. That's what you're going to learn here: the "how to" of photography. Not every situation is covered in this chapter, but if you master these techniques, there won't be too many pictures that get by your camera. And when your friends mutter out loud something like "How do I shoot that object inside the glass case?", you can reply, "Oh that's easy. Just put the edge of the lens barrel against the glass to minimize reflections, then turn off the flash." 3.1.1. Take Great Outdoor PortraitsWhen most folks think of portrait photography, they envision studio lighting, canvas backdrops, and a camera perched upon a tripod. But many photographers don't have access to lavish professional studios, and honestly, it's not necessary for dynamite portraits. All you really need is a willing subject, a decent outdoor setting (preferably with trees), and your digital camera, and you can be on your way to creating outstanding images. First, start with the magic rules for great outdoor portraits: 3.1.1.1. Try adding supplemental light from the flash or a reflector.Turning on the flash outdoors is a trick that wedding photographers have been using for years. If you really want to impress your subjects, position them in the open shade (such as under a tree) with a nice background in the distance. Then turn on the fill flash and make sure you're standing within 10 feet (so the flash can reach the subject). The camera will balance the amount of light from the flash with the natural background illumination, resulting in an evenly exposed portrait (see Figure 3-1). A variation on this technique is to turn off the flash and use a reflector to "bounce" the light back toward the model's face. The advantage here is that the reflected light is softer than that from a fill flash (see Figures 2-1 and 2-15 for more examples of portraits using fill flash).
3.1.1.2. Learn to love high clouds and overcast days.High clouds turn the entire sky into a giant lighting softbox, and all of nature becomes your portrait studio. The diffused lighting is perfect for outdoor portraits, and it softens skin tones. In this situation, you have the option of shooting without a flash and reflectors. If you want to brighten up your model's eyes a bit, turn on the fill flash or use a reflector. One thing to remember when shooting in this type of lighting: change your white balance to Cloudy, or the skin tones may be too "cool." 3.1.1.3. Get close.The tighter you frame the shot, the more impact it will have. Extend your zoom lens and move your feet to create more powerful images. Once you've moved in close and have shot a series of images, get closer and shoot again. I captured the shot in Figure 3-2 on about the sixth frame, just as the model had begun to relax.
Once you've found a setting that you like and have everything in order, you can begin to "work the scene." Start by taking a few straightforward shots. Pay close attention while you have the model turn a little to the left, then to the right. When you see a position you like, shoot a few frames. (Don't get too carried away with this "working the angles thing," or your subjects will hate you. You're not a swimsuit photographer on a Sports Illustrated location shoot. The point is, don't be afraid to experiment with different camera positions. Just do it quickly.) Next, move in closer and work a few more angles. Raise the camera and have the model look upward; lower the camera and have the subject look away. Be sure to take lots of shots while experimenting with angles, because once you've finished shooting and have a chance to review the images on your computer screen, you'll end up discarding many images that may have looked great on the camera's LCD monitor. When they're enlarged, you'll see bothersome imperfections you didn't notice before. When shooting portraits, communicate with your subjects and try to put them at ease. Nobody likes the silent treatment from the photographer. It makes your subjects feel like you're unhappy with how the shoot is going. Here are a few other things to avoid when shooting outdoor portraits: 3.1.1.4. Avoid harsh side lighting on faces.Light coming in from the side accentuates texture. That's the last thing most models want to see in their shots, because more texture equates to increased visibility of skin aging or imperfections. Use a fill flash or reflector to minimize texture, and avoid side lighting unless for special effect. 3.1.1.5. Don't show frustration.Never, ever make subjects feel it's their fault that the shoot isn't going well. They're already putting their self-confidence on the line by letting you take their picture. Don't make them regret that decision. When shoots go well, credit goes to the models. When shoots go badly, it's the photographer's fault. Keep your ego in check so theirs can stay intact. 3.1.1.6. Avoid skimping on time or the number of frames you shoot.Your images may look good on that little 2" LCD monitor, but when you blow them up on the computer screen, you're going to see lots of things you don't like. Take many shots of each pose, and if you're lucky you'll end up with a few you really like. 3.1.1.7. Don't torture models by making them look into the sun.Yes, you were told for years to shoot with the sun to your back but the photographer, not the model, devised that rule. Blasting your subjects' retinas with direct sunlight is only going to make them squint, sweat, and maybe swear. Be kind to your models, and they'll reward you with great shots. 3.1.1.8. Avoid busy backgrounds.Bright colors, linear patterns, and chaotic landscape elements will detract from your compositions. Look for continuous tones without the hum of distracting elements. Now that the basics are covered, here are a couple of super Pro Tips. Make sure you have some good, solid shots recorded on your memory card before you start experimenting with these techniques. But once you do, try these suggestions: 3.1.1.9. Soft background portraitsThese are simply lovely. A soft, slightly out-of-focus background keeps the viewer's eye on the model and gives your shots a real professional look. The mechanics of this technique are described in Chapter 2, under "Aperture Value (Av) Mode," with an example illustrated in Figure 2-1. 3.1.1.10. Rim lighting for portraitsWhen you place the sun behind the model, often you get highlights along the hair. Certain hair-styles really accentuate this effect. Remember to use fill flash for this setup, or your model's face will be underexposed. 3.1.2. Set Up Group ShotsMany of the rules for engaging portraits apply to group shots, too, so keep in mind everything that you've learned so far while preparing for this assignment. The first challenge is to arrange the group into a decent composition. If you've ever participated in a wedding, you know this drill. Avoid, if possible, having all of the heads in a straight line. This creates a static composition. Notice that in Figure 3-3 one of the subjects is positioned on the ground, avoiding the straight-line composition. Also resist the urge to center all of the subjects in the middle of the frame. You can create a little compositional dynamism by working the Rule of thirds (see "Composition" in Chapter 2).
Remind everyone in the shot that they need to have a clear view of the camera. If they can't see the camera, then the camera won't be able to see them. Next, position people as close together as possible. Group-shot participants tend to stand too far apart. That might look OK in real life, but the camera accentuates the distance between people and the result looks awkward. Plus, you can't afford to have the shot span the width of a football field, or you'll never see people's faces unless you enlarge the image to poster size. Remember to take lots of shots for large groups, a minimum of five frames for each composition. This gives you a chance to overcome blinking eyes, sudden head turns, bad smiles, and unexpected gusts of wind ruining your pictures. Before pressing the shutter button, quickly scan the group and look for little annoyances that will drive you crazy later: crooked ties, sloppy hair, and turned-up collars will make you insane during postproduction.
Finally, work quickly. You're not John Ford making the great American epic, so don't act like you are. Keep things moving for the sake of your subjects. (And for your own tired feet!) 3.1.3. Capture Existing-Light PortraitsBy now you've probably realized one of the great ironies in good portrait photography: the flash is your friend when working outdoors. So guess what the great secret is for indoor portraiture? That's right; sometimes it's better to turn off the flash. Some of the most artistic portraits use nothing more than an open window and a simple reflector. The problem with using your on-camera flash indoors is that the light is harsh and creates an image filled with contrast. "Harsh" and "high contrast" are two words models don't like to hear when it comes to picture descriptions. Fill flash works outdoors because everything is bright. The flash "fills" right in. But ambient light is much dimmer indoors, and the burst of light from the flash is much like a car approaching on a dark street. Of course, there are times when you have no choice but to use your camera's flash indoors. It's very convenient, and you do get a recognizable picture. But when you have the luxury of setting up an artistic portrait in a window-lit room, try existing light only. First, position the model near a window and study the scene. You can't depend solely on your visual perception, because your eyes and brain will read the lighting a little differently than the camera will, especially in the shadow areas you will see detail in the dark areas that the camera can't record. This is why you'll probably want to use a reflector to "bounce" some light into the shadow areas. Many photographers swear by collapsible light discs, but a large piece of white cardboard or foam core will work just as well. Place your reflector opposite the window and use it to "bounce" the light onto the dark side of the model's face. This will help "fill in" the shadow area so you can see some detail. Now put your camera on a tripod and slowly squeeze the shutter button. Review the image on the LCD monitor. If the shadow area is too dark, you may want to add another reflector. If the overall image is too dark, turn on exposure compensation, set it to +1, and try another picture. If the color balance of the image is too "cool" (that is, bluish), you may want to set the white balance control to Cloudy and see if that improves the rendering. Remind your model to sit very still during exposure, because you may be using a shutter speed that's as slow as 1/15th of a second, or even longer. You can increase the camera's light sensitivity by adjusting the ISO speed to 200, but don't go beyond that setting the image quality will degrade too much for this type of shot. Once you've played with these variables, go back to the artistic side of your brain and work on the composition. Try to get all the elements in the picture working together, and let nature's sweet light take it from there. When it all comes together, existing-light portraits are magical (see Figure 3-4). 3.1.4. Take Passport Photos and Self-PortraitsSome people may think that turning the camera toward yourself is the height of narcissism, but sometimes you need a shot and no one is around to take it for you. Headshots for passport photos and résumés are typical scenarios for the emergency self-portrait. Start with the basics: make sure your hair is combed, your collar is down, your shirt is clean, and your teeth are free of spinach (and lipstick!). Then find a location with a pleasing, uncluttered background. Put the camera on a tripod, and set it to focus on the area where you'll be standing or sitting. Activate the self-timer.
If the room is too dim for an existing-light portrait, try using "slow-snychro" flash (see "Flash Modes" in Chapter 2 for more information). This type of flash provides enough illumination for a good portrait, but slows down the shutter enough to record the ambient light in the room. Now position yourself where you focused the camera, and look directly into the lens. Don't forget to smile, or at least not to grimace. (Remember, you want governments to let you in to their country.) See Figure 3-5.
Take several shots, trying different poses until you hit on a few you like. If you have a remote release for your camera, you can save yourself lots of running back and forth from the tripod to the modeling position.
Self-portraits are perfect for experimenting with different "looks," which you might feel more self-conscious about when someone else is behind the camera. You can try different expressions and poses and erase the bad ones, and the world will never know the difference. 3.1.5. Take Interesting Kid ShotsChildren are a challenge for many consumer digital cameras, primarily because of shutter lag. In short, kids move faster than some digicams can react. But with a few adjustments, you can capture excellent images regardless of the type of camera you have. One of the most important adjustments is to get down to kid level when shooting. This is "hands and knees" photography at its best, as shown in Figure 3-6. If you need to, get on your belly for just the right angle. Getting down to their level will instantly make your shots more engaging.
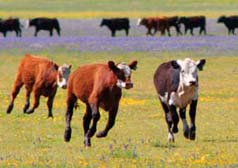
Next, get close. Then get closer. This may seem impossible at times with subjects who move so fast, but if you want great shots, you've got to keep your subjects within range. Now turn on the flash, regardless of whether you're indoors or out. Not only will this provide even illumination, but the flash helps "freeze" action, and you'll need all the help you can get in this category. Keep in mind, however, that the flash range of most digicams ends at around 8 feet. Finally, use the "focus lock" technique described in the practical example "Capturing the Decisive Moment" in Chapter 2. By doing so, you can reduce shutter lag and increase your percentage of good shots. Some of the most rewarding pictures you'll ever record will be of children. Like the child-rearing process itself, kid photography requires patience but the results can far surpass the effort. 3.1.6. Capture Engaging Travel LocationsMake sure you pack a spare memory card and extra batteries when you hit the road with your digital camera. These compact picture-takers are perfect travel companions, but you don't want to run out of storage space or juice halfway through your trip. When you're on the road, approach your travel photography the same way a director thinks about filming a movie scene. The first frame, often called the establishing shot, is of the point of interest itself, such as an old church. The second image is a nicely framed portrait, with an element of the structure included in the picture. If the subject warrants it, you might even want to move in very close for a third shot, or several follow-ups. Why multiple shots? For the same reason that moviemakers use this technique. If you try to tell the whole story with just establishing shots (see Figure 3-7), your viewers may soon lose interest in the presentation, and you may miss interesting details. That's the problem with so many vacation shots they're taken at too great a distance.
On the other hand, if all of your travel compositions are tightly framed (see Figure 3-8), your viewers won't know the difference between Denmark and Detroit. By using the multiple-shot approach, you establish both the setting and the detail of each location. This method is particularly effective when building slideshows.
3.1.7. Take Pictures at WeddingsWeddings are portrait heaven. Your subjects look sharp, are happy, and are in pretty settings. All you have to do is have your camera ready for the opportunities as they present themselves. Here are a few tips for great wedding shots:
Finally, don't forget to include props in the shots when they're available. A hint of wedding cake in the background or a beautiful flower arrangement could be the frosting that adds the perfect finish to your portrait.
3.1.8. Prevent Red EyeYour subjects are vulnerable to red eye in dimly lit rooms when their pupils are open wide. The effect is actually caused by the light from the flash bouncing off the retina and being reflected back into the picture-taking lens. Point-and-shoot cameras are notorious for causing red eye, because the flash is so close to the lens; this makes for a perfect alignment to catch the reflection from the retina. Even though many cameras provide a setting to reduce red eye (see "Flash Modes" in Chapter 2), they don't always work well and actually can be irritating to both subject and photographer. Instead, try following these suggestions when shooting in low light:
If all else fails, you can touch up the photograph in an image editor after uploading it to your computer. It's not a perfect solution, but thanks to friendlier computer technology it's easier than it used to be. (For help with touching up red eye, try iPhoto 5: The Missing Manual or Photoshop Elements 3: The Missing Manual, both from O'Reilly and Pogue Press.) 3.1.9. Take Pictures from the Stands at Sporting EventsSpeaking of the flash, how many times have you seen hundreds of cameras firing off from the stands during a sporting event in a large stadium? Alas, what a waste of film, battery power, and space on memory cards. The flash range of most point-and-shoot cameras is about 10 feet. That means that if you're shooting from the stands, you're illuminating a couple of rows of seats in front of you, and that's about it. Instead, turn off your flash and use existing-light techniques. If you can adjust your camera's ISO setting (see "ISO Speed" in Chapter 2), bump it up to 200 or 400. This will increase your camera's light sensitivity. When you take the shot hold the camera very steady, because the shutter speed will be slow and you'll want to minimize camera shake, which degrades image quality. Better yet, use a tripod if the situation allows. Even if you hold the camera steady, the action on the playing field will blur, so try to make your exposures right after, or before, the action. Obviously, you're not going to get Sports Illustrated shots from the cheap seats. But for memorable occasions, such as your hometown team winning the NCAA championship, it's great to have a few well-exposed images from the event to keep in your scrapbook. 3.1.10. Capture Action ShotsThe keys to capturing effective action shots are to shoot at your camera's highest resolution, use a fast shutter speed, and take measures to reduce shutter lag (see Figure 3-11).
Following these suggestions will improve the quality of your action shots:
Another helpful technique for action shooting is called panning, in which you "follow" the moving subject during exposure. Using this technique may feel odd at first, because you're taught to always hold the camera as still as possible when taking the picture. But panning can provide stunning results if you follow the subject accurately, it will be in focus while the background displays motion blur. This effect gives the photograph great energy and a sense of movement. The classic panning exercise is to have a bicyclist ride by while you keep the camera fixed on the rider during exposure. Use focus lock and burst mode to give yourself the best odds for timing the shot correctly. You might not be able to fully appreciate the effect on your small LCD monitor, but when you upload the images to you computer you'll see a wonderfully blurred background providing the sensation of motion. Give it a try! 3.1.11. Shoot in MuseumsMuseums, aquariums and natural habitat parks provide opportunities for unusual shots. They also present some difficult challenges for the digital photographer, but nothing that can't be overcome with a little ingenuity. Before you get too excited at the prospect of shooting beautiful works of art in a museum, be sure to ask if it's OK. Often you'll discover that photography is allowed in some areas, but not in others. To avoid embarrassing confrontations, ask when you first enter the facility. Even when you're granted permission, you'll probably be told that you can't use a flash or set up a tripod. So here are a few tips to help you work around those constraints
Regardless of the type of museum you're visiting, you're probably going to encounter exhibits behind glass. The trick to eliminating unwanted reflections is to put the outer edge of the camera's lens barrel right up against the glass, hold the camera steady, then shoot (make sure the flash is turned off!). By putting the lens barrel close to the glass, you eliminate those nasty room reflections that often ruin otherwise beautiful shots. (See Figure 3-12.)
When you upload the pictures from your visit to the museum, you'll probably notice that many of the images suffer from softness and other flaws that you didn't detect on the LCD monitor. Don't despair, though even if only a fraction of your images survive, they'll be treasured for years to come and are well worth the effort of capturing. 3.1.12. Shoot Architecture Like a ProAdding pictures of buildings and their interesting elements to your travel portfolio brings another dimension to your presentations. Point-and-shoot cameras aren't ideal for architectural shooting, but if you follow these suggestions, you'll be surprised by the results you can achieve. You may have noticed a phenomenon called converging lines when taking pictures of large buildings. Instead of the structure standing straight and tall, the lines of the building slant inward so it looks like it's falling backward. This effect becomes more pronounced the more you angle your camera upward to compose the shot. To some degree this is a natural effect that viewers accept. Even in real life, looking upward at a tall building creates converging lines. We don't think about it much, but it can detract from your photos. If you want to lessen this effect, there are a few things you can do. If you can get some distance from the building, you'll find that you don't have to hold your camera at such a severe angle, which will minimize the convergence of lines. You can zoom in with your lens if necessary to tighten the composition. You can also elevate your position, such as shooting from an upper floor of a building across the way, as in Figure 3-13. This allows you to hold your camera relatively parallel to the structure, which again lessens the effect. Digital SLR shooters who are serious about architectural photography might consider renting a "tilt shift" lens that is specially designed for this type of shooting. The Nikon 28mm f-3.5 PC Nikkor AI-S and the Canon TS-E 24mm f-3.5L are two examples of lenses that allow for shift movements, enabling you to minimize the effect of converging lines.
But don't limit yourself to shooting only the big picture: architectural elements are often just as interesting (if not more so) than the complete structure. Look for interesting designs around windows, over doors, and along the roofline. Zoom in on specific areas that interest you, as in Figure 3-14, or elements that you might have missed during casual observation. To enhance textures and depth, look for "side lighting," which often provides more interesting images than flat front lighting. And don't forget to grab a couple of snaps of signs and placards to help you tell the story once you return home.
3.1.13. Shoot Items Using Tabletop PhotographyThere are two ways to shoot items using tabletop photography: the hard way and the easy way. The hard way involves multiple studio lights, softboxes, umbrellas, and seamless backdrop paper. Professionals use this equipment to produce outstanding images for commercial advertising and high-end editorial work. But if you just want a nice picture of your old 35mm camera to sell on eBay, you probably don't want to set up an entire studio. So here's the easy way:
This simple setup can produce studio-like results with a fraction the cost or effort. Give it a try. 3.1.14. Create Powerful Landscape ImagesYou could spend your entire lifetime studying how to make great landscape images. There are, however, a few key techniques that will improve your nature shots right away while you learn the subtleties of the craft. Keep these few tips (demonstrated in Figure 3-15) in the back of your mind while shooting.
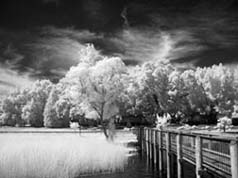
3.1.14.1. Work with "magic light."Landscape pictures shot before 9:00 a.m. and after 5:00 p.m. look better, especially with digital cameras that have a hard time taming harsh midday sun. 3.1.14.2. Keep your compositions simple.Clutter is the bane of powerful landscape imagery. Look for simple, powerful compositions, and skip the rest. 3.1.14.3. Don't put the horizon line in the middle of the frame.Landscapes become more powerful when the horizon line is in the lower or upper third of the composition. You can create a very dynamic composition by putting the horizon very low in the frame and letting sky dominate the scene. 3.1.14.4. Look for converging lines to give the eye a path to follow.A diagonal line adds energy to the composition and can help lead the eye to a primary point of interest. 3.1.14.5. Alternate dark and light tones.This is a technique that Ansel Adams used quite effectively, finding a dark tone for the bottom of the frame, then a light tone, then another dark area (usually a shadow of some sort), then bright again, and possibly dark again at the top of the frame. Alternating tones adds plenty of visual interest. 3.1.14.6. Use a tripod when possible.By keeping your camera rock steady, you will squeeze every bit of sharpness out of the lens, rendering even the tiniest elements with clarity. Plus, photographers who use tripods tend to study their scenes more and have more refined compositions. 3.1.14.7. Be patient.Sometimes you have to wait for nature to paint you the perfect picture. Allow enough time to stay put for a while and watch the light change. 3.1.14.8. Use a polarizing filter.If your camera accepts accessories such as auxiliary lens and filters, consider adding a polarizing filter to your bag of tricks. Polarizers remove unwanted reflections, deepen color saturation, and bring an overall clarity to the scene. The effect is strongest when the sunlight is coming into the scene from over your shoulder. 3.1.14.9. Protect against lens flare by shielding the front glass element of your camera from the sun.Lens flare is that demon that degrades the color saturation of your images. Lens hoods were once standard issue for 35mm cameras, but no one seems to use them for digitals. To improve the quality of your shots, make sure the sun is not reflecting off the front of your lens. If it is, shield it with your hand, or better yet, this book, which is a perfect size for the job. 3.1.14.10. Shoot at the highest resolution and sharpness your camera allows.Landscapes look best when printed big, but to do so you need all the resolution your camera can muster. 3.1.14.11. Get out and walk.If you see a good shot from the seat of your car, chances are it's even better a few hundred yards away from the road. 3.1.14.12. Don't increase your ISO speed setting to cope with low light.Bumping up your speed will degrade the quality of your image. Use a tripod and your self-timer instead. By keeping these tips in mind, and by reviewing the section "Composition" in Chapter 2, you can begin mastering the craft of landscape photography with your digital point-and-shoot camera, and take some great shots while doing so. 3.1.15. Shoot Infrared ImagesInfrared photography has been around for a long time, but capturing these stunning pictures on film required true perseverance. Digital imaging has changed all of that. Shooting infrared photos, such as the one shown in Figure 3-16, has never been easier or more fun. When you shoot infrared, you're actually dealing with a spectrum of light that's outside our normal range of perception. But with the assistance of a special filter, such as an IR 87 or Hoya R72, many digital cameras can produce the telltale dramatic effects, including a darkened sky, vivid clouds, and foliage emitting an eerie glow. But not all digital cameras see the infrared spectrum equally. Ironically, as manufacturers made improvements in color fidelity, they often compromised the camera's infrared capability. For example, the older Canon G1 records fantastic infrared, but the newer models don't work quite as well. (This is a good argument for holding on to your previous cameras after upgrading.)
If you want to test your digicams to see which one will work the best for this type of shooting, line them up on a table in a darkened room. Enable picture-taking mode and make sure the LCD monitor is on. Then point your television remote control at each lens and press a control button, such as the channel changer. The camera that shows the brightest light emitting from the remote control will be your best infrared capture device. Attach an infrared filter such as the Hoya R72 to your camera, grab your tripod, and look for a brightly lit scene that has sky, clouds, and trees. Set your aperture at f-5.8 or f-8 to help compensate for the different way infrared "sees" the world; the focusing plane in this type of photography is slightly different, and the added depth of field produced by a smaller aperture will help keep things sharp. Be sure to turn on the self-timer so you don't jar the camera during exposure, and record a frame. The world you see in your LCD monitor will look much different from what you observe with your eyes.
3.1.16. Take Flash Pictures of People Who Blink at FlashEvery now and then you'll run into someone whose eyes are very sensitive to flash and who has a knack for blinking right as the flash fires. The result is a series of unflattering facial expressions and lots of frustration. One of the best tricks to help calm the nerves of model and photographer alike is to use the red eye reduction mode. (See "Flash Modes" in Chapter 2 and "Prevent Red Eye" earlier in this chapter for more information.) The pre-flash that is designed to reduce red eye will actually cause the model to blink early, so her eyes will be open when the exposure takes place. It works almost every time. |


| < Day Day Up > |
EAN: 2147483647
Pages: 44