Synchronizing Files with Briefcase
Briefcase lets you create copies of files for offline use and subsequently synchronize those files with their online originals. It's less easy to use than the offline-files feature described in the first part of this chapter. But it's the tool you need if you don't have a local-area- network connection between your portable and desktop computers. If you copy files from a desktop computer onto a floppy or other removable disk when you travel with your laptop, Briefcase is for you. You can also use Briefcase if you have a direct cable connection between your portable and desktop machines. For information about setting up a direct cable connection, see "Connecting Two Computers with a Direct Connection."
Using Briefcase with Removable Disks
The procedure for using Briefcase with removable media is as follows:
- Put a disk (preferably a freshly formatted one) in a removable disk drive.
- In Windows Explorer, open the folder for your removable disk.
- From Windows Explorer's File menu, choose New, Briefcase.
- Rename the briefcase (an optional step, but you'll want to do this if you use more than one briefcase at a time).
- Open the briefcase. (It's a folder, almost like any other.)
- Copy files into your new briefcase until the removable disk is somewhat less than full. Don't fill the disk, because you need to leave room for your files to grow as you work with them.
- Insert the removable disk in your portable computer and move or copy the briefcase to your portable's hard disk (this step is optional but speeds access to your files).
- Repeat these steps for as many removable disks as you need, but give each briefcase a unique name before moving it to your portable computer.
- Upon returning to your desktop computer, copy each briefcase to a removable disk, and transfer the disk to your desktop computer.
- Synchronize by opening Briefcase and choosing Update All from Windows Explorer's Briefcase menu. (The Briefcase menu appears only when a briefcase folder is selected.) If you want to synchronize only particular files, select Details view, select the files you want to synchronize, and then choose Update Selection from the Briefcase menu.
The first time you open a new briefcase, the Briefcase Wizard appears. Simply click Finish to dismiss the wizard. When you do this, the wizard sets up your new briefcase, creating the hidden files that Windows will use to track the status of your files.
Getting Status Information About Briefcase Files
In Large Icons view, the inside of a briefcase looks pretty much like the inside of any other folder window, except for the presence of a Briefcase menu. But if you switch to Details view, Briefcase provides useful information about the origin and status of your documents. As Figure 10-7 shows, the Status column in Details view shows you which files are current and which need updating (in other words, which files have changed since you copied them into the briefcase). The Sync Copy In column tells you where the original version of each of your files is stored.
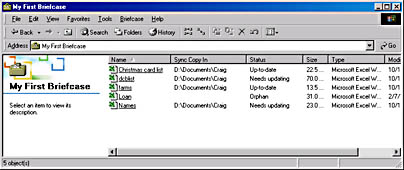
Figure 10-7. By choosing Details view in a briefcase, you can see which of your files has changed since you copied them into the briefcase.
When your briefcase is online with the computer on which it was created (for example, when the briefcase is on a floppy disk in the desktop computer's disk drive), you can also get status information about a particular file by right-clicking it and viewing the Update Status tab of its properties dialog box. Figure 10-8, shows the Update Status tab for a file that has been changed in the briefcase.
Synchronizing Files
When you're ready to synchronize your briefcase files with their sync copies, you can work with either one file at a time or update the whole briefcase at once. To update a single file, select it, and then choose Update Selection from the Briefcase menu. (You can also update a group of selected files this way. Hold down the Ctrl key while you click each file you want to update. Then choose Update Selection.)
To update the entire briefcase at once, right-click the briefcase icon (in the folder where it resides) and choose Update All. You'll see a dialog box similar to the one shown in Figure 10-9.
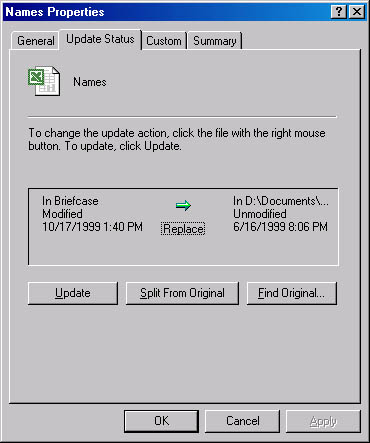
Figure 10-8. The properties dialog box for a briefcase file can tell you where the file's sync copy resides and which version of the file is more current.
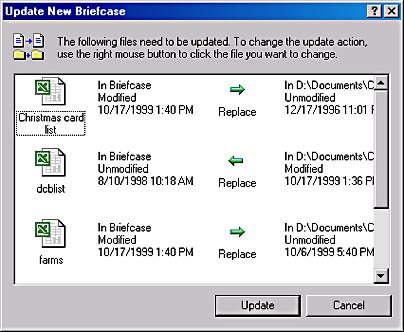
Figure 10-9. When you choose Update All, Windows uses left-pointing and right-pointing arrows to show which copy of each changed file is newer.
Notice that the arrows in the center of the dialog box can point in either direction, depending on the target of the proposed updating. When you click the Update button, Windows copies the newer version of each file, wherever it might reside, over the unchanged version. If both files have been modified, the default action is to skip updating either file. If a file was deleted in one location, it will be copied from the other location to replace the deleted file.
If the update action that Briefcase proposes for an item isn't the action you want, right-click its entry in the Update New Briefcase dialog box. Then, from the shortcut menu, choose the action you prefer. To prevent changes to either file, choose Skip.
Divorcing a Briefcase File from Its Sync Copy
If you move a file from a briefcase to any other folder, the link between that file and its sync copy is broken. The result is an ordinary copy. You can also sever the link between a file and its sync copy without removing it from the briefcase. To do this, select the file and choose Split From Original from the Briefcase menu. In Briefcase's Status field, your file will then be listed as an orphan. You can carry as many orphans as you please in your briefcase.
Using Briefcase with a Direct Cable Connection
To use Briefcase with a direct cable connection, first connect your portable and desktop computers. On the portable, open Windows Explorer. Navigate to the folder where you want the briefcase to reside. Open Windows Explorer's File menu and choose New, Briefcase. Copy the files you want to use offline from your desktop computer to the new briefcase. Disconnect the portable computer and work offline. When you reconnect, synchronize the offline and desktop versions of your files, as described in "Using Briefcase with Removable Disks."
EAN: 2147483647
Pages: 317