Setting Sounds for Various Events
If your computer has a sound card, you can customize the various beeps, squeals, squeaks, and other exclamations emitted by Windows as you go about your workday. Or you can opt for golden silence instead. You can even create named sound schemes, comparable to your named appearance schemes, for easy reuse and recall.
To change the sounds used by Windows, launch Sounds And Multi-media in Control Panel. The Sounds And Multimedia Properties dialog box appears, as shown in Figure 6-10.
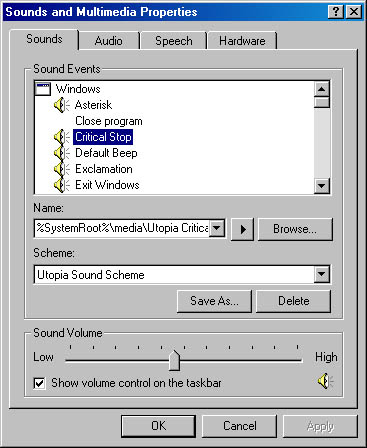
Figure 6-10. The Sounds And Multimedia Properties dialog box lets you assign sound files to events and create named sound schemes.
The Sound Events list on the Sounds tab lists all the different system events to which you can attach (or from which you can detach) sounds. The list is structured as a two-level hierarchy. The first top-level item is Windows itself. The events subordinate to the Windows heading include events such as opening and closing programs, maximizing and minimizing windows, and starting and ending a Windows session. If you scroll downward through the Sound Events list, you will find another top-level heading for Windows Explorer and, possibly, additional headings for other applications installed on your computer.
Directly below the Sound Events list is a box labeled Name. This lists all the sound files (files with the extension .wav) that are available in the current folder.
Near the bottom of the dialog box is another box labeled Scheme. Here you will find complete sets of sounds and events that you can choose to activate. You can switch from one sound scheme to another by choosing from this list.
To hear what sound is currently assigned to an event, select the event in the Sound Events list. The name of the assigned sound appears in the Name box, and you can click the Play icon (the right-pointing arrow beside the Name box) to hear the current sound.
To assign a new sound to an event, select the event, and then choose a different item from the Name list. Click the Play button to be sure you've chosen the sound you want. If the sound you're looking for isn't listed in the Name list, click the Browse button. This takes you to the file-and-folder browser, where you can hunt for a different sound file.
To remove all sound from an event, select the event in the Sound Events list. Then choose (None) in the Name list.
Once you've hit upon a combination of sounds and events that pleases your ear, you can name it and add it to the Scheme list. Simply click the Save As button and enter a name for your new sound scheme.
Adjusting the Volume
The slider at the bottom of the Sounds tab lets you set the volume. (You can test your new setting by selecting a sound and clicking Play.) To silence your system temporarily, click the speaker icon below the volume slider, which mutes the system.
TIP
Select the Show Volume Control On The Taskbar check box to include an icon in the taskbar's status area that you can click to change the volume at which sounds are played or mute the system.
EAN: 2147483647
Pages: 317