Completing the Installation
This section is intended to guide you through the trickier areas of the Setup program. Fortunately, those areas are few and far between. And except for the first two choices described in the following sections—selection of an installation partition and a file system for the system drive—the other settings you make during setup can be changed at any time later. If you're unsure how to proceed at some point, accept the default setting proposed by Setup. After you complete the installation, refer to other sections of this book for information on changing particular settings and options.
Selecting a Partition
A hard disk can be divided into one or more logical partitions; when you run Windows 2000 (or another operating system), each partition appears to be an independent hard drive. During Setup, if you don't choose to upgrade an existing version of Windows, you might see a screen similar to the one shown in Figure A-1. Setup needs you to select the partition on which you want to install Windows 2000. You can install Windows 2000 on any partition that has enough free space. If you want to continue using another operating system that's already installed, you must install Windows 2000 on a different partition from the one used by the other operating system.
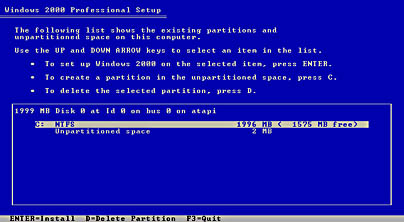
Figure A-1. Select a partition for Windows 2000—or clear the decks and create a new partition.
At this point, you have the opportunity to completely remove all data from your hard drive and start with a clean slate. If you really want to start fresh—and you have backups of any files you want to save—select a partition and press D to delete the partition. Confirm your decision on the next two screens, and then repeat the process for each remaining partition. Then select Unpartitioned Space, press C to create a partition, and specify the size. Repeat this step to create more than one partition on your hard disk.
WARNING
Be sure you have backups of any data you want before you delete a partition. Once you do that, any data previously on the hard disk is irretrievable.
When the partitions are set up the way you want them, select the one on which you want to install Windows 2000 and press Enter. If the partition hasn't been formatted, the Setup program then formats it. (If you created other new partitions, you can format them after you finish installing Windows 2000.)
Selecting a File System
The Setup program might ask you whether you want to format (or convert) your hard disk to the NTFS file system, either during the character-based portion of Setup (see Figure A-2) or during the graphical portion (see Figure A-3).
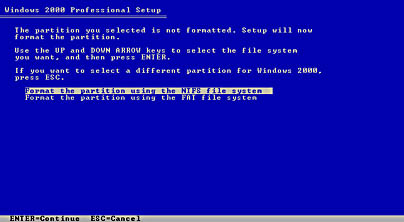
Figure A-2. If you select an unformatted partition, Setup must format it.
SEE ALSO
For information about file systems, see "Understanding File Systems."
If you're going to use another operating system on your computer in addition to Windows 2000 (in a multiple-boot configuration), you probably want to use the FAT file system. (In other words, you do not want Setup to convert the disk to NTFS.) If Windows 2000 will be your only operating system, you'll be better off with NTFS.
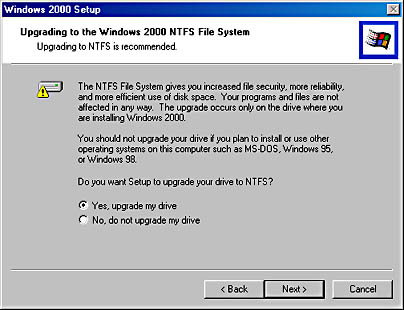
Figure A-3. Allow Setup to convert your partition to NTFS unless you're going to set up a computer that also boots another operating system.
Specifying the Computer Name and Administrator Password
When the screen shown in Figure A-4 on the next page first appears, you'll see that Setup proposes a cryptic name for your computer based on your name, with various characters appended to it. This is one place where you should feel free to override the default proposed by Setup and enter a name that's easier to remember and easier to type. If your network administrator has assigned a computer name for you, use it. Otherwise, create a name that's unique on your network (that is, it's not the same as the name of any other computer, workgroup, or domain), that's 15 characters or less, and that contains only letters and numbers. (The actual rules aren't this strict, but you might encounter problems if the name is longer or if it includes spaces or punctuation.)
SEE ALSO
For information about user accounts, see Chapter 27, "Implementing Windows 2000 Security."
This same screen is the place where you create the password for the Administrator user account. This user account has complete control of the computer, and you shouldn't use it as your everyday account. Be sure to write down the Administrator password you create and store it in a safe place; if you can't find it when you need to perform administrative tasks (such as adding new hardware, creating user accounts, or taking ownership of files created on your computer by someone else), you're sunk. (You might need to reinstall Windows to regain your administrative privileges.)
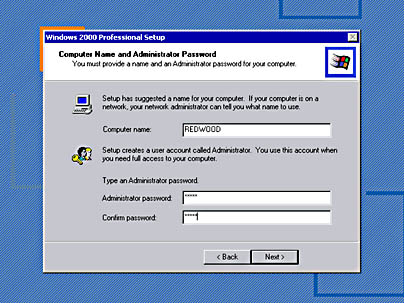
Figure A-4. Type the computer name assigned by your network administrator.
Specifying Networking Settings
On the Networking Settings page, the Setup program offers two choices: Typical Settings and Custom Settings. The latter choice takes you to additional dialog boxes that let you set up network adapters, protocols, and services. Fortunately, in most cases you don't need to go there. If all the computers on your network run Windows 2000 or Windows NT, select Typical Settings. For other network configurations, consult your network administrator for the requirements of your particular setup. (If you don't have the information you need while you're running Setup, select Typical Settings. You can always change networking settings after you complete the installation.)
SEE ALSO
For information about configuring network connections, see "Working on a LAN."
On the Workgroup Or Computer Domain page (see Figure A-5), you specify whether your computer is a member of a domain or a workgroup, and you specify the name of the domain or workgroup.
If your computer will be part of a domain with security managed by a domain controller running Windows 2000 Server or Windows NT Server, select Yes and enter the name of the domain, which your network administrator should provide. The network administrator must set up an account for your computer on the domain controller before you install Windows 2000. If Setup can't find a computer account on the domain controller, it offers you the opportunity to create a computer account. To do that, however, you'll need to provide the user name and password of an account that is a member of the Domain Admins group on the domain controller.
If your computer account hasn't been set up and you don't have a user account with sufficient privileges to set up the computer account yourself, return to the screen shown in Figure A-5 and select No. Join a workgroup for now, complete the installation, and then work with the network administrator to join the domain.
In all other cases (your computer is not connected to a network or the network is not set up as a domain), select No. Type the name of the workgroup used by other computers on your network; the default (WORKGROUP) is perfectly adequate for a small network with a single workgroup.
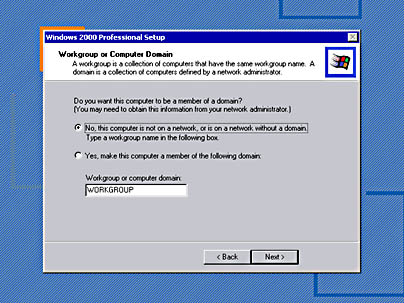
Figure A-5. If you're unable to join a domain during setup, select No and then join a domain after you complete the installation.
Configuring Logon Options
After you see the Completing The Windows 2000 Setup Wizard page and click Finish, you might think you're done. In fact, after the computer restarts, the Network Identification Wizard leads you through one final task: setting up logon options. See Figure A-6.
Unless your computer is not connected to a network (or the Internet) and it's in a secure location where others don't have physical access to it, we recommend that you select the first option: Users Must Enter A User Name And Password To Use This Computer. If you select this option, you'll need to log on by providing a user name and password each time you start your computer. The first time you log on after you complete the installation, use Administrator as the user name and the password you created earlier. Then immediately create a new user account for yourself and use that account ever after. (If your computer is part of a domain, you can log on using your domain user account and password; you don't need to log on as Administrator or set up a local user account.)
SEE ALSO
For information about logging on, see Appendix B, "Logging On and Logging Off." For information about creating user accounts, see "Working with Local User Accounts and Groups."
If you select the second option in the dialog box shown in Figure A-6, whenever you start your computer, Windows automatically enters the user name and password you specify here—in effect bypassing the entire logon process. Although this sounds convenient, it means that anyone who turns on your computer logs on using your credentials. If you decide to go this route, select your name in the User Name list. (If you joined a domain earlier in the setup process, the list includes all the domain user accounts. If you didn't join a domain, the list includes only Administrator and your name.)
If you have a domain user account, enter its password in the two password boxes; the domain controller requires its entry before you can log on to the domain. If you're not part of a domain, you can create a password by entering it here—but because you're eschewing security with this choice, there's little need to create a password.
After the Network Identification Wizard finishes, the installation is complete and you can log on to Windows 2000 Professional for the first time.
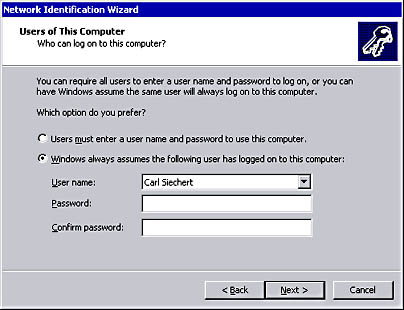
Figure A-6. For best security, select the first option.
EAN: 2147483647
Pages: 317