Flylib.com

Books Software


Updating Calendar Information


Updating Calendar Information

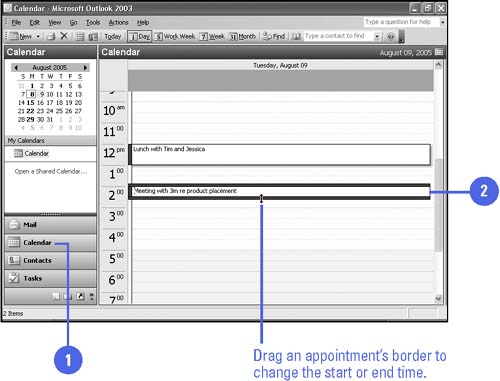
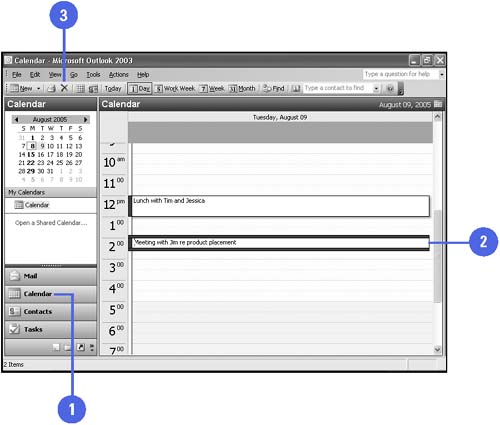
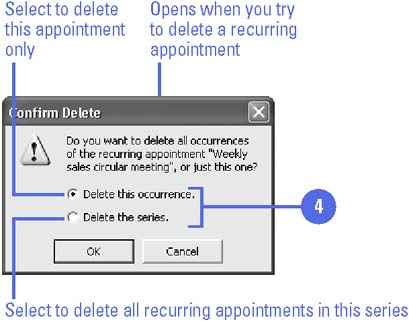
You can edit activity information in the Calendar at any time. During meetings, for example, you might want to use the memo area of the Appointment window to enter the names of those present, and note any subjects you want to discuss with them after the meeting. Or, if an appointment time is postponed, you can reschedule the start and end times, and then set a reminder. When an activity is cancelled or no longer needs to be recorded in the Calendar, you can delete the activity. Deleting an activity sends it to the Deleted Items folder along with deleted messages and contacts, where they remain until you empty the folder. You can retrieve a deleted appointment or event from the Deleted Items folder and drag it back into the Calendar. When you open or delete a recurring activity, Outlook asks whether you want to work with only the selected activity or with all occurrences of that activity.

Modify an Activity

graphics/one_icon.jpg

Click the Calendar button on the Navigation pane.

graphics/two_icon.jpg

Double-click an activity.

graphics/three_icon.jpg

If you double-clicked a recurring activity, click the Open This Occurrence or Open The Series option, and then click OK.

graphics/four_icon.jpg

Change activity details.

graphics/five_icon.jpg

Click the Save And Close button.

TIMESAVER To change the time of an appointment, drag an appointment from one time slot to another, or drag the appointment's border.

graphics/07inf20.jpg

Did You Know?

You can modify an activity description in the Appointment area . Click an activity, and then modify the activity description.

Delete an Activity

graphics/one_icon.jpg

Click the Calendar button on the Navigation pane.

graphics/two_icon.jpg

Click an activity to select it.

graphics/three_icon.jpg

Click the Delete button on the Standard toolbar.

graphics/four_icon.jpg

If you are deleting a recurring activity, click the Delete This Occurrence or Delete The Series option, and then click OK.

graphics/07inf21.jpg

graphics/07inf22.jpg


Managing and Organizing Activities

graphics/microsoft13.gif

You can group appointments and events by categories. A category is any keyword or phrase associated with an Outlook item. For example, you might want to categorize business and personal appointments, or create a new category to categorize family events. If you assign categories to activities, you can then change the view to group your activities by category. You can assign a category to an activity in the Appointment window or by using the Ways To Organize pane. You can select from existing categories, such as Holiday, Business, or Gifts, or you can create a new category. Outlook starts you off with a Master Category List of some common categories, but you can add or remove them to fit your purposes.

Assign Activities to Categories

graphics/one_icon.jpg

Click the Tools menu, click Organize, and then click the Using Categories tab.

graphics/two_icon.jpg Click the activity you want to assign to a category.

To assign the activity to a new category, click in the Create A New Category text box, type a new category name , and then click the Create button.

graphics/three_icon.jpg

Click the Add Appointments list arrow, and then click a category name.

graphics/four_icon.jpg

Click the Add button.

graphics/five_icon.jpg

Click the Close button in the Ways To Organize pane.

TIMESAVER Right-click the appointment, and then click Categories on the shortcut menu to assign an activity to a category.

graphics/07inf23.jpg

Did You Know?

You can use the Organize pane in the Calendar . Click the Tools menu, and then click Organize. Click the Using Categories or Using Views tab to display your appointments in different views.

Assign and Remove Categories to and from an Outlook Item

graphics/one_icon.jpg

Click any Outlook item to select it.

graphics/two_icon.jpg

Click the Edit menu, and then click Categories.

graphics/three_icon.jpg

Select or clear check boxes to assign or remove categories.

graphics/four_icon.jpg

Click OK.

graphics/07inf24.jpg

Add or Remove a Master Category

graphics/one_icon.jpg

Click any item to select it.

graphics/two_icon.jpg

Click the Edit menu, and then click Categories.

graphics/three_icon.jpg

Click Master Category List.

graphics/four_icon.jpg

To add a category, type a new category name, and then click Add.

graphics/five_icon.jpg

To remove a category, click the category you want to remove, and then click Delete.

graphics/six_icon.jpg

Click OK.

graphics/seven_icon.jpg

Click OK.

graphics/07inf25.jpg