Transparency
The Form object provides a couple of properties that you can use to make a form partially transparent. Opacity determines the form’s opaqueness. At design time, the Properties window shows Opacity as a percentage where 100% means the form is completely opaque, and 0% means that the form is completely transparent. At runtime, your program must treat Opacity as a floating-point value between 0.0 (completely transparent) and 1.0 (completely opaque).
A program can use an Opacity value less than 100% to let the user see what lies below the form. For example, you might build a partially transparent Search dialog box so the user could see the underlying document as a search progresses.
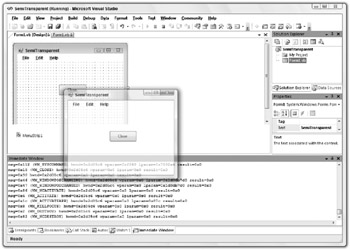
Figure 10-1 shows a form with Opacity set to 66%. You can still see the form’s borders, title bar, system menus, menu bar, and button, but you can also see the Visual Basic IDE showing through from behind.

Figure 10-1: A form with Opacity set to 66% allows the Visual Basic IDE to show through.
If Opacity is greater than 0%, the form behaves normally aside from its ghostlike appearance. The user can click it, interact with its controls, minimize and maximize it, and grab its borders to resize it.
If Opacity is 0%, the form is completely transparent and the user can only interact with the form through the keyboard. For example, the user can press the Tab key to move between the form’s controls, type text, press the Spacebar to invoke a button that has the focus, and press Esc or Cancel to fire the form’s Accept and Cancel buttons. However, the form and its controls will not detect mouse clicks. The user also cannot see the form (obviously), so figuring out which control has the focus can be difficult.
If Opacity is 1%, the form is still invisible, but it recognizes mouse clicks, so it can obscure the windows below.
| Tip | Normally, you should set a form’s Opacity big enough that the user can see the form. It can be useful to have toolbars, property grids, and other secondary windows float translucently above the main form to provide information without completely obscuring the main form. In cases such as those, Opacity less than 50 percent makes it hard to read the secondary form, while Opacity greater than 75 percent makes it hard to see the main form. A value around 66 percent seems to provide a reasonable balance. |
A second property that helps determine the form’s transparency is TransparencyKey. This property is a color that tells Visual Basic which parts of the form should be completely transparent. When the form is rendered, any areas with this color as their background colors are not drawn.
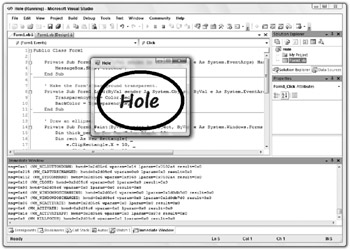
Figure 10-2 shows a form with TransparencyKey set to red. Both the form and the Hole label have red backgrounds so they are transparent. The form’s Paint event handler draws a black ellipse around the inside of the form.

Figure 10-2: A form’s TransparencyKey property lets you make shaped forms such as this one with a hole in it.
Although the transparent pixels are not drawn, the form does respond to mouse events on those pixels. For example, if the user clicks a hole in the form caused by removed pixels, the program stills receives MouseDown, MouseUp, and Click events.
TransparencyKey applies to both the form’s client and nonclient areas, and to any controls on the form. That can cause some strange side effects. For example, the form, many controls, and the tops of form borders have BackColor values of SystemColors.Control. If you set TransparencyKey to SystemColors.Control, the form, control, and border backgrounds disappear.
In Windows Vista, the form’s title bar and border are visible, but they do not respond to mouse events. For example, when you hover the mouse over the form’s border, you see whatever cursor is appropriate for the application below, instead of the resize cursor that you would probably expect. When you click a form’s title bar, the click falls through to whatever application lies below. That gives the application the input focus and moves it to the top, possibly obscuring the program with TransparencyKey set. The result is rather confusing. To prevent confusion, you should probably remove the form’s title bar and borders by setting its FormBorderStyle property to None.
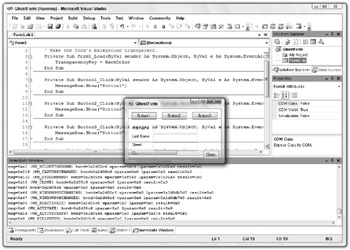
Figure 10-3 shows a form in this rather unusual state. The form contains a button, label, and check box that all float over whatever lies beneath. If you look very closely, you may be able to see some pale-colored pixels near the text. Those are anti-aliasing pixels that would have made the text appear smoother on a light gray form. These pixels are out of place when the background behind the form is dark, as is it here.

Figure 10-3: TransparencyKey applies to the form’s client and nonclient areas, as well as its controls.
If you look very closely at the form’s title bar in Figure 10-3, you’ll see the shadows of text showing through the Aero style in Windows Vista; this style provides glass-like window decoration. If you click these parts of the form, the mouse click falls through to the application below.
In Windows XP, the underlying window shows through in places where the title bar and its icons have the TransparencyKey color. If you click part of a button that has been cut out, the click falls through to the Visual Basic IDE. If you click the tiny pieces of the buttons that are not transparent, the buttons function normally.
The most common use for TransparencyKey is to create shaped forms. Set the form’s FormBorderStyle property to None to remove the borders, title bar, and system buttons. Set the form’s BackColor and TransparencyKey properties to a color that you don’t want to appear on the form. Then draw the shape you want the form to have in some other color.
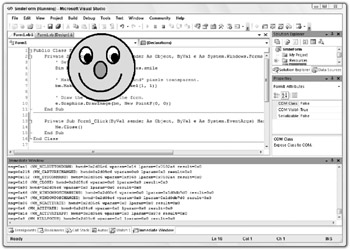
Figure 10-4 shows a form shaped like a smiley face. The form’s Paint event handler draws the image from a bitmap file. These sorts of forms make interesting splash screens and About dialog boxes, although they are often too distracting for use in a program’s main user interface.

Figure 10-4: The TransparencyKey property lets you make shaped forms such as this one.
Note that this form has no title bar, borders, or system buttons, so the user cannot move, resize, minimize, maximize, or close it. To use this form as a splash screen, add a Timer control to make the form disappear after a few seconds. To use it as an About dialog box or some other kind of dialog box, add a button that closes it.
If you use Opacity and TransparencyKey together, pixels that match TransparencyKey are completely removed and any remaining pixels are shown according to the Opacity value.
EAN: N/A
Pages: 417