| Setting off items in a list with numbers or bullets is a great way to present information clearly. Word's bulleted and numbered list features add the bullets or numbers for you, and they create hanging indents so that when text in an item wraps to the next line, it doesn't wrap underneath the number or bullet. Also, when you use the numbered list feature to create a list and then add, delete, or move items in the list, Word keeps the numbering sequential. Word enables you to create single-level lists, or lists with two or more levels. Figure 7.17 shows single-level bulleted and numbered lists, and one multilevel list. Figure 7.17. You can create single-level and multilevel lists. 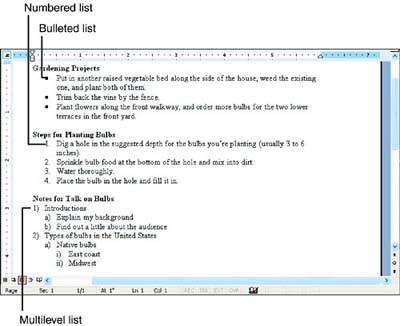 Follow these steps to create a single-level bulleted or numbered list: -
Click where you want the list to start. -
Click the Bullets or Numbering button on the Formatting toolbar (see Figure 7.18). Figure 7.18. The Bullets and Numbering buttons on the Formatting toolbar let you create lists quickly.  -
Type the first item in the list, and press Enter. Word inserts a bullet or number on the next line for you. Continue typing items in your list. -
After the last item, press Enter twice to turn off the bullets or numbers.  | You can also turn off the bullets or numbering by clicking in the paragraph where you don't want the bullets or numbers, and clicking the Bullets or Numbering toolbar button again. |
To switch from numbers to bullets (or vice versa), select all of the items in the list, and then click the Bullets or Numbering button.  | If you want two or more paragraphs within one item in a bulleted or numbered list, press Shift+Enter at the end of each paragraph but the last. Pressing Shift+Enter inserts a line-break character, which ends the line without ending the paragraph (a soft return ), so you don't get a bullet or number on the next line. (Word inserts a bullet or number only at the beginning of a paragraph.) If you click the Show/Hide button on the Formatting toolbar, you'll see that the symbol for the line-break character looks like this:  . If you want to add a blank line in between the items in the list, select all but the first item in the list and press Ctrl+O to add one blank line above each of the selected paragraphs. . If you want to add a blank line in between the items in the list, select all but the first item in the list and press Ctrl+O to add one blank line above each of the selected paragraphs. |
Instead of turning on the bulleted or numbered list feature and then typing the list, you can also type the list first, select it, and then click the Bullets or Numbering toolbar button. You may notice that Word automatically turns on the bulleted or numbered list feature as soon as you type a line of text that begins with an asterisk (*), the number 1, or the letter A (followed by a space or a tab), and press Enter. If you like this behavior, great. If you don't, you can turn it off: Choose Tools, AutoCorrect Options, click the AutoFormat As You Type tab, clear the check boxes for Automatic Bulleted Lists and Automatic Numbered Lists, and then click OK. | | If you want to insert a bullet or two but don't want to turn on the bulleted list feature, see "Inserting Symbols and Special Characters" in Hour 12, "Handy Editing Techniques." |
If you have more than one numbered list in a document, Word starts each new list at number 1. If you want the numbering to continue from the previous list, right-click the first paragraph of the new list and choose Continue Numbering in the context menu that appears. By the same token, if Word assumes you want to continue the previous numbering and you want to restart it, choose Restart Numbering in the context menu. These options are also available in the Numbered tab of the Bullets and Numbering dialog box (Format, Bullets and Numbering). Changing the Appearance of Your Bullets and Numbers In many documents, the default bullets and numbers that Word uses will suit you. If you have a hankering for a different look, though, you can choose from a wide range of options. Follow these steps to change the bullet used in your bulleted list: -
Click where you want the bulleted list to start (or, if you've already typed your list, select the entire list). -
Choose Format, Bullets and Numbering to display the Bullets and Numbering dialog box. -
Click the Bulleted tab. This tab contains a gallery of different bullets (see Figure 7.19). The one you are currently using has a box around it. If you see a bullet that you want to use here, click it, and then click OK . Figure 7.19. You may see the bullet you want to use in the Bulleted tab. 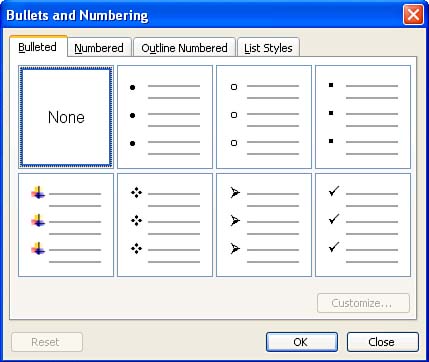 -
If you don't see a bullet you want to use, click one of the seven gallery positions that you don't mind replacing with another bullet (other than None), and click the Customize button to display the Customize Bulleted List dialog box (see Figure 7.20). Figure 7.20. The Customize Bulleted List dialog box enables you to modify your bullet. 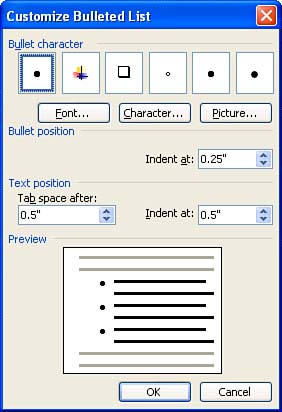 | | Some bullets look much better when they are larger. You can increase the size of your bullet by clicking the Font button in the Customize Bulleted List dialog box and then increasing the point size in the Font dialog box that appears. The Font button is dimmed out when the selected bullet is a graphic image and not a symbol from a character set. If you want to increase the size of a graphic bullet (called a picture bullet ), after you insert it in your document, select it and increase its size. |
-
If you want to use a symbol, click the Character button to display the Symbol dialog box (see Figure 7.21). Look for the symbol you want to use for your bullet. If you don't see the one you want, choose a different character set in the Font list. (The Webdings and Wingdings sets contain a lot of fun symbols.) Figure 7.21. Hunt down the symbol you want to use in the Symbol dialog box. 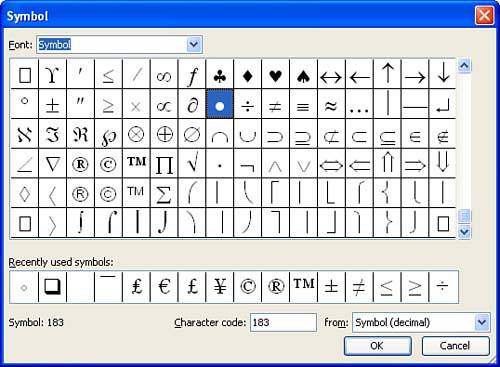 -
If you want to use a picture, click the Picture button to display the Picture Bullet dialog box (see Figure 7.22). If you have an image you want to use for your bullet stored on your own computer, click the Import button to locate it. Figure 7.22. Browse the picture bullets until you find one you like. 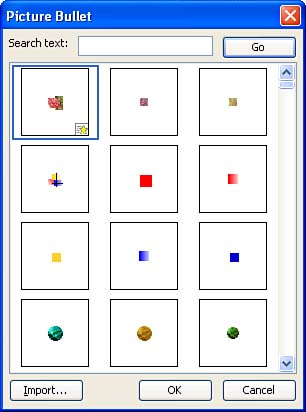 -
When you find the symbol or picture you want, click it and click OK twice to return to your document and insert the new bullet. The new bullet is now the default, so clicking the Bullets toolbar button inserts this bullet until you repeat these steps to choose something else. | | If you choose a new bullet, it takes over a position in the Bulleted tab of the Bullets and Numbering dialog box. If you want to return that position to the bullet that appears there by default, click the position, and click the Reset button. |
Follow these steps to change the numbering used in your numbered list: -
Click where you want the numbered list to start (or, if you've already typed your list, select the entire list). -
Choose Format, Bullets and Numbering to display the Bullets and Numbering dialog box. -
Click the Numbered tab. If you see the numbering that you want to use here, click it, and then click OK (see Figure 7.23). Figure 7.23. You may see the numbering you want to use in the Numbered tab. 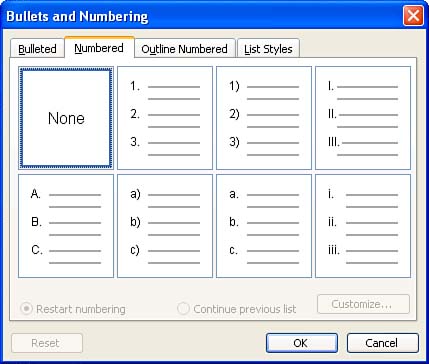 -
If you don't see the numbering you want to use, click one of the seven gallery positions that you don't mind replacing with another type of numbering (other than None), and click the Customize button to display the Customize Numbered List dialog box. -
If you want to revise the format of the numbers, type the change in the Number Format text box. Leave the sample number in the box, but type any text you like before or after it or even remove the trailing period (see Figure 7.24). Use the Number Style list to change to another style, such as Roman numerals, ordinals, or letters . Use the Number Position and Text Position options to adjust the positioning of the numbers and text. Change the number in the Start At text box to begin the list at a number other than 1. The Preview area in the lower half of the dialog box shows you the effect of your changes. When you're finished, click OK . Figure 7.24. The Customize Numbered List dialog box lets you modify your numbering. 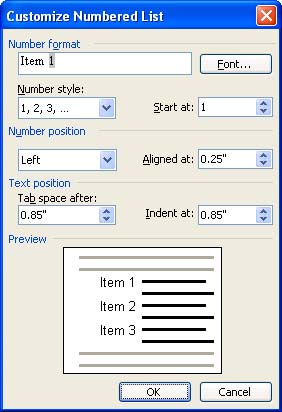 The new numbering is now the default, so clicking the Numbering toolbar button inserts this numbering until you repeat these steps to change it to something else. | | If you modify your numbering, the new numbering takes over a position in the Numbered tab of the Bullets and Numbering dialog box. If you want to return that position to the numbering that appears there by default, click the position, click the Reset button, and click Yes. |
Creating Multilevel Lists Word enables you to turn any bulleted or numbered list into a multilevel list. When you want to create a sublist within your main list, click the Increase Indent button on the Formatting toolbar or press Alt+Shift+right arrow. Then type the first item in the sublist and press Enter. Word assumes you want to type another item in the sublist. If you do, continue typing sublist items. When you are ready to type another item one level up, click the Decrease Indent toolbar button or press Alt+Shift+left arrow. You can customize the numbering in a multilevel list by using the same method you use to customize bullets or numbers in a single-level list: -
Click where you want the list to begin (or select the list if you've already typed it). -
Choose Format, Bullets and Numbering to display the Bullets and Numbering dialog box. -
Click the Outline Numbered tab (see Figure 7.25). If you see the numbering scheme you want to use in the top row of gallery positions, click it and click OK . (The lower row is used for creating outlines, which you'll learn about in Hour 13, "Working with Long Documents.") Figure 7.25. You may see the numbering you want to use in the Outline Numbered tab. 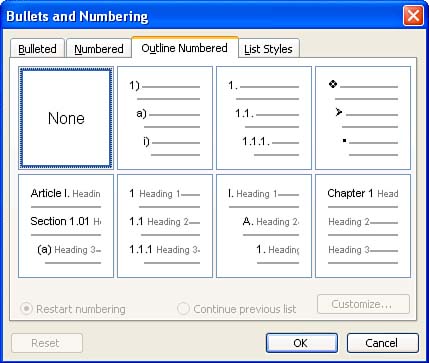 -
If you don't see the outline numbering you want to use, click the scheme in the top row that most resembles the one you want to use, and click the Customize button to display the Customize Outline Numbered List dialog box (see Figure 7.26). Figure 7.26. The Customize Outline Numbered List dialog box lets you modify your outline numbering. 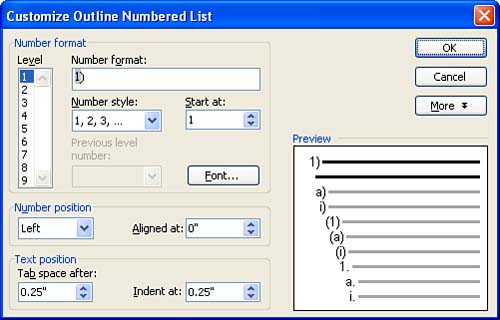 -
Under Level in the upper-left corner of the dialog box, click the list level that you want to change, and then select the desired options for that level. Repeat this process to adjust the appearance of any other levels, and then click OK . As with the single-level lists, the new multilevel list takes a position in the Outline Numbered tab of the Bullets and Numbering dialog box. To reset the position to the default, click it and click the Reset button. | | The List Styles tab in the Bullets and Numbering dialog allows you to select a style for your list. (You can also create, modify, or delete list styles from here.) A style is a collection of formatting codes, and a list style is a collection of formatting codes that is designed specifically for formatting lists. You will learn about styles in Hour 9, "Working with Styles." |
 |