Working with Custom Tabs


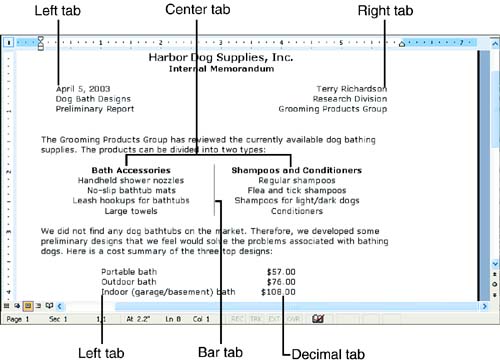
Word's default tabs are left tabs, meaning that they left-align text at the tab stops. The default tab stops are positioned every half-inch across the horizontal ruler. You can see them on the bottom edge of the rulerthey look like faint gray tick marks. Each time you press the Tab key, your insertion point moves to the next default tab stop, pushing over any text to the right of the insertion point.

In regular body text, the default tabs work just fine. In some situations, however, you may want to create a custom tab at the exact location on the horizontal ruler where you want to align your text. For example, if you wanted to line up several lines of text at the 3-inch mark, you would have to press the Tab key six times at the beginning of each line. A much more efficient solution is to create a custom tab at the 3-inch mark. When you insert the custom tab, all of the default tabs to its left disappear. You can then press the Tab key once to bring the insertion point directly to the spot where you want to type your text.

Another advantage of custom tabs is that in addition to creating custom left tabs, you can also create right, center, decimal, and bar tabs to align text in different ways. Figure 7.6 shows a document including all five types of custom tabs.

Figure 7.6. You can create five types of custom tabs in Word.

graphics/07fig06.jpg

Left tabs left-align text at the tab stop. Right tabs right-align text at the tab stop. Center tabs center text over the tab stop, and decimal tabs align numbers along the decimal point. Bar tabs create a vertical line at the tab stop. You can use a bar tab to add a vertical line between columns of text that you've aligned with the other types of custom tabs, or to put a vertical line along the right or left edge of a paragraph.
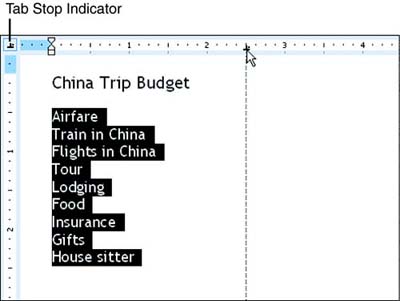
graphics/lightbulb_icon.gif

Custom tabs are great for creating simple lists in two or more columns. If your lists or charts require more complex formatting, however, the powerful table feature is a much better option (see Hour 15, "Columns and Tables").


Creating Custom Tabs

To create a custom tab using the ruler, follow these steps:
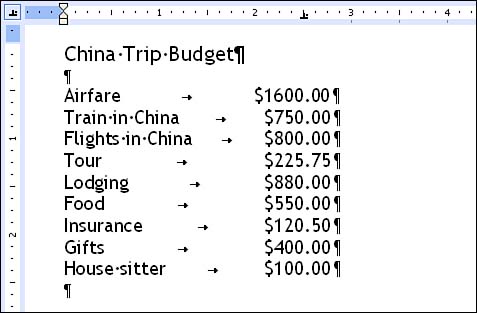
  1. Click in the paragraph to which you want to add the tab (or select multiple adjacent paragraphs to add the tab to all of them). If you haven't yet typed the text in the paragraph, just click on the blank line where you want the custom tabs to begin.

  2. Click the Tab Stop Indicator button at the left end of the ruler (see Figure 7.7) until you see the symbol for the tab that you want to insert. Each symbol is labeled with a ScreenTip so that you can easily tell which is which.

    Figure 7.7. When you insert a custom tab, the default tabs to its left disappear.

    graphics/07fig07.jpg

    graphics/bookpencil_icon.gif

    The Tab Stop Indicator button also displays symbols for first line and hanging indents. It's probably easier to create these indents by dragging the indent markers on the ruler, as you'll learn later in this hour.


  3. Click at the desired location on the ruler to insert the tab. In Figure 7.7, a decimal tab will be added at the 2.5-inch mark on the ruler for all of the paragraphs in the list of budget items (in preparation for typing a column of numbers). Note that all of the default tabs to the left of the custom tab will disappear as soon as the user clicks to place the tab on the ruler.

  4. Repeat steps 2 and 3 to insert any additional custom tabs.

graphics/lightbulb_icon.gif

You can also create custom tabs from scratch in the Tabs dialog box (Format, Tabs). In the Tab Stop Position text box, type the position of the tab you want to add in inches, mark the desired option buttons under Alignment and Leader, and click the Set button (you'll learn about dot leaders in just a moment). Add any other custom tabs you like, and click OK. The tabs appear on the ruler just as if you had added them directly to the ruler.


Using Custom Tabs

To use your custom tabs, press Tab to move to the first custom tab stop, and type your text. Press Tab to get to the next tab stop (if any) and type your text. If you accidentally press the Tab key too many times, delete the extra tab characters by pressing Backspace (if the insertion point is just past the tabs) or Delete (if the insertion point is just before them). Press Enter after typing the last block of text on the line, and type the remaining paragraphs that use the custom tabs. Figure 7.8 shows the budget with all of the dollar amounts typed in and lined up on the decimal tab. The Show/Hide button in the Formatting toolbar is turned on so that you can see where the Tab and Enter keys were pressed.

Figure 7.8. Press the Tab key to move out to your custom tab stops, and type your text.

graphics/07fig08.jpg

graphics/lightbulb_icon.gif

As a reminder, you can see what custom tabs are in effect for any paragraph by clicking anywhere in the paragraph, and then looking at the ruler.


graphics/bookpencil_icon.gif

Unlike the other custom tabs, the bar tab doesn't require you to press the Tab key. As soon as you add the bar tab to the ruler, a vertical line automatically appears at the location of the tab, running down the paragraph containing the insertion point (or the selected paragraphs).


Moving and Deleting Custom Tabs

When you work with custom tabs, you frequently need to adjust their positions on the horizontal ruler. To move a custom tab, follow these steps:

  1. Click in the paragraph containing the tab (or select multiple adjacent paragraphs if they all contain the tab and you want the move to apply to all selected paragraphs).

  2. Point to the tab on the ruler, drag it to the new position, and release the mouse button (see Figure 7.9). The text at that tab stop adjusts to the new position of the tab.

    Figure 7.9. To move a custom tab, simply drag it along the ruler.

    graphics/07fig09.jpg

graphics/lightbulb_icon.gif

If you need to move the tab to a precise location on the ruler, hold down the Alt key as you drag. The ruler displays the exact location of the tab in inches as you drag it along the ruler.


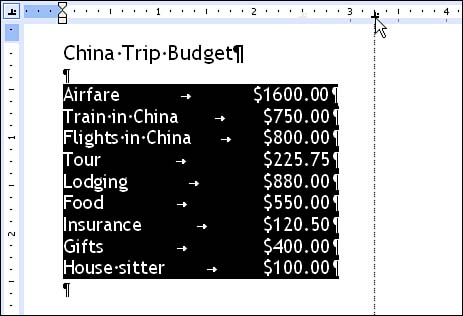
If you select several adjacent paragraphs and notice that a custom tab on the ruler is gray instead of black, it means that the tab is set in some of the selected paragraphs, but not all. If you drag the tab, it creates the same tab in all of the selected paragraphs.

If you insert a custom tab by accident (easy enough to do), you need to know how to get rid of it. As soon as you delete a custom tab that does not have any other custom tabs to its right, all of the default tabs to its left automatically reappear. To delete custom tabs, follow these steps:

  1. Click in the paragraph that contains the tab that you want to remove (or select several adjacent paragraphs if they contain the same tab and you want to delete it in all paragraphs). If you haven't yet typed the text in the paragraph, just click on the blank line.

  2. Point to the tab on the ruler, drag straight down into the text area of the Word window, and then release the mouse button.

  3. Repeat step 2 to delete any other custom tabs in the paragraph (or selected paragraphs).

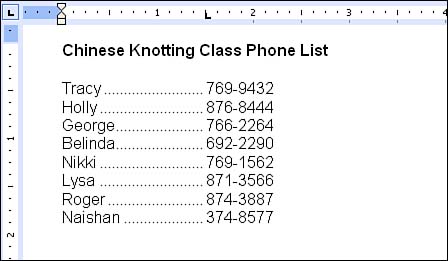
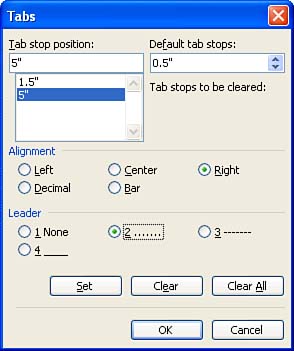
If you want to restore all of the default tabs below a paragraph that contains custom tabs, click in the paragraph where you'd like the default tabs to begin, and simply drag all of the custom tabs off the ruler.

Adding a Dot Leader to a Tab

You can add a dot leader a dotted line in the space created by the tabto any type of custom tab. Figure 7.10 shows a phone list created with a custom left tab that has a dot leader.

Figure 7.10. Dot leaders are great for phone lists.

graphics/07fig10.jpg

To add a dot leader to a tab, follow these steps:

  1. Click in the paragraph that has the tab to which you want to add the dot leader (or select multiple adjacent paragraphs if they all contain the same tab).

  2. Choose Format, Tabs to display the Tabs dialog box.

  3. In the Tab Stop Position list, click the tab to which you want to add the leader (all of the custom tabs in the paragraph containing the insertion point or the selected paragraphs are listed). Mark the option button for the type of leader you want under Leader , and click the Set button. In Figure 7.11, a dot leader is added to the right tab at the 5-inch mark.

    Figure 7.11. You can use the Tabs dialog box to add a dot leader to a tab.

    graphics/07fig11.jpg

  4. Click OK .


Sams Teach Yourself Microsoft Office Word 2003 in 24 Hours
ISBN: 067232556X
EAN: 2147483647
Year: 2003
Pages: 315
Authors: Heidi Steele

flylib.com © 2008-2017.
If you may any questions please contact us: flylib@qtcs.net