Working with Multiple Images
| When you are creating a drawing made up of multiple drawing objects, or if you have more than one picture on a page, you may need to stack images on top of one another, align them, or group them together to treat them as a unit. As you learned in the previous section, if you're working with drawing objects or WordArt, some of these tasks are easier to accomplish if you place the objects in a drawing canvas. In the remainder of this hour , you'll learn a variety of techniques for working with multiple images. Ordering ImagesIf you have moved images on top of one another, you can reorder them however you like. Select the image in the stack that you want to move, click the Draw button on the Drawing toolbar, point to Order, and choose one of these commands:
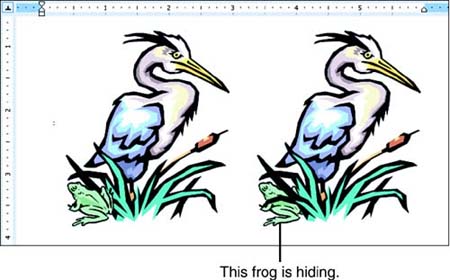
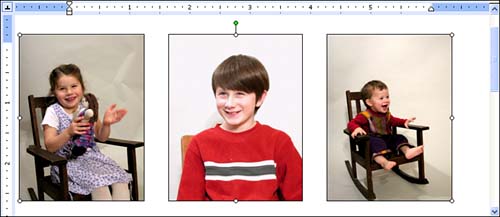
Figure 17.22 shows two copies of a stork and frog pair. On the left, the frog image is in front. On the right, it has been sent to the back. Figure 17.22. You can order stacked images however you like. Selecting Multiple ImagesWhen you're working with multiple images, it helps to be able to select more than one at a time. When multiple images are selected, you can then move them as a unit, apply the same formatting to all of them, copy or delete all of them at once, and so on. To select multiple images, click the first one, and then Shift+click the additional ones. If you need to select a large number of images, click the Select Objects button in the Drawing toolbar (the white arrow toward the left end of the toolbar), and then drag to draw a large rectangle around all the images. When you release the mouse button, they will all be selected. To remove one image from a selection, Shift+click it again. If you want to deselect all the images, click anywhere else in the document. If you frequently handle the same set of images together, consider putting them on a drawing canvas. Grouping ImagesWhen you group two or more images, Word treats them as a single object. This makes it possible to maintain the same spatial relationships between them when you move them around. To group images, select them all, click the Draw button in the Drawing toolbar, and click Group. When the images are grouped, you will see only one set of sizing handles around all of them, as shown in Figure 17.23. Figure 17.23. These three photographs are grouped together. To ungroup images, select the group and choose Ungroup in the Draw menu. As soon as they are ungrouped , they all get their own sizing handles. If you ungroup a set of images to manipulate one of the images in the group independently and then want to group them again, make sure one of the members of the group is selected and choose Regroup in the Draw menu. Word remembers which objects were originally in the group and includes them again.
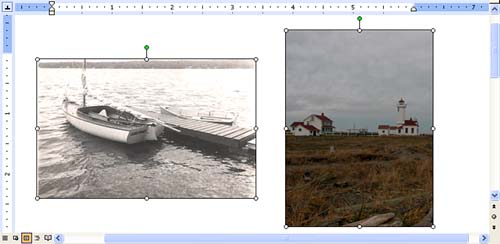
Aligning and Distributing ImagesIf you want to align two or more images with each other, select them all, click the Draw button, point to Align or Distribute, and choose any of the alignment options in the submenu that appears. (The commands Distribute Horizontally and Distribute Vertically put an even amount of space between the selected images.) In Figure 17.24, the two photographs have been aligned in the middle. Figure 17.24. These two photographs are aligned on the middle.
|
EAN: 2147483647
Pages: 315
- Chapter III Two Models of Online Patronage: Why Do Consumers Shop on the Internet?
- Chapter V Consumer Complaint Behavior in the Online Environment
- Chapter VII Objective and Perceived Complexity and Their Impacts on Internet Communication
- Chapter XI User Satisfaction with Web Portals: An Empirical Study
- Chapter XVII Internet Markets and E-Loyalty