| As you enter text in a table, you will almost certainly need to change its structure. Here you learn the most common adjustments that you'll need to make. As you experiment with these techniques, keep in mind that Word does not prevent you from making a table too wide to fit on the page. If you're adding columns and increasing column widths, check periodically to make sure that the table isn't running off the page. (You have to check in Print Layout view or Print PreviewNormal view won't do the trick.)  | Most of the commands in the Table menu are active only when the insertion point is in a table. If you notice that the commands are dim, it's a sign that you accidentally clicked outside the table. Click inside the table and then display the Table menu again. |
Adding and Deleting Rows and Columns You can add or delete rows and columns in a table using the following steps: -
If you want to add a row at the end of the table, click anywhere in the lower-right cell in the table, and press the Tab key. -
To add a row in the middle of the table, select the row below the desired location of the new one, and click the Insert Rows button on the Standard toolbar. (The Insert Table button turns into Insert Rows when a row is selected.) If you want to add two or more rows, select that number of rows before clicking the Insert Rows button. -
To insert a column, select the column to the right of where the new one will go, and click the Insert Columns button on the Standard toolbar. (The Insert Table button turns into Insert Columns when a column is selected.) Again, you can add two or more columns at once by selecting that number before clicking the Insert Columns button. -
If you want to delete a row or column, select it first, and then choose Table, Delete, Rows or Table, Delete, Columns (or right-click the selected row or column and choose Delete Rows or Delete Columns ). Merging and Splitting Cells When you merge cells, they become one larger cell. You might, for example, merge all the cells in the top row of a table to create a large cell in which to type a centered title. You can merge cells that are horizontally or vertically adjacent to one another. To merge cells, first select them, and then click the Merge Cells button in the Tables and Borders toolbar (see Figure 15.18). Figure 15.18. The Merge Cells and Split Cells buttons in the Tables and Borders toolbar give you a quick way to merge and split cells. 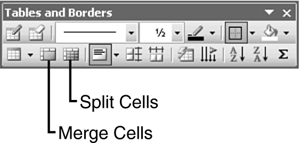  | Merging cells is not the same as hiding the lines that separate them. When you merge cells, they become one single cell. When you hide the lines, the individual cells remain separate even though they appear to be a single cell. |
You can also split a cell into two cells. To do so, click in the cell and then click the Split Cells toolbar button. | | Another way to merge cells is to erase the lines between them with the Eraser tool in the Tables and Borders toolbar. And you can split a cell by drawing a line through it with the Draw Table tool. This approach gives you more flexibility in choosing where the cell should be split. |
|