Varying the Page Formatting in Your Document


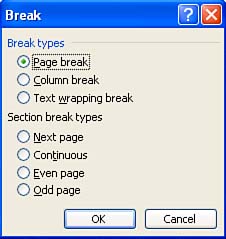
Word automatically applies all page formatting to your entire document. In many cases, you need to alter this behavior. For example, you may have a table in a long report that you have to print in landscape orientation to fit all of the columns on the page, but you want the other pages to print in portrait orientation. Or you might want to vertically center the text on your title page but not on the remaining pages. To make these kinds of changes, you have to divide your document into multiple sections by inserting section breaks at the appropriate spots. After you've done this, you can apply different page formatting in each section, independent of the others.

Word lets you create four kinds of section breaks:

  • Next page This section break is like a page break and a section break combined. It both breaks the page and starts a new section. An appropriate place to use a next page section break would be at the end of a title page.

  • Continuous This section break does not break the page. Once in a while, you may need to apply different page formatting on the same page. For example, if you want to format your document text in two columns but want the title to be centered in the middle of the page, you can insert a continuous section break directly under the title. This enables you to keep the title and document text on the same page but use the default single-column format for the title and a two-column format for the text.

  • Even page This type of section break is most useful for longer documents that are divided into multiple parts , especially those that are bound. It forces the text in the new section to begin on the next even page.

  • Odd page This is the same as an even page section break, but it forces the text in the new section to begin on the next odd page.

It's easiest to work with section breaks in Normal view because the breaks are labeled onscreen. To insert a section break, follow these steps:

  1. Choose View, Normal if you aren't already using Normal view.

  2. Move the insertion point to the location where you want to insert the section break.

  3. Choose Insert, Break to display the Break dialog box (see Figure 8.18).

    Figure 8.18. Use the Break dialog box to insert a section break.

    graphics/08fig18.jpg

  4. Under Section Break Types , mark the desired option button.

  5. Click OK .

graphics/lightbulb_icon.gif

If you want to apply different page formatting from the Page Setup dialog box to a particular block of text in your document, you can have Word create the section breaks for you automatically. To do so, select the text and then choose File, Page Setup. Choose the desired options in the dialog box, and then display the Apply To drop-down list and choose Selected Text. Click OK. Word will insert next page section breaks above and below the selected text and restrict the page formatting options you chose to the new section.


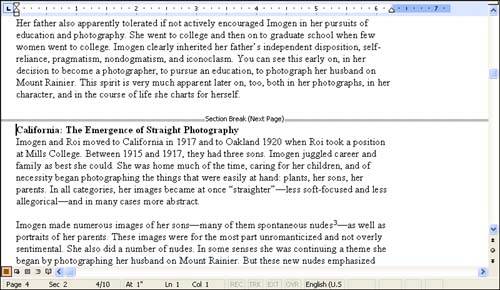
After you've inserted one or more section breaks in your document, you can use the status bar to keep track of which section you are in. Figure 8.19 shows a next page section break in Normal view. Note that the section break is labeled Section Break (Next Page), and the insertion point is below the break, so the status bar indicates Sec 2.

Figure 8.19. The status bar tells you in what the section the insertion point is located.

graphics/08fig19.jpg

When your document has more than one section, all of the formatting options in the Page Setup dialog box are by default applied to the section containing the insertion point. To apply page formatting to the entire document, change the setting in the Apply To list from This Section to Whole Document.

To delete a section break, use the same methods as the ones you use to delete manual page breaks (see the preceding section). To change a section break from one type to another, delete the old break and then insert the new one.

graphics/alarmclock_icon.gif

When you delete a section break, the page formatting options that were applied to the section immediately above the break are removed from your document. Any text that was in that section then takes on the formatting of the next section. So, for example, if section 1 of your document is formatted to use landscape orientation and section 2 is formatted with portrait orientation and you remove the break between them, the pages in what had been section 1 take on the portrait orientation.


Sams Teach Yourself Microsoft Office Word 2003 in 24 Hours
ISBN: 067232556X
EAN: 2147483647
Year: 2003
Pages: 315
Authors: Heidi Steele

flylib.com © 2008-2017.
If you may any questions please contact us: flylib@qtcs.net