Chapter 4: Partitions and File Systems
| | ||
| | ||
| | ||
Windows systems operate off the concept of logical areas of a disk being appropriated for individual file systems. These logical areas are called partitions, and they might contain different operating systems or file systems. Additionally, available space on a disk might not be partitioned at all and be classified as unpartitioned space. This space is inaccessible to the logical structures of an operating system but can hold both current (if intentionally hidden) as well as legacy data.
Master Boot Record
Disk space is apportioned into partitions through the use of the master boot record (MBR). The MBR determines how partitions are allocated space, what type those partitions are, and which partition is the active partition. The MBR is always located in sector zero, track zero of the disk drive so ROM BIOS knows where to look for executable code.
| |
Understanding the hardware boot process used by Windows allows the computer investigator to contextualize the partitioning schemes used on a hard disk. The boot process itself takes place as a transition from hardware to software, and the details of booting can provide insight into the use of an investigation of multi-partition and multiple operating system cases.
The boot process starts with the powering on of the computer. Pressing the power button no longer controls a relay but instead makes a contact that allows the PS_ON signal to be sent to the power supply, turning on the power to the motherboard itself. There is always a low-power, 5V supply to the motherboard in ATX-style cases whether the power switch is turned on or not. Some power supply units still provide a second, relay-based switch on the supply itself, which actually does disable the main AC power source in addition to the power button.
After power is applied, the CPU performs a basic initialization and then reads the system's ROM BIOS for the location of the first instructions to run. The first instructions, which perform a Power-On Self Test (POST), are then executed. The POST validates that the hardware and CMOS RAM are intact and functioning and then turns control back to the ROM BIOS to search for a boot device.
The boot device location is read from CMOS RAM and can be a floppy disk, hard disk, CD-ROM, network, or other device. In the case of the hard disk, the ROM BIOS reads the first sector of the disk, the MBR, always located at sector zero, track zero for information on the partitions present. After determining the boot partition, a JMP instruction in the boot sector of that partition is loaded and directs the CPU to the location of the first OS code to execute.
In the case of Windows NT/2000/XP, the first instructions to run are the bootstrap code located in the NTLDR. NTLDR provides for the capability to address all of the RAM on the system as well as the ability to read from and write to the file system. The boot.ini file is read from the root directory to determine the location of the operating system to be loaded. For dual boot machines, a menu is provided to select the operating system. If the operating system to be loaded is Windows NT/2000/XP, the NTDetect.exe program is run from the root directory to determine what hardware is present.
The Ntoskrnl.exe and Hal.dll kernel files are then loaded by NTLDR to provide for the raw operating system kernel's booting. These files are located in %SystemRoot%/System32 and provide the basis for later systems operations. After loading these files, the Windows Registry is read, and the associated hardware profile information loaded (or the specific profile selected by the user if multiple profiles are present). Additionally, any necessary device drivers are loaded at this point.
Execute control is transferred to the Ntoskrnl.exe file, which completes the boot sequence. The Smss.exe Session Manager code is executed as are any registry programs set to load on startup. Winlogon.exe is executed to begin the login process, and the Local Security Administration subsystem (lsass.exe) program is executed, culminating in the login prompt for the user.
For Windows 9 x , the IO.SYS and MSDOS.SYS files are loaded in place of the NTLDR. The config.sys and autoexec.bat files are executed to provide any basic configuration information, and then control is transferred over to the actual Windows kernel (win386.exe). Until the point win386.exe takes over, the system is functioning under the limitations of the older DOS operating system.
The win386.exe file reads the registry and loads the necessary device drivers for the basic system hardware. The system fonts are loaded, as is the basic display system. Any specific display drivers are loaded, and finally the desktop and any associated startup programs are executed.
| |
Each drive may be allocated up to four primary partitions, defined in the MBR. Each partition is described in the partition table with a 16-byte entry as shown in Table 4-1.
| LOCATION # | OF BYTES | IDENTIFIER | NOTES |
|---|---|---|---|
| 00h | 1 | Active flag | Set to either 00h or 80h (active), this flag represents status of the partition. |
| 01h | 1 | Start head | The starting head of the partition |
| 02h | 1 (10 bits) | Start sector | The starting sector of the partition |
| 02h | 1 (6 bits) | Start cylinder | The starting cylinder of the partition |
| 04h | 1 | File system | A designator representing the type file system present on the partition. See Appendix D for details on the individual operating system types. |
| 05h | 1 | End head | The ending head of the partition |
| 06h | 1 (10 bits) | End sector | The ending sector of the partition |
| 06h | 1 (6 bits) | End cylinder | The ending cylinder of the partition |
| 08h | 4 | Offset sectors | The number of sectors from the beginning of the partition table to the start of the partition |
| 0Bh | 4 | Total length | The total length of the partition, in sectors |
Only one partition may be designated as active at any time (through the assignment of the value 80h). The boot sector of this partition is provided control of the system upon initial boot, although it might contain a boot loader allowing the transfer of control to other partitions. Windows refers to the active partition as the boot partition. The MBR may be viewed directly using a hex editor and viewing Sector zero, Track zero of a drive. The first two Partition Table entries and part of the bootstrap code are shown in Figure 4-1 using WinHex, which provides a template to view the hex information present.
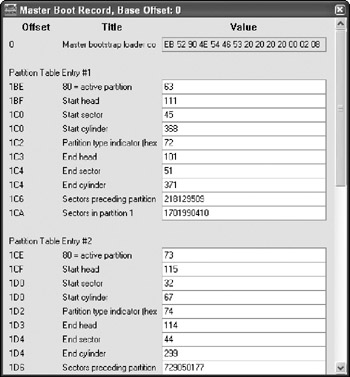
Figure 4-1: Hard disk master boot record
| Warning | The boot partition should not be confused with the system partition. In Windows, the boot partition contains the jump instruction to the location of the boot loader, but the system partition, which contains the operating system, may be different. |
In addition to primary partitions, there can be other partitions present called extended partitions . An extended partition contains an entry in the MBR but instead of pointing to a bootable file system (extended partitions are not generally bootable), the entry points to a virtual MBR located in the place of that partitions boot sector. Under that extended partition entry, additional logical partitions may be added, increasing the total number of partitions permitted on a disk.
| Tip | Command line tools to display partition information are available for all versions of Windows. For Windows 9 x and NT, the fdisk command allows for the viewing of partition information. Likewise, for the Windows 2000/XP/2003 family, the diskpart command allows for the same information to be viewed. |
If when analyzing the MBR you find additional partitions that do not appear in Windows, you will want to look at the File System Type field to determine what file system the partition is based on. That said, this can even be altered if the suspect really wants to disguise the system type, in which case an analysis of the boot sector of that partition is necessary to determine the file system present. If non-Windows file systems are present, an analysis tool capable of analyzing those file systems must be used (such as EnCase) or the appropriate Installable File System (IFS) module for Windows loaded.
Any discrepancy in the size of the disk and the total size allocated to partitions might indicate the presence of unallocated space. Unallocated space is not assigned to any particular partition and may represent a deleted partition, an area of the drive intentionally used to hide information from the operating system, or space that was never assigned to a partition.
| |
Because the MBR controls the boot process itself, it is a popular target for virus infection (although most antivirus programs now protect the MBR to some degree). When a virus or other mechanism corrupts the MBR, the computer investigator might need to repair it to boot a given disk. Repairing an MBR can be fairly straightforward or a major challenge, depending upon the corruption type and the number/types of partitions present.
For Windows 9 x and NT, the fdisk command is used to view, create, delete, and alter partitions. One less-known switch of fdisk is the /mbr switch, which reconstructs the MBR. To repair an MBR on a Windows 9 x or NT machine, do the following:
-
Reboot the machine using a bootable DOS disk that contains the fdisk.exe program.
-
Type fdisk /mbr at the DOS prompt. Wait for the program to finish reconstructing the MBR.
-
Remove the floppy disk and reboot.
The fdisk program will not function properly with Windows 2000/XP/2003. In Windows 2000/XP/2003, the Microsoft Recovery Console provides the tools necessary to automatically repair or reconstruct the MBR. To use the Recovery Console, do the following:
-
Insert a bootable Windows CD for the relevant version of the operating system into the drive and ensure the CD is the first boot device.
-
At the Welcome screen, type R to enter the Recovery Console.
-
Enter the Administrator password.
-
At the command prompt, type fixboot to repair the Windows boot sector.
-
After repairing the boot sector, type fixmbr to repair the MBR.
-
Remove the CD and reboot.
Both toolsets only repair the bootstrap code on the MBR. They do not actually repair the partition tables. To repair the partition tables, the investigator needs to know where each partition begins and ends as well as the type of partition. To gather the data to enter into the partition table:
-
Search the drive using WinHex for the values 55 AAh, which indicate the end of a boot sector. This value will be offset by 01 FEh from the start of the boot sector for Windows machines.
-
Note the start head, sector, and cylinder from WinHex of the location.
-
Note the partition type name. It should be in readable ASCII right after the 3-byte-JMP instruction at the start of the sector. Look up the appropriate partition type for that name in the appendix.
-
Repeat the search to find the next unique boot sector start. Compare the values to the previously found values. Copies of a boot sector might be present on the same partition.
-
Find the start of that boot sector and note the head, sector, and cylinder of the byte immediately preceding it.
-
Calculate the number of sectors as (end-start)/512.
-
Calculate the offset by subtracting that MBR partition table start location from the start location of the boot sector.
-
Repeat to find any other partitions present.
-
Enter the information found directly into the MBR partition table at the appropriate locations.
| |
When an intact, deleted partition is present (for example, the MBR has less than four records and the sectors of the unallocated space can be determined), the examiner will want to use a hex editor to view the boot sector of the suspected deleted partition. Unless a secure wiping utility is used, when a partition is deleted, only the MBR entry for that partition is erased. By reconstructing that MBR entry (use a tool such as WinHex to find the start and stop locations of the partition and partition type then add the appropriate MBR hex values), the partition can be made accessible to forensic analysis. Even if inaccessible, a hex editor can be used to search the unallocated space for text fragments and other data remnants.
| Tip | WinHex is a forensic Hex Editor, providing both traditional hex editing capabilities in addition to support for forensic searches and slack analysis. WinHex is produced by X-Ways Trace and can be found online at http://www.winhex.com. |
| | ||
| | ||
| | ||
EAN: 2147483647
Pages: 71