Exam 70-124: Objective 1.2: Analyzing Your Security Configuration
|
|
After you've carefully configured, tested, and deployed your security solution using security templates and Group Policy, you will want to analyze the security settings from time to time to validate your work and to monitor for changes. Often, changes are made to security settings, such as the temporary promotion of a user to an administrative role, and go unchanged when the situation returns to normal. Other sources of policy change are changes made but not properly documented in your change log or changes made by users who might or might not have a reason to be poking around in your security configuration but either way have found a way to muck it up.
The tools introduced earlier in this chapter come back into play here as you now use them to verify your current settings against your template (ideal) settings. In the next few sections, we examine how the Security Configuration and Analysis snap-in and the command-line tools (secedit.exe, gpresult.exe, and gpotool.exe) can be used as part of a routine check and restore system in order to keep security in your organization where it is supposed to be. A key point to remember as we progress is that the Security Configuration and Analysis snap-in cannot be used to examine settings at the domain or organizational level because the snap-in only compares a specific machine's security configuration against a template.
Using Security Configuration and Analysis
One of the most useful features of the Security Configuration and Analysis snap-in is the ability to compare the desired security policies as they are set up in the template with the actual state of the local machine. The administrator is able to glean a tremendous amount of insight regarding the machine's current security configuration using the Analyze feature of the Security Configuration and Analysis snap-in.
Running the analysis is easy. After you import the security settings from the appropriate templates, all you need to do is right-click the Security Configuration and Analysis node and select the Analyze Computer Now option. Exercise 1.11 walks you through the steps to compare your configured settings against those of a preconfigured template. You need to open an existing database or create a new one in order to perform this analysis. You will test your present security configuration against these entries in the database. If desired, you can apply the settings saved in the database to the computer itself, thus updating the local machine's security configuration.
Exercise 1.11: Analyzing Local Security with the Security Configuration and Analysis Snap-in
-
Right-click Security Configuration and Analysis, and select Open Database (see Figure 1.42).
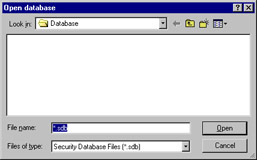
Figure 1.42: The Open Database Dialog Box -
If there is already an existing database, you can open that one. If no databases are currently defined, you can create a new one by entering the name of the database in the File name box. Then click Open.
-
The Import Template dialog box appears (see Figure 1.43). You need to populate the database with security configuration entries. The templates contain this information. Select the template that contains the information that most closely represents the level of security you are interested in (these templates were discussed in Table 1.2), and then click Open.
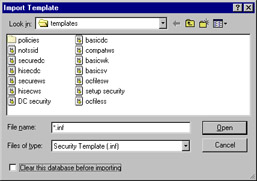
Figure 1.43: The Import Template Dialog Box -
In the right pane, you will see instructions on how to analyze or configure your computer. Right-click the Security Configuration and Analysis node and select Analyze Computer Now. Be careful; if you select Configure Computer Now, it will apply the settings that you have imported into the database to the active security configuration of the computer.
-
After you choose Analyze Computer Now, you will be prompted to give a location in which to store the log files. Use the Browse button to set the correct location. The default name for the log file is database_name.log (where database_name is the name of your database). Click OK to continue.
-
After you click OK, you will be given the Analyzing System Security window shown in Figure 1.44.You can see from this window which component of your system is currently being analyzed. Once this process has finished running, you can see the differences between the template file and your local system.
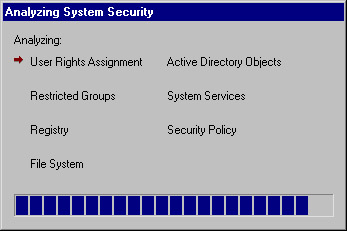
Figure 1.44: Running the Analysis
Examining the Analysis Results
After you've performed the analysis, the time-consuming and critically important next step of inspecting the differences comes into play. You need to look through each node of the analysis results and determine if the results agree with your desired settings for the computer. Should you find that the results are not agreeable, you can change the database setting by right-clicking the configuration item and selecting Security, as shown in Figure 1.45. The change will then be implemented in the database for further analysis and configuration usage.
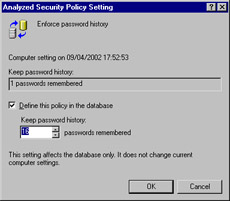
Figure 1.45: Changing Settings from within the Database
Once all the database settings agree with how you want the computer to be, you can apply them by selecting Configure Computer Now. Additionally, you can export the template as previously discussed for easy application to other computers in the same role (workstations or member servers and the like).
Figure 1.46 shows the results of our analysis in the Password Policy node where we had previously made some configurations. As you can see, a difference is shown between the database (security template) settings and those currently configured on the local computer. Because we are configuring and testing this template for deployment, this is not a problem in and of itself. Had we found mismatches such as this one during a routine audit of computer security policies, a problem could exist in the organization.
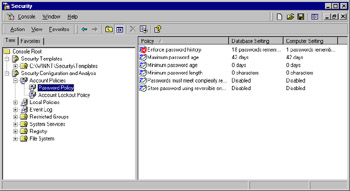
Figure 1.46: Finding Differences in the Password Policies
The following icons are used in the analysis output:
-
Icons with a green check mark indicate that the database setting and the machine settings are the same.
-
Icons with a red X indicate that there is a discrepancy between the entry in the database and that of the actual configuration.
-
The generic icon means that no setting for that security parameter was set in the database, and thus no analysis was performed.
-
Icons with a circled exclamation point or question mark indicate settings that were not analyzed, typically due to not being applicable to the local controller.
In our case, only one setting was different. If this setting was configured correctly (in other words, the way we want it to be when applied to the computer), no action is required. However, should we desire, we can edit the database setting as previously discussed to bring it in line with our expectations.
Using Secedit.exe
The secedit.exe command-line interface allows the administrator to:
-
Analyze system security
-
Configure system security (discussed previously)
-
Refresh security settings
-
Export security settings
-
Validate the syntax of a security template
The secedit command has the following high-level syntax:
secedit [/analyze] [/configure] [/refreshpolicy] [/export] [/validate]
| Test Day Tip | As far at is pertains to this exam, you should concentrate on understanding how secedit can be used to analyze and configure system security. The other functions of secedit are not likely to be tested but are valuable information to have at your disposal nonetheless. |
secedit /analyze
The /analyze switch is used to initiate a security analysis and has the following syntax:
secedit /analyze [/DB filename ] [/CFG filename ] [/log logpath] [/verbose] [/quiet]
Modification parameters include the following.
This command informs secedit.exe as to which database to apply the security analysis results to:
/DB filename
This command points to the location of the template that will be imported into the database for analysis:
/CFG filename
This is the location of the logfile that will be created from the analysis; the default file is used:
/log logpath
This command provides additional screen and log output when analysis is carried out:
/verbose
This prevents any screen or log output:
/quiet
You can still view the results, however, using Security Configuration and Analysis.
secedit /refreshpolicy
The /refreshpolicy switch is used to update system security after changes have been made. It has the following syntax:
secedit /refreshpolicy {machine_policy | user_policy}[/enforce] Modification parameters include the following.
This command updates the security settings for the local computer:
machine_policy
This command updates the security settings for the currently logged in local user account:
user_policy
This command refreshes security settings, even if there have been no changes to the GPO settings:
/enforce
secedit /export
The /export switch is used to export the security template currently stored in the database to an .inf file for storage and later use. It has the following syntax:
secedit /export [/mergedPolicy] [/DB filename ] [/CFG filename ] [/areas area1 area 2...] [/log logPath] [/verbose] [/quiet]
Modification parameters include the following.
This command merges and exports domain and local policy security settings into the .inf file:
/mergedPolicy
This switch informs secedit.exe as to which database to apply the security analysis results to:
/DB filename
This switch points to the location of the template that will be applied to the database:
/CFG filename
This switch causes the current template in the database to be overwritten rather than appended:
/overwrite
This switch allows you to specify a specific security "area" to be configured. The default is all areas:
/area area1 area2...
This switch is the location of the logfile that will be created with details of the security configuration:
/log logpath
This switch provides additional screen and log output:
/verbose
This switch suppresses screen and log output:
/quiet
secedit /validate
The /validate switch is used to validate the syntax of a security template before you import it for analysis or configuration of the system. It has the following syntax:
secedit /validate filename
Modification parameters include the following. The filename of the security template you want to validate:
filename
Areas
The following areas are available for use with the area modifier with the /export switch of secedit:
-
SECURITYPOLICY Local and domain policy for the system, including account policies, audit policies, and so on.
-
GROUP_MGMT Restricted group security.
-
USER_RIGHTS User logon rights and granting of privileges settings.
-
REGKEYS Registry key security settings.
-
FILESTORE File system security settings.
-
SERVICES System services security settings.
Analyzing Security with Secedit.exe
Exercise 1.12 presents the basic process to analyze security on a local computer using the secedit command. This process could also be done over the network using scripting. After the analysis is completed, you can either open the database in the Security Configuration and Analysis snap-in to examine the differences or read through the text log itself if you used the /verbose modifier. Beware—the text file generated using the /verbose modifier can quickly grow into thousands of lines; the log generated by the example in Exercise 1.12 was 5110 lines long, to be exact!
Exercise 1.12: Analyzing Security with Secedit.exe
-
Open a command prompt window by typing CMD in the Run box and clicking OK.
-
From the command prompt, enter the secedit /analyze command with the required modifiers such as secedit /analyze /db c:\sectest\1.sdb /cfg C:\WINNT\security\templates\basicwk.inf /log c:\sectest\1.log /verbose, where the locations and names are specific to your computer. See Figure 1.47.
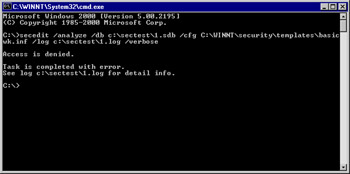
Figure 1.47: Performing an Analysis Using secedit -
You can either view the results in the Security Configuration and Analysis snap-in by opening the database or by viewing the created text log file. Figure 1.48 shows a portion of the text log file indicating a mismatch in the password history size item. Note that we also saw this in Figure 1.44 when we performed analysis using the GUI—the security template used in the two instances was the same one.
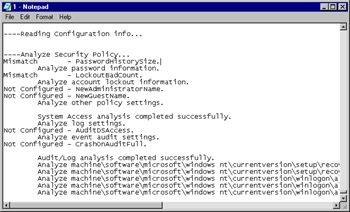
Figure 1.48: Identifying Mismatches in the Text Log Output of secedit -
You might also find the Windows Grep tool, available for download from www.wingrep.com/, very helpful in searching through your log files. Figure 1.49 shows the output of Windows Grep on our log file.
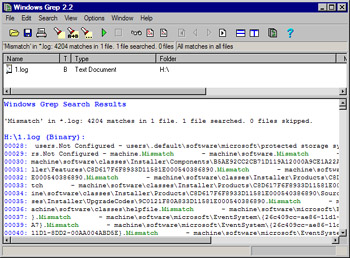
Figure 1.49: Using Windows Grep to Search the Log File
Using Gpresult.exe and Gpotool.exe
These two free utilities are part of the Windows 2000 Resource Kit and can be quite helpful when it comes time to troubleshoot Group Policy application issues. They can be found at www.microsoft.com/windows2000/techinfo/reskit/tools/default.asp.
The gpresult.exe utility can perform the following tasks, plus several others:
-
Provide general information about the operating system, currently logged-in user, and computer
-
The last time policy was applied and the domain controller that applied policy, for the currently logged-in user and computer
-
The complete list of applied Group Policy objects and their details
The gpotool.exe utility can perform the following tasks, plus several others:
-
Check Group Policy object consistency
-
Check Group Policy object replication
-
Display information about a particular Group Policy object, including properties that can't be accessed through the Group Policy snap-in.
| Test Day Tip | You will not be tested on the gpresult.exe or gpotool.exe tools, but they are useful utilities that should be in your administrative and security toolbox. Should you run into problems with your security configurations that deployed in Group Policy, these utilities should be able to provide you with some insight. |
|
|
EAN: 2147483647
Pages: 162