Configuring SMTP Service Domains
|
SMTP virtual servers are configured to support specific service domains. The only types of service domains you can create are alias and remote domains. The default domain is set automatically when you install the virtual server. If necessary, you can set an alias domain as the default.
Viewing Configured Service Domains
Before you create additional service domains on an SMTP virtual server, you should check the domains that are already being serviced by the SMTP virtual servers installed on the Web server. Each virtual server has separate service domains. You can view the configured service domains by completing the following steps:
-
Start the IIS snap-in and then double-click the entry for the virtual server you want to work with.
-
You should now see a node called Domains. When you select this node in the left pane, configured service domains are displayed in the right pane, as shown in Figure 10-4. The domain entries depict two characteristics:
-
Domain Name The DNS name of the service domain, such as microsoft.com
-
Type The type of the service domain such as Local (Default), Local (Alias), or Remote
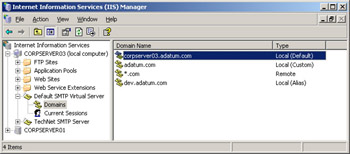
Figure 10-4: SMTP virtual servers can have local alias, local default, and remote service domains.Note Any domains you’ve designated for use with POP3 are listed as domains serviced by the default SMTP Virtual Server. The domain type is set to Local (Custom).
-
-
To view the properties of a service domain, right-click the domain entry and then select Properties from the shortcut menu.
Working with Local Domains
Local service domains are domains that are serviced locally by SMTP. Two types of local domains are available: default and alias. The default domain serves as the default for incoming and outgoing messages. Alias domains allow you to create secondary domains that point to the default domain and use its settings. Messages addressed to the default domain and any associated alias domains are stored in the virtual server’s Drop directory. Outgoing messages use the default domain as their domain of origin.
With local domains you have several administration options. You can:
-
Create alias domains
-
Set the default domain
-
Configure Drop directory location and quota settings
Creating Alias Domains
Alias domains allow you to create secondary domains that point to the default domain. Alias domains use the same configuration settings and the same Drop directory as the default domain.
You can create an alias domain by completing the following steps:
-
Start the IIS snap-in and then double-click the entry for the virtual server you want to work with.
-
Right-click Domains, choose New, and then select Domain. This starts the New SMTP Domain Wizard.
-
Select Alias as the domain type and then click Next.
-
Type the DNS domain name of the alias in the Name field.
Note You can’t use wildcard characters in domain names. For example, you can use tech.microsoft.com, but not *.microsoft.com.
-
Click Finish to create the alias domain.
Setting the Default Domain
The default domain serves as the default for all messages transferred into or out of the domain. Messages addressed to the default domain are stored in the virtual server’s Drop directory. Outgoing messages that don’t have a domain set in the From field of the e-mail address use the default domain as their domain of origin. An SMTP virtual server can have only one default domain.
For the default SMTP virtual server (the one created automatically when you install the SMTP Service), the default domain name is set automatically based on the full computer name as set in the Computer Name tab of the System Properties dialog box. For example, if the system name is corpserver01 and the domain is adatum.com, the full computer name is corpserver01.adatum.com and the default SMTP virtual server sets this name as the default domain service. If you change the computer name or domain association in the System Properties dialog box, the default domain used is updated the next time you start the SMTP service.
If you need to set a new default service domain for other SMTP virtual servers, you do this by renaming the default domain. Follow these steps:
-
Start the IIS snap-in and then double-click the entry for the virtual server you want to work with.
-
Select the Domains node in the left pane. You should see a list of service domains configured on the server.
-
Right-click the default domain and then select Rename from the shortcut menu.
-
Type the domain name you want to use as the default and then press Enter.
Changing the Drop Directory Settings for the Default Domain
The Drop directory is the final destination for all incoming messages addressed to local domains. This means that messages addressed to the local domain and any alias domains are transferred from the Queue to the Drop directory. By default, the Drop directory is located at Inetpub\Mailroot\Drop. You can change the Drop directory settings by completing the following steps:
-
Start the IIS snap-in and then double-click the entry for the virtual server you want to work with.
-
Select the Domains node in the left pane. You should see a list of service domains configured on the server.
-
Right-click the default domain and then select Properties. The Properties dialog box shown in Figure 10-5 on the following page is displayed.
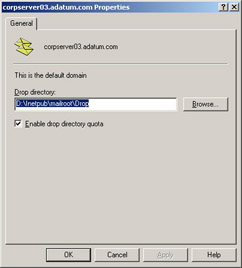
Figure 10-5: The Drop directory is used by the default domain and all alias domains configured on the virtual server. You can change the directory location and quota configuration at any time. -
Type the new location of the Drop directory in the field provided or click Browse to search for a folder. The folder you want to use must be created before you can select it, and it must be on a local drive. If necessary, use Windows Explorer to create the directory before you browse for a folder.
-
You can enforce a quota policy for the Drop directory by selecting Enable Drop Directory Quota. Otherwise, clear this option.
Tip Quotas are useful to restrict the total size of the messages stored in the Drop directory. Quotas are enforced according to the quota policies configured for the directory owner. For more information about working with quotas, see the section entitled “Using, Configuring, and Managing Disk Quotas” in Chapter 14, “Data Sharing, Security, and Auditing” of the Microsoft Windows Server 2003 Administrator’s Companion (Microsoft Press, 2003).
-
Click OK.
Working with Remote Domains
Any message with a nonlocal destination address is queued for delivery to a remote server. By default, the SMTP Service forwards messages directly to the destination SMTP servers as listed in DNS. If you have unique delivery requirements for a specific remote server, you can add a remote domain to the SMTP virtual server and configure the necessary delivery requirements.
Once you create a remote domain, you have different configuration options. The key options are the following:
-
To set relay restrictions
-
To configure support for Extension to SMTP (ESMTP) or standard SMTP
-
To set outbound access and authentication security
-
To queue messages for remote triggered delivery
-
To configure route domains with smart hosts
Creating Remote Domains
Remote domains allow you to set delivery paths and routing for other SMTP servers and mail gateways. You typically configure remote domains for domains to which you commonly send messages. For each remote domain, you can set specific delivery options and require authentication before delivering mail to the domain.
You can create a remote domain by completing the following steps:
-
Start the IIS snap-in and then double-click the entry for the virtual server you want to work with.
-
Right-click Domains, choose New, and then select Domain. This starts the New SMTP Domain Wizard.
-
Select Remote as the domain type and then click Next.
-
Specify the domain’s address space. Typically, this is the DNS domain name of the remote domain.
Tip You can also use a wildcard character in the name so that all- inclusive domains use the same settings. Use an asterisk (*) as the first character, followed by a period (.), and then type the remaining portion of the domain name, such as *.com for all .com domains or *.microsoft.com for all domains ending with microsoft.com.
-
Click Finish to create the remote domain. Select Domains in the left pane of the IIS snap-in. Right-click the remote domain entry in the right pane and then select Properties. You should now set properties for routing and securing message delivery to the remote domain. Click OK when your changes are completed.
Setting and Removing Relay Restrictions for Remote Domains
Mail relaying allows external users to use your mail system to relay messages bound for another organization. By default, the SMTP service is configured to prevent mail relaying, and you typically should maintain this setting to prevent the systems from being used to distribute spam. In this way, external users are unable to relay mail through your SMTP virtual server. Sometimes, however, you’ll want users to be able to relay mail to designated mail gateways. The way you do this is to create a remote domain that specifies the target service domain and then authorizes mail relaying to this service domain.
You can set or remove relay restrictions by completing the following steps:
-
Start the IIS snap-in and then double-click the entry for the virtual server you want to work with.
-
Select the Domains node in the left pane. You should see a list of service domains configured on the server.
-
Right-click the remote domain to which you want to relay mail and then select Properties. The Properties dialog box shown in Figure 10-6 on the following page is displayed.
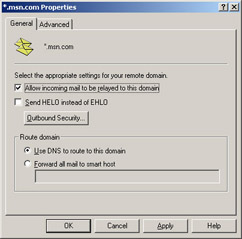
Figure 10-6: You can configure remote domains to allow or prevent mail relaying. Mail relaying is prevented by default. -
To allow mail relaying to the remote domain, select Allow Incoming Mail To Be Relayed To This Domain.
-
To prevent mail relaying to the remote domain, clear Allow Incoming Mail To Be Relayed To This Domain.
-
Click OK.
Switching SMTP Modes Used with Remote Domains
The SMTP service supports standard SMTP and ESMTP. Although ESMTP is more efficient and secure than SMTP, you might want to configure a specific remote domain to use SMTP instead. The most likely scenario in which you’d do this is when the e-mail system in the remote domain doesn’t support ESMTP and you’re receiving error messages when initiating the ESMTP session (see RFC 1651 for more information on ESMTP).
By default, SMTP virtual servers always try to initiate ESMTP sessions using the EHLO session command, but you can change this to the more widely compatible SMTP HELO command. The SMTP service initiates SMTP sessions with other mail servers by issuing a HELO start command. The SMTP service initiates ESMTP sessions with other mail servers by issuing an EHLO start command.
You can change SMTP modes by completing the following steps:
-
Start the IIS snap-in and then double-click the entry for the virtual server you want to work with.
-
Select the Domains node in the left pane. You should see a list of service domains configured on the server.
-
Right-click the remote domain you want to work with and then select Properties. The Properties dialog box shown previously in Figure 10-6 is displayed.
-
The Send HELO Instead Of EHLO check box controls the use of SMTP or ESMTP. To use SMTP, select this option. To use ESMTP (which is the default), clear this option.
-
Click OK.
Queuing Messages for Remote Triggered Delivery
The SMTP service can hold mail for mail clients or gateways that periodically connect to a virtual server and download mail. In this case the client initiates delivery of the mail by issuing an Authenticated Turn (ATRN) command. The ATRN command tells the SMTP service to start sending messages to the remote domain. When you configure remote triggered delivery, you must specify the domain accounts in the enterprise that are authorized to use this feature. You do this by adding the domain accounts to an authorization list.
You can enable remote triggered delivery for named accounts in a remote domain by completing the following steps:
-
Start the IIS snap-in and then double-click the entry for the virtual server you want to work with.
-
Select the Domains node in the left pane. You should see a list of service domains configured on the server.
-
Right-click the remote domain you want to work with and then select Properties.
-
Select the Advanced tab, as shown in Figure 10-7.
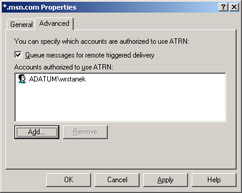
Figure 10-7: You can queue messages addressed to specific users in a remote domain; then the user’s mail client can trigger delivery of those messages. -
To enable remote triggered delivery, select Queue Messages For Remote Triggered Delivery.
-
To specify an authorized account, click Add. This displays the Select Users Or Groups dialog box, which you can use to select users or groups that are in the same Active Directory domain forest or tree.
-
To remove an authorized account, select the account in the Accounts Authorized To Use ATRN list box and then click Remove.
-
Click OK.
Configuring Authentication for Remote Domains
By default, the SMTP service doesn’t authenticate connections to remote domains. This means that the connectors anonymously access remote domains to send messages. You can configure an SMTP virtual server to pass authentication credentials to remote domains, however. The key reasons to do this are when a specific level of authentication is required to access a remote domain and when you’re sending messages to a specific address in the remote domain that requires authentication.
You can use several types of authentication:
-
Basic Standard authentication with wide compatibility. With basic authentication, the user name and password specified are passed as clear text to the remote domain.
-
Integrated Windows authentication Secure authentication for Windows- compatible domains. With this authentication level, the user name and password specified are passed securely to the remote domain using Windows security.
-
Transport Layer Security (TLS) encryption Encrypted authentication for servers with smart cards or X.509 certificates. This type of authentication is combined with basic or Windows authentication.
To configure outbound security for a remote domain, follow these steps:
-
Start the IIS snap-in and then double-click the entry for the virtual server you want to work with.
-
Select the Domains node in the left pane. You should see a list of service domains configured on the server.
-
Right-click the remote domain you want to work with and then select Properties.
-
Click Outbound Security in the General tab to display the dialog box shown in Figure 10-8.
-
To set standard authentication for maximum compatibility, select Basic Authentication.
-
To set secure authentication for Windows-compatible domains, select Integrated Windows Authentication.
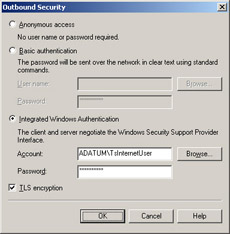
Figure 10-8: Select the outbound security options and add TLS encryption if it’s supported by the remote domain. -
Each authentication mode has associated user account and password fields. Use these fields to set the authentication credentials. If the remote domain is in the same Active Directory domain forest or tree, click Browse to find an account in the remote domain using the Select User dialog box, and then type the account password.
-
If you want to encrypt message traffic and the destination servers in the remote domain support smart cards or X.509 certificates, select the TLS Encryption check box.
-
Click OK.
Tip When you select TLS encryption, the destination servers in the remote domain must support smart cards or X.509 certificates. If the servers don’t, all messages sent to the remote domain are returned with a non-delivery report.
Configuring Smart Hosts for Remote Domains
You can route all outgoing messages for a remote domain through a smart host instead of sending them directly to the destination domain. This allows you to route messages for the remote domain to a specific server. The goal is to route messages over a connection that might be more direct or less costly than the standard route.
You can add or remove a smart host for a remote domain by completing the following steps:
-
Start the IIS snap-in and then double-click the entry for the virtual server you want to work with.
-
Select the Domains node in the left pane. You should see a list of service domains configured on the server.
-
Right-click the remote domain you want to work with and then select Properties.
-
To add a smart host, in the General tab of the Properties dialog box, select Forward All Mail To Smart Host, and then type the IP address or the DNS name of the smart host in the field provided.
Tip If you use an IP address to identify a smart host, enclose the IP address in brackets [] to prevent the SMTP service from attempting to perform a DNS lookup on the address. also that smart host settings for remote domains override smart host settings configured for the SMTP virtual server itself.
-
To remove a smart host, select Use DNS To Route To This Domain.
-
Click OK.
Renaming and Deleting SMTP Service Domains
The service domain name determines how e-mail messages are serviced and routed. If the domain name is incorrect, e-mail can’t be handled properly. For example, if you created a service domain called tec.microsoft.com that should have been tech.microsoft.com, e-mail for tech.microsoft.com won’t be handled properly. Don’t worry, there’s an easy way to fix this. Simply follow these steps to rename the service domain:
-
Start the IIS snap-in and then double-click the entry for the virtual server you want to work with.
-
Select the Domains node in the left pane. You should see a list of service domains configured on the server.
-
Right-click the default domain and then select Rename from the shortcut menu.
-
Type the domain name you want to use as the default and then press Enter.
If you no longer need a service domain, you can delete it. Keep in mind, however, that you can’t delete the default domain.
You delete a service domain by completing the following steps:
-
Start the IIS snap-in and then double-click the entry for the virtual server you want to work with.
-
Select the Domains node in the left pane. You should see a list of service domains configured on the server.
-
Right-click the remote domain you want to delete and then select Delete from the shortcut menu. When prompted to confirm the action, click Yes.
|