Working with SSL
|
Installing a site certificate automatically enables SSL so that it can be used, but you might need to change the default settings. You’ll need to configure and troubleshoot SSL as necessary.
Configuring SSL Ports
Once you install a certificate on a Web site, you can change the SSL port for the site. The SSL port is used for secure communications with client browsers. To view or change the SSL port, follow these steps:
-
In the IIS snap-in, right-click the site you want to work with and then select Properties.
-
The SSL Port field in the Web Site tab shows the currently configured SSL port (if any).
-
As shown in Figure 8-17, change the SSL port by typing a new value in the SSL Port field. Multiple sites can use the same SSL port, provided that the sites are configured to use different IP addresses.
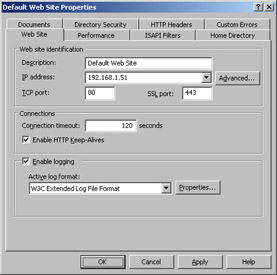
Figure 8-17: Specify a port value for SSL. -
Click OK.
A site can also have multiple SSL identities (meaning the site can answer on different SSL ports). The SSL port configured in the Web Site tab is the one the site responds to by default. All other SSL ports must be specified in the browser request. For example, if you configure SSL for ports 443, 444, and 445, a request for https://yoursite/ is handled by port 443 automatically, but you must specify the other ports to use them, such as https://yoursite:445/.
To configure multiple SSL identities for a site, complete these steps:
-
In the IIS snap-in, right-click the Web site you want to manage, and then select Properties.
-
In the Web Site tab of the Properties dialog box, click Advanced. The Advanced Web Site Identification dialog box is displayed.
-
As shown in Figure 8-18, use the Multiple SSL Identities For This Web Site frame to manage SSL port settings as follows:
-
Add Adds a new SSL identity. Click Add, select the IP address you want to use, and then type an SSL port value. Click OK when you’re finished.
-
Remove Allows you to remove the currently selected entry from the SSL Identities list box.
-
Edit Allows you to edit the currently selected entry in the SSL Identities list box.
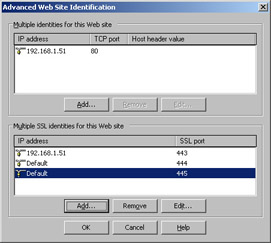
Figure 8-18: Web sites can have multiple SSL identities. The port that is set in the Web Site tab is the primary identity; the others are alternatives that must be specified in a URL request.
-
-
Click OK and then click OK again to save your settings. Click OK a final time to close the Properties dialog box.
Adding the CA Certificate to the Client Browser’s Root Store
Most root CA certificates issued by third-party CAs are configured as trusted CAs in Web browsers. However, if you’re acting as your own CA, client browsers won’t recognize and trust your root CA certificate. To get browsers to trust the root CA certificate, the user must install the certificate in the browser’s authorities store.
To install the root CA certificate, users need to complete the following steps:
-
Connect to your site using a secure URL that begins with https://.
-
As shown in Figure 8-19, the user’s browser displays a security alert stating that there’s a problem with the site’s security certificate.
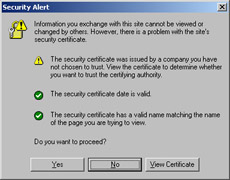
Figure 8-19: A security alert warns that the browser doesn’t trust your root CA. -
The alert is displayed because the user hasn’t chosen to trust your root CA. At this point, the user can elect to proceed by clicking Yes, to cancel the request by clicking No, or to view the root CA certificate by clicking View Certificate.
-
Click View Certificate. This displays the Certificate dialog box.
-
The General tab information should state that the CA Root certificate isn’t trusted. To enable trust, click Install Certificate.
-
This starts the Certificate Import Wizard. Click Next.
-
Choose Automatically Select The Certificate Store Based On The Type Of Certificate, as shown in Figure 8-20, and then click Next.
-
Click Finish. The default options allow the browser to select the certificate store based on the type of certificate.
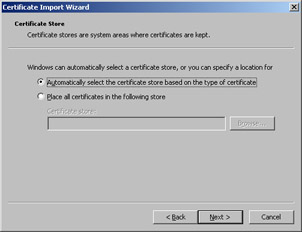
Figure 8-20: In the Certificate Import Wizard, select Automatically Select The Certificate Store Based On The Type Of Certificate. -
Click OK in response to the successful import message that appears, and then click OK to close the Certificate dialog box. The user shouldn’t see the security alert again.
Confirming that SSL Is Correctly Enabled
Secure connections can be established only when the browser connects to the server using a secure URL beginning with https://. Browsers display a warning if any embedded content (such as images) on a secure Web page are retrieved using an insecure (http://) connection. This warning tells users that some of the content on the page is insecure and asks them if they want to continue.
Once you’ve enabled SSL on your server, you should confirm that SSL is working and that the encryption level is set properly. To confirm that SSL is working in Internet Explorer, complete these steps:
-
Access your Web site using a secure URL beginning with https://. A padlock displayed in the bar at the bottom of the Internet Explorer window indicates that an SSL session has been established. If the padlock isn’t displayed, the SSL session wasn’t established.
-
Right-click anywhere on the Web page and then select Properties. This displays a Properties dialog box, which provides summary information on the Web page.
-
Click Certificates and then select the Details tab. Scroll down to display details concerning the certificate and the level of encryption used.
To confirm that SSL is working in Netscape Navigator 7, complete the following steps:
-
Access your Web site using a secure URL beginning with https://. The padlock in the lower right corner of the Navigator window should be closed instead of open. This indicates that an SSL session has been established. If the padlock is open, the SSL session wasn’t established.
-
Click the padlock icon. This displays the Security tab of the Page Info dialog box, which also indicates the level of encryption currently being used.
Resolving SSL Problems
If SSL isn’t working, ensure that you’ve installed the server certificate on the correct Web site and that you’ve enabled SSL on the site. These steps should resolve a server-based SSL problem.
If the encryption level isn’t what you expected, you should check to make sure the browser supports the encryption level you’re using. If a browser supports 128-bit encryption and the encryption level in use according to the browser’s Properties dialog box is 40-bit, the problem is the server certificate. The server certificate must be upgraded to 128-bit encryption.
In Internet Explorer, check encryption support by completing the following steps:
-
From the Help menu, select About Internet Explorer.
-
The Cipher Strength field shows the level of encryption supported. You must have 128-bit support to establish a 128-bit session.
-
Click OK.
-
From the Tools menu, select Internet Options. From the Internet Options dialog box, select the Advanced tab.
-
Scroll down through the Advanced options until you see the Security heading. Ensure that Use SSL 2.0 and Use SSL 3.0 are selected.
-
Click OK.
In Netscape Navigator 7, check encryption support by completing these steps:
-
Click the Edit menu and then select Preferences. This displays the Preferences dialog box.
-
On the left, select the Privacy & Security category, and then select SSL. In the SSL frame, there are three check boxes, all selected by default: Enable SSL Version 2, Enable SSL Version 3, and Enable TLS. Make sure that at least both versions of SSL are selected.
-
Click OK to save your settings.
|