Quick Tips for Managing Files, Folders, and Disk Drives Windows Server 2003 provides many ways to manage files and folders. The most common operations are copy and move. You can copy or move resources within windows ”such as within Windows Explorer ”and between windows ”such as copying a file from Windows Explorer to the My Network Places window. You can also copy or move resources to and from the desktop. Examining File and Folder Properties Windows Explorer, My Computer, and My Network Places all let you examine the properties of files and folders. There are two ways you can do this: Figure 13-1 shows the Properties dialog box for a folder on NTFS. The General tab provides an overview of the folder and allows you to set its attributes. Folder and file attributes include -
Read-Only Shows whether the file or folder is read-only. Read-only files and folders can't be modified or accidentally deleted. -
Hidden Determines whether the file is displayed in file listings. You can override this by telling Windows Explorer to display hidden files. -
Advanced Click the Advanced button to set compression, encryption, and archiving for the file. Figure 13-1. The file and folder Properties dialog boxes are similar. 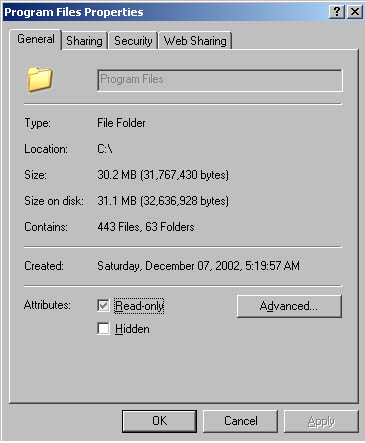 Displaying Hidden and Compressed Files in Windows Explorer As an administrator, you'll often want to see system files, such as dynamic-link libraries (DLLs), and files that have or haven't been compressed. By default, however, Windows Explorer doesn't display hidden file types or differentiate between compressed and uncompressed files. To override the initial settings, select Folder Options from the Tools menu and then select the View tab. You can now configure new settings using the dialog box shown in Figure 13-2. -
To display hidden files, click the Show Hidden Files And Folders button. -
To always display file extensions, clear the Hide File Extensions For Known File Types check box. -
To display operating system files, clear the Hide Protected Operating System Files check box. -
To highlight compressed and encrypted resources, select Show Encrypted Or Compressed NTFS Files In Color. Figure 13-2. Set options for Windows Explorer using the Folder Options dialog box. 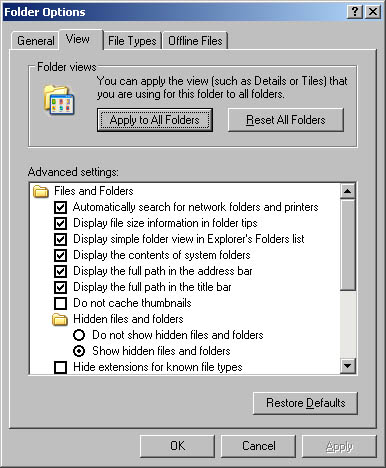 Tips for Selecting Multiple Files and Folders In Windows Explorer you can select individual and multiple files in a variety of ways. Select individual files by clicking them with the mouse. To select multiple files or folders: -
Select multiple resources individually Hold down the Ctrl key and then click the left mouse button on each file or folder you want to select. -
Select a series of resources at once Hold down the Shift key, select the first file or folder, and then click the last file or folder. Tips for Copying and Moving Resources To copy or move items to any open window or visible area on the desktop, complete the following steps: -
Select the item(s) you want to copy or move. Hold down the mouse button and drag the item(s) to the new location. -
If you drag the file or folder to a new location on a different drive, it's copied automatically. To move the file instead, hold down the Shift key as you drag the file or folder. -
If you drag the file or folder to a new location on the same drive, Windows Server 2003 tries to move the item instead. To prevent this, hold down the Ctrl key as you drag the file or folder. Note To copy a file by dragging it, the source and destination location must be visible. This means you might need to open multiple versions of Windows Explorer or multiple windows and expand the folders within these windows as necessary.
Tips for Copying Resources to Locations That Aren't Displayed You might also need to copy items to locations that aren't currently displayed. To do this, follow these steps: -
Select the item(s) you want to copy. Hold down the mouse button and drag the item(s) into the Folders pane. -
Slowly drag the items up to the last visible folder at the top of the pane (or down to the last visible folder at bottom of the pane). You should be able to scroll up or down slowly through the existing tree structure. -
When you find the destination folder, release the mouse button. If it's on a different drive, the item is copied. Otherwise, it's moved. Tips for Copying and Pasting Files I prefer to move files around by copying and pasting. When you copy and paste files, you don't have to worry about whether the file will be copied or moved. You simply copy files to the Microsoft Clipboard and paste them anywhere you like. You can even paste copies of files in the same folder ”something you can't do by dragging. To copy and paste files, follow these steps: -
Select the item(s) you want to copy. Right-click and select Copy from the shortcut menu. You could also select Copy from the Edit menu or press Ctrl+C. -
Access the destination location, then right-click and select Paste from the shortcut menu. You could also select Paste from the Edit menu or press Ctrl+V. Note Windows Server 2003 might not let you copy files and folders to special windows. For example, you generally can't copy a file and then paste it into the My Computer window. Similarly, you might not be able to copy items in special folders and paste them into other windows.
Moving Files by Cutting and Pasting To move files by cutting and pasting, follow these steps: -
Select the item(s) you want to move. Right-click and select Cut from the shortcut menu. You could also select Cut from the Edit menu or press Ctrl+X. -
Access the destination location, and then right-click and select Paste from the shortcut menu. You could also select Paste from the Edit menu or press Ctrl+V. -
When prompted to move the selected items, click OK. Note When you use the CUT and PASTE commands, Windows Server 2003 doesn't delete the item(s) from the original location immediately. The CUT command simply places references to the item(s) on the Clipboard. After you use the PASTE command to paste the file to the new location, the file is copied to the new location and then deleted from the old location.
Formatting Floppy Disks and Removable Disks Windows Explorer makes it easy to work with floppy and other removable disks. You can format disks by doing the following: -
Insert the floppy or other removable disk you want to format. -
Right-click the floppy or other removable disk's icon in Windows Explorer's Folders pane. -
Select Format from the shortcut menu, and then use the Format dialog box to set the formatting options. For floppy disks, the only available file system type is FAT. For removable disks, such as Zip, you can use FAT, FAT32, or NTFS. Note If you format removable disks as NTFS volumes, they're formatted as NTFS 5.0 volumes. Unlike Windows NT 4.0, Windows 2000 and Windows Server 2003 allow you to eject volumes formatted as NTFS at any time. Click the eject button on the removable drive or right-click the drive icon in Windows Explorer and then select Eject.
-
Click the Start button to begin formatting the floppy or other removable disk. Copying Floppy Disks To copy a floppy disk, follow these steps: -
Right-click the floppy disk icon in Windows Explorer's Folders pane, and then select Copy Disk from the shortcut menu. -
Use the Copy Disk dialog box to select the source and destination drives. In the Copy From area, select the drive you want to use as the source. In the Copy To area, select the drive you want to use as the destination. If you only have one floppy drive, the source and destination drive will be the same (as shown in Figure 13-3). -
Click the Start button when you're ready to begin copying, and then insert the source and destination disks when prompted. The progress bar in the lower area of the Copy Disk dialog box shows the progress of the copy operation. Figure 13-3. Use the Copy Disk dialog box to select the source and destination drives.  |