| Windows Server 2003 has several remote connectivity features. With remote assistance, invitations can be sent to support technicians, allowing them to service a computer remotely. With Remote Desktop, users can connect remotely to a computer and access its resources. In this section you learn how to configure Remote Assistance and Remote Desktop. By default, neither of the remote connectivity features are enabled. You must manually enable the remote assistance and remote desktop features. Configuring Remote Assistance Remote Assistance is a useful feature for help desks to take advantage of. Not only can administrators allow higher-level support personnel to view the server's desktop, but administrators can also allow the support personnel to take control of the desktop and solve problems. This feature could be used to walk junior administrators through a complex process or even to manage system configuration while another administrator watches the progress of the changes. The key to remote assistance is in the access levels that you grant. Note By default, remote assistance is configured to allow support personnel to view and remotely control desktop computers running Windows XP Professional. Anyone logged on to a Windows Server 2003 system can send assistance invitations to internal and external resources, and this might present a security concern for organizations. To reduce potential security problems, you might want to allow support staff to view but not control desktop computers.
To configure remote assistance, follow these steps: -
Double-click the System utility in the Control Panel and then select the Remote tab. -
To disable remote assistance, clear Allow Remote Assistance Invitations and then click OK. Skip the remaining steps. -
To enable remote assistance, select Allow Remote Assistance Invitations. Afterward, click Advanced. This displays the Remote Assistance Settings dialog box shown in Figure 5-4. Figure 5-4. Use the Remote Assistance Settings dialog box to set limits for remote assistance. 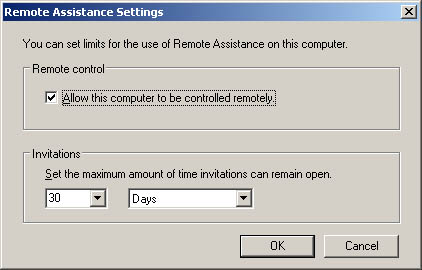 -
The Allow This Computer To Be Controlled Remotely option sets limits for Remote Assistance. When selected, this setting allows assistants to view and control the computer. To provide view-only access to the computer, clear this check box. -
The Invitations options control the maximum time window for invitations. You can set a value in minutes, hours, or days, up to a maximum of 30 days. If you set a maximum limit value of 10 days, for example, you can create an invitation with a time limit up to, but not more than, 10 days. The default maximum expiration limit is 30 days. Security Alert Another key aspect of remote assistance that you can control is the time limit for invitations. The default maximum time limit is 30 days. Although the intent is to give support personnel a time window in which to respond to requests , it also means that they could use an invitation to access a computer over a period of 30 days. For instance, suppose you send an invitation with a 30-day time limit to a support person who resolves the problem the first day. That person would then still have access to the computer for another 29 days, which wouldn't be desirable for security reasons. To reduce the risk to your systems, you'll usually want to reduce the default maximum time limit considerably ”say, to 1 hour . If the problem isn't solved in the allotted time period, you can issue another invitation.
-
Click OK twice when you're finished configuring Remote Assistance options. Configuring Remote Desktop Access Unlike Remote Assistance, which provides a view of the current user 's desktop, Remote Desktop provides several levels of access: -
If you're currently logged on to the desktop locally and you then try to log on remotely, the local desktop locks automatically and you can access all of the currently running applications just as if you were sitting at the keyboard. This feature is useful if you want to work from home or an alternate location, allowing you to continue to work regardless of whether you're at the keyboard. -
If you're listed on the computer's remote access list and not logged on otherwise , you can initiate a new Windows session. The Windows session will behave just as if you were sitting at the keyboard and can be used when other users are also logged on to the computer. In this way, multiple users could access the same server simultaneously . Remote desktop isn't enabled by default. You must specifically enable it, thereby allowing remote access to the computer. When it's enabled, any members of the Administrators group can connect to the computer. Other users must be placed specifically on a remote access list to gain access to the computer. To configure remote access, follow these steps: -
Double-click the System utility in the Control Panel and then select the Remote tab. -
To disable remote desktop access, clear Allow Users to Connect Remotely and then click OK. Skip the remaining steps. -
To enable remote desktop access, select Allow Users to Connect Remotely. Afterward, click Select Remote Users. -
To grant remote desktop access to a user, click Add. This opens the Select Users dialog box. In the Select Users dialog box, type the name of a user you want to use in the Name text box and then click Check Names. If matches are found, select the account you want to use and then click OK. If no matches are found, update the name you entered and try searching again. Repeat this step as necessary and then click OK when finished. -
To revoke remote access permissions for a user account, select the account and then click Remove. -
Click OK twice when you're finished. Making Remote Desktop Connections As an administrator, you can make remote desktop connections to Windows servers and workstations. With Windows 2000 Server, you enable remote desktop connections by installing Terminal Services and then configuring Terminal Services in remote access mode. With Windows XP, remote desktop connections are enabled by default and all administrators are granted access automatically. With Windows Server 2003, Remote Desktop is installed automatically but not enabled until you specifically do so. One way to make a remote desktop connection to a server or workstation is to follow these steps: -
Choose Start, then Programs or All Programs as appropriate, then Accessories, then Communications, and then Remote Desktop Connection. This displays the Remote Desktop Connection dialog box. -
In the Computer field, type the name of the computer to which you want to connect. If you don't know the name of the computer, use the drop-down list provided to choose an available computer or select Browse For More on the drop-down list to display a list of domains and computers in those domains. -
By default, Windows Server 2003 uses your current user name, domain, and password to log on to the remote computer. If you want to use different account information, click Options and then enter values in the related User Name, Password, and Domain fields. -
Click Connect. Enter your account password if prompted, and then click OK. If the connection is successful, you'll see the Remote Desktop window on the selected computer and you'll be able to work with resources on the computer. In the case of a failed connection, check the information you provided and then try to connect again. Note Clicking Options in the Remote Desktop Connection dialog box displays additional options for creating and saving connections. These advanced options allow you to change display size for the remote desktop; manage connections to local resources, such as printers, serial ports, and disk drives ; run programs automatically on connection; and enable or disable local caching and data compression.
While Remote Desktop Connection is easy to use, it isn't the best tool to use if you routinely connect to computers remotely. Instead, you'll want to use the Remote Desktops console. With Remote Desktops, you can configure connections for multiple systems and afterward, you can easily switch between connections. You'll find Remote Desktops as an option on the Administrative Tools menu. Figure 5-5 shows the console with connections configured for CorpServer01, CorpServer02, CorpServer03, and CorpServer04. These connections were added by right-clicking the Remote Desktops node in the console, selecting Add New Connection and then entering the server name (or IP address) and the necessary logon information. The requirements are the same as for the Remote Desktop Connection utility. Once you define a connection, you can connect to the server and display the remote desktop simply by clicking the connection entry. If for some reason the connection fails, you can force Windows to try to connect again by right-clicking the connection and selecting Connect. Figure 5-5. If you routinely connect to remote systems, Remote Desktops should be your tool of choice. You can configure persistent connection information and then establish connection simply by clicking. 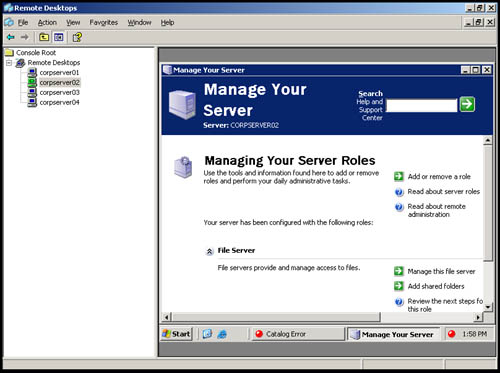 |