11.9. Planning, Implementing, and Maintaining Group Policy Group Policy is critical for proper domain operations. You configure and maintain Group Policy to manage computer and user security, to configure the user environment, and to configure the computer environment.
Tip: Group Policy affects only Windows 2000 and later computers. Computers running pre-Windows 2000 operating systems do not support Group Policy.
11.9.1. Understanding Group Policy Group Policy is as a set of rules that you can apply to help you manage users and computers. Active Directory defines two distinct sets of policies:
Computer policies Applied to computers that are stored under Computer Configuration in Group Policy
User policies Applied to users that are stored under User Configuration in Group Policy Use Computer Configuration settings to configure policy on a per-computer basis. Use User Configuration settings to configure policy on a per-user basis. The way Group Policy is processed depends on the type of policy. When a computer is started and the network connection is initialized, computer policy settings are applied and a history of the registry-based settings that were applied is written to %AllUsersProfile%\Ntuser.pol. When a user logs on to a computer, user policy settings are applied, and a history of the registry-based settings that were applied is written to %UserProfile%\Ntuser.pol. Once applied, Group Policy settings are automatically refreshed to keep settings current and to reflect any changes. By default, Group Policy is refreshed every 5 minutes on domain controllers and every 90 to 120 minutes on other computers. Group Policy is refreshed every 16 hours in full. Slow link and policy-processing settings can affect when refresh occurs. You can use Group Policy to manage settings on all workstations and servers running Windows 2000 or later. You can't use Group Policy to manage Windows NT, Windows 95, Windows 98, Windows Me, or Windows XP Home Edition. Group Policy is applied using Group Policy Objects (GPOs). GPOs contain settings that are applied according to the Active Directory structure in place. Sites, domains, and organizational units all have related Group Policy Objects. The settings of top-level GPOs are inherited by lower-level GPOs. For local environments, a subset of Group Policy called Local Group Policy is available that allows you to manage policy settings that affect everyone who logs on to a local machine. Local Group Policy is managed through the Local Group Policy Object (LGPO). All computers have an LGPO. Its settings have the least precedence and can be superseded by site, domain, and OU settings. Although domain controllers have LGPOs, Group Policy for domain controllers should be managed through the Default Domain Controllers Policy. 11.9.2. Using Group Policy Manage Group Policy by configuring policy settings. Policy settings can be enabled, disabled, or not configured. Enabled policy settings are active and applied. Disabled policy settings are inactive and not applied or enforced. Not configured policy settings are not being used. Inheritance and blocking can affect the meaning of these states. If inherited policy settings are enforced, you cannot override them and the inherited policy setting is applied as per the configured state. If inherited policy settings are blocked and inheritance is not enforced, the inherited policy setting is overridden and does not apply. Each GPO has a specific inheritance precedence. Everyone who logs on to the local machine is affected by Local Group Policy. Active Directory-based policy settings are applied in this basic order: site, domain, OU. By default, when policy is set at one level, the setting applies to all objects at that level and all objects in the levels below due to inheritance. Unless it is blocked, here's how inheritance works: A policy setting applied at the site level affects all users and computers located within domains and OUs that are part of the site. A policy setting applied at the domain level affects all users and computers located within OUs that are part of the domain. A policy setting applied at the OU level affects all users and computers defined within the OU as well to child OUs.
11.9.3. Understanding GPO Links and Default GPOs Before you can move on to more advanced Group Policy topics, you must understand two fundamental concepts: GPO links. and default GPOs GPO links affect the way policy is applied. Default GPOs are special-purpose policy objects that Active Directory depends on to establish baseline security settings for domain controllers and domains. In Active Directory, all GPOs are stored in the Group Policy Objects container. This container is replicated to all domain controllers in a domain. The link between a domain, site, or OU is what makes a GPO active and applicable to that domain, site, or OU. You can link a GPO to a specific site, domain, or OU. You can also link a GPO to multiple levels, such as to a site and a domain. If you unlink a GPO from a site, domain, or OU, you remove the association between the GPO and that site, domain, or OU. You can work with Group Policy in a variety of ways. For managing Local Group Policy, you can use the Local Security Policy tool. For managing Active Directory Group Policy, you can use the Group Policy Object Editor (GPOE), which is included with a standard installation of Windows Server 2003, or the Group Policy Management Console (GPMC), which is available as a free download from the Microsoft Download Center (http://www.microsoft.com/downloads). When you create a domain, two GPOs are created by default:
Default Domain Controllers Policy GPO This is the default GPO created for and linked to the Domain Controllers OU. It is applied to all domain controllers in a domain (as long as they aren't moved from the Domain Controllers OU). Use this GPO to manage security settings for domain controllers in a domain.
Default Domain Policy GPO This is the default GPO created for and linked to the domain within Active Directory. It is used to establish policy settings that apply to all users and computers in a domain. These default GPOs are essential for processing of Group Policy. By default, the Default Domain Controllers Policy GPO has the highest precedence among GPOs linked to the Domain Controllers OU, and the Default Domain Policy GPO has the highest precedence among GPOs linked to the domain. You should edit the Default Domain Policy GPO only to manage the default Account Policies settings for: Password Policy Account Lockout Policy Kerberos Policy
You should manage other areas of domain policy by creating a new GPO and linking it to the domain or an appropriate OU within the domain. You should also manage these Computer Configuration\Windows Settings\Security Settings\Local Policies\Security options using the Default Domain Policy GPO:
Accounts: Rename Administrator Account Renames the built-in Administrator account on all computers throughout the domain.
Accounts: Rename Guest Account Renames the built-in Guest account on all computers throughout the domain.
Network Security: Force Logoff When Logon Hours Expire Forces users to log off from the domain when logon hours expire.
Network Access: Allow Anonymous SID/Name Translation Determines whether an anonymous user can request security identifier (SID) attributes for another user. This setting should only be enabled for backward compatibility with Windows NT applications that require this feature. In the GPMC, the Default Domain Policy GPO is listed when you click the domain name in the console tree. Right-click the Default Domain Policy node and select Edit to get full access to the Default Domain Policy GPO. If you want only to work with security settings in the Default Domain Policy GPO, you can use the Domain Security Policy console on the Administrative Tools menu. Use the Default Domain Controllers Policy GPO to ensure that all domain controllers in a specified domain have the same security settings. In the GPMC, the Default Domain Controllers Policy GPO is listed when you click the Domain Controllers node in the console tree. Right-click the Default Domain Controllers Policy and select Edit to get full access to the Default Domain Controllers Policy GPO. If you want only to work with security settings in the Default Domain Controllers Policy GPO, you can use the Domain Security Policy console on the Administrative Tools menu. By default, all domain controllers are placed in the Domain Controllers OU. This means any policy setting changes you make to the Default Domain Controllers Policy GPO will apply to all domain controllers by default. Microsoft recommends that you edit the Default Domain Controllers Policy GPO only to configure User Rights Assignment and Audit Policy. You may also want to set Security Options and event log settings. 11.9.4. Working with Group Policy As an administrator, you'll work with both Local Group Policy and Active Directory Group Policy. Local Group Policy applies only to a local machine, and there is only one Local GPO per local machine. With Active Directory Group Policy, each site, domain, and OU can have its own GPOs. To work with Active Directory Group Policy, you can the Group Policy Object Editor (GPOE). or the Group Policy Management Console (GPMC) Figure 11-32 shows Group Policy being accessed in the Group Policy Object Editor. Figure 11-32. Accessing Group Policy. 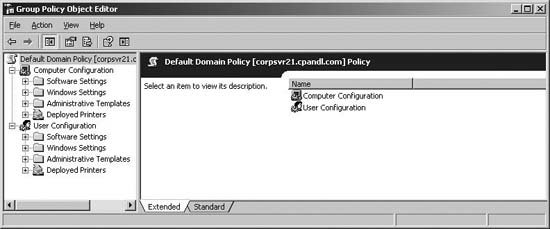
Group Policy applies only to users and computers. Group Policy settings are divided into two categories:
Computer Configuration This contains settings that apply to computers.
User Configuration This contains settings that apply to user accounts. These two categories are divided further into several major classes of settings, including:
Software Settings Provides settings for automating deployment of new software and software upgrades, and for uninstalling software.
Windows Settings Provides settings for managing Windows settings for both computers and users. For computers, you can manage security settings and startup/shutdown scripts. For users, you can also manage Remote Installation Services, Folder Redirection, Internet Explorer maintenance, security settings, and logon/logoff scripts.
Administrative Templates Provides settings for managing registry settings that configure the operating system, Windows components, and applications. 11.9.5. Implementing Group Policy Manage Group Policy on a local machine using Local Group Policy. Manage Group Policy for Active Directory using the Active Directory Group Policy. Whenever you work with Active Directory Group Policy, any changes you make to policy settings are made first on the domain controller acting as the PDC Emulator if it is available. In this way, replication of changes is simplified because there is one central point of contact. If the PDC Emulator is unavailable when you try to edit policy settings, you are able to choose the domain controller on which changes should be made. 11.9.5.1. Managing Local Group Policy To work with Local Group Policy, you must use an administrator account. You can access Local Group Policy by typing: gpedit.msc /gpcomputer:"%computername%"
where %computername% is an environment variable that sets the name of the local computer and must be enclosed in double quotation marks. Or by typing: gpedit.msc /gpcomputer:"RemoteComputer"
where RemoteComputer is the name of a remote computer enclosed in double quotation marks, such as: gpedit.msc /gpcomputer:"engsvr25"
You can also access Local Group Policy by completing the following steps: At a command prompt, type mmc. Click File  Add/Remove Snap-In. Add/Remove Snap-In. In the Add Standalone Snap-In dialog box, click Group Policy Object Editor, and then choose Add. The Select Group Policy Object page is displayed with the Local Computer selected as the Group Policy Object target. Click Finish. In the Add Standalone Snap-In dialog box, click Close. In the Add/Remove Snap-In dialog box, click OK.
Tip: If you want only to work with security settings in Local Group Policy, you can use the Local Security Policy console. Click Start Programs  Administrative Tools Local Security Policy. Local Security Policy is not available if you are working on a domain controller. Administrative Tools Local Security Policy. Local Security Policy is not available if you are working on a domain controller.
Editing a GPO On the Group Policy tab, you can edit an existing GPO linked to the selected container by selecting it, and then clicking Edit. This displays the Group Policy Object Editor dialog box. You can then make changes to Group Policy as necessary; these changes are applied the next time Active Directory is refreshed. To edit a policy, double-click it to display a properties dialog box similar to the one shown in Figure 11-34, and then configure the policy as appropriate. Figure 11-34. Configuring a policy. 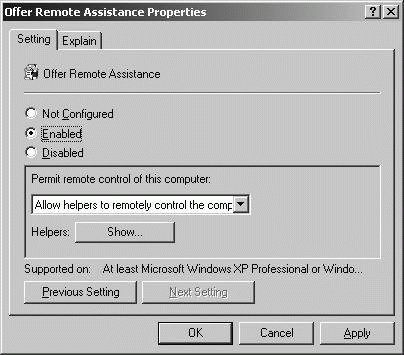
Linking to an existing GPO In the Group Policy tab, you can link to an existing GPO by clicking Add. This displays the Add A Group Object Link dialog box, as shown in Figure 11-35. Select the All tab to see all the GPOs that are available. Select the one you want to which you want to link, and then click OK. The linked policy is applied the next time Active Directory is refreshed. Figure 11-35. Linking to an existing GPO. 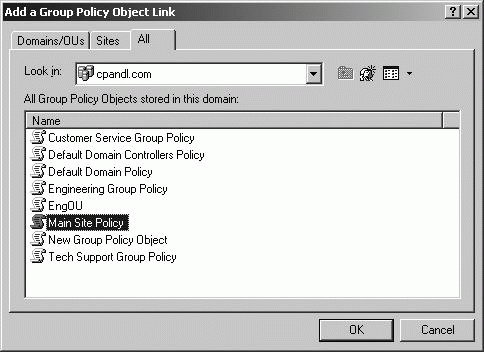
Deleting a GPO In the Group Policy tab, you can remove an existing GPO by selecting it, and then clicking Delete. As Figure 11-36 shows, you can then Remove The Link From The List so that the GPO no longer applies to the container, or you can Remove The Link And Delete so the GPO no longer applies and is deleted permanently. Figure 11-36. Deleting a GPO. 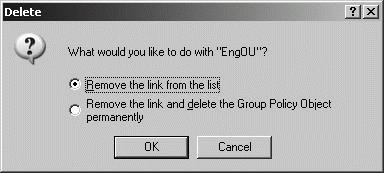 11.9.5.3. Configuring Administrative Templates Administrative Templates are used to manage the Windows graphical user interface (GUI). You can use Administrative Templates to manage:
Control Panel These settings determine how the Control Panel and Control Panel utilities can be used.
Desktop These settings are used to configure the Windows desktop and the available options from the desktop.
Network These settings are used to configure networking and network client options for offline files, DNS clients, and network connections.
Printers These settings are used to configure printer settings, browsing, spooling, and directory options.
Shared folders These settings are used to allow publishing of shared folders and Distributed File System (DFS) roots.
Start Menu and Taskbar These settings determine the available options and configuration of the Start Menu and taskbar.
System These settings are used to configure system settings for disk quotas, user profiles, user logon, system restore, error reporting, etc.
Windows Components These settings determine the available options and configuration of various Windows components, including Event Viewer, Internet Explorer, Task Scheduler, Windows Installer, and Windows Updates. Administrative Templates policy settings are registry-based, meaning changes you make to these settings affect actual registry settings. Each set of Administrative Templates is defined using an administrative template (.adm) file. Administrative template files do not affect the processing of policy. Instead, they are used to display the settings that can be configured. If a .adm file is removed from a GPO, the settings are not displayed in the Group Policy Object Editor. However, the settings will continue to be applied because the setting details are stored in the Registry.pol file associated with the GPO. Every Windows computer has default administrative templates. With Windows XP Professional with Service Pack 1 or later and Windows Server 2003, the default administrative templates include Conf.adm, Inetres.adm, System.adm, Wmplayer.adm, and Wuau.adm. These files are stored in the %Windir%\inf folder. When you create a new GPO, the default administrative templates on your system generally determine the default templates that are available initially and then stored with the GPO. Two GPO settings can be used to modify this behavior:
Turn Off Automatic Updates Of ADM Files under User Configuration\Administrative Templates\System\Group Policy When this setting is enabled and you edit a GPO, the .adm files on your computer are compared with those stored in the GPO. If any .adm files on your computer have a newer timestamp, those files are written to the GPO.
Always Use Local ADM Files For Group Policy Editor under Computer Configuration\Administrative Templates\System\Group Policy When this setting is enabled and you edit a GPO, the .adm files on your computer are used to determine the Administrative Templates options. You can edit a GPO and determine which .adm files are being in the GPO by completing the following steps: Open Active Directory Users and Computers. In the console tree, right-click the domain or OU you want to work with, and then select Properties. In the Properties dialog box, click the Group Policy tab. On the Group Policy tab, you can edit an existing GPO linked to the selected container by selecting it, and then clicking Edit. In the Group Policy Object Editor dialog box, expand the User Configuration node. Right-click Administrative Templates, and then select Add/Remove Templates. As shown in Figure 11-37, the current templates are listed by name, size, and date modified. Figure 11-37. Viewing the .adm files for a GPO. 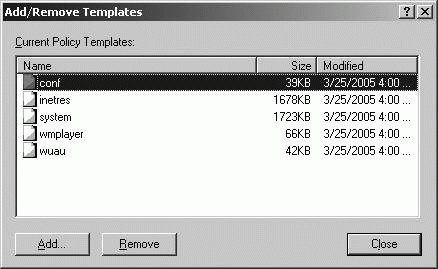
When the Add/Remove Templates dialog box is displayed, you can import additional templates into the GPO, such as custom templates you've created or those for Microsoft Office. To do this, complete the following steps: Click Add. In the Policy Templates dialog box, select the .adm files you want to add, and then click Open. The selected templates are added to the GPO for your use.
11.9.5.4. Managing policy inheritance and processing With Active Directory Group Policy, GPOs can be linked to sites, domains, and OUs. When you create and link a GPO to a site, domain, or OU, the GPO is applied to the user and computer objects in that site, domain, or OU according to the current inheritance and preference options. By default, Group Policy settings are inherited from top-level containers by lower-level containers (unless inheritance is blocked or overridden). Because of this, a setting in a top-level GPO can affect every user and computer throughout the enterprise. The end result of inheritance and policy processing is referred to as the Resultant Set of Policy (RSoP). The order in which policies are applied determines which policy settings take effect if multiple policies modify the same settings. When multiple policies are in place, the policies are applied in the following order: Local computer policy Site policy Domain policy OU policy
If there are conflicts among the policy settings, the settings applied later have precedence by default. This means they overwrite previously applied settings. Most policies have three configuration options: Not Configured, Enabled, and Disabled. The default state of most policies is Not Configured, meaning the policy setting is not configured and does not apply. If a policy is set to Enabled, the policy is enforced and does apply to users and computers that are subject to the GPO. If a policy is set to Disabled, the policy is not enforced and does not apply to users and computers that are subject to the GPO. You can change inheritance in several ways: You can override a policy setting that is enabled in a higher-level container by disabling it in a lower-level policy. In Active Directory Users And Computers, right-click the domain or OU you want to work with, and then select Properties. In the Properties dialog box, click the Group Policy tab, select the GPO you want to work with, and then click Edit. After you locate the policy setting to override, double-click it, select Disabled, and then click OK. You can override a policy setting that is disabled in a higher-level container by enabling it in a lower-level policy. In Active Directory Users And Computers, right-click the domain or OU you want to work with, and then select Properties. In the Properties dialog box, click the Group Policy tab, select the GPO you want to work with, and then click Edit. After you locate the policy setting to override, double-click it, select Enabled, and then click OK. You can block inheritance so that no policy settings from higher-level containers are applied. In Active Directory Users and Computers, block inheritance by right-clicking the domain or OU that should not inherit settings from higher-level containers and selecting Properties. In the Group Policy tab of the Properties dialog box, select Block Policy Inheritance, and then click OK. Enforce inheritance to prevent administrators who have been delegated authority over a container from overriding the inherited Group Policy settings. In Active Directory Users And Computers, enforce inheritance by right-clicking the domain or OU that should be required to inherit settings from higher-level containers and selecting Properties. In the Group Policy tab of the Properties dialog box, select No Override, and then click OK.
Tip: For Exam 70-294, you'll need a strong understanding of inheritance and how it can be enforced, blocked, or overridden.
By default, the policy settings applied to a GPO apply to all users and computers in the container to which the GPO is linked. The GPO applies to all users and computers because the default settings of GPOs specify that Authenticated Users have Read permission as well as Apply Group Policy permission. Since both user accounts and computer accounts are considered to be types of authentication users, all users and computers with accounts in the domain are affected by the policy. By default, Computer Configuration settings are applied during startup of the operating system, and User Configuration settings are applied when a user logs on to a computer. You can modify Group Policy processing by disabling a policy in whole or in part. In Active Directory Users And Computers, you can enable and disable policies partially or entirely by completing the following steps: In Active Directory Users And Computers, right-click the domain or OU you want to work with, and then select Properties. In the Properties dialog box, click the Group Policy tab, select the GPO you want to work with, and then click Edit. To disable a GPO entirely, select the GPO, and then click Options. In the Options dialog box, shown in Figure 11-38, select Disabled. When prompted to confirm the action, click Yes, and then click OK. To later enable the GPO, you would repeat this process and clear the Disabled checkbox. Figure 11-38. Disabling a GPO. 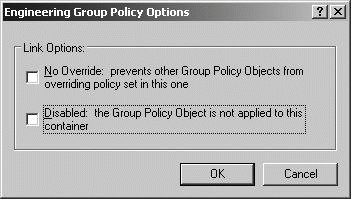 To disable a GPO partially, select the GPO, and then click Properties. In the Properties dialog box, shown in Figure 11-39, select or clear Disable Computer Configuration Settings and Disable User Configuration Settings as necessary. Figure 11-39. Disabling computer or user settings. 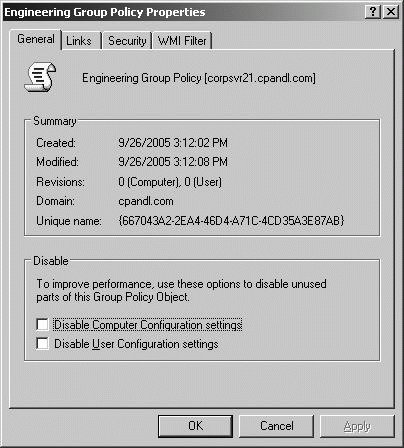
11.9.6. Planning Group Policy Application Using Resultant Set Of Policy Resultant Set Of Policy (RSoP) can be used for planning and logging purposes. Using RSoP Planning mode is discussed in this section. Using RSoP Logging mode is discussed in the section of this chapter titled, "Troubleshooting the application of Group Policy security settings." In Planning mode, RSoP can be used for testing different scenarios for modifying Computer Configuration and User Configuration settings. Using Planning mode, you can model the effects of: Modifying policy settings Moving a user or computer to another container in Active Directory Adding a user or computer to an additional security group
You work with RSoP using the Resultant Set Of Policy snap-in. After you install the AdminPak, you can add this snap-in to a custom console by completing these steps: Type mmc at a command prompt. Click File Add/Remove Snap-in. Click Close, and then click OK.
You can start planning and testing various scenarios by completing these steps: In the Resultant Set Of Policy snap-in, right-click the Resultant Set Of Policy node, and then select Generate RSoP Data. Click Next. Select Planning Mode, and then click Next to display the User And Computer Selection page, as shown in Figure 11-40. Figure 11-40. Select the user and computer containers. 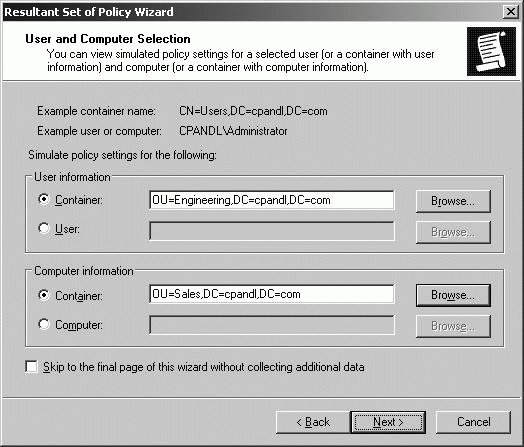 Under User Information, select Container, and then click Browse to display the Choose User Container dialog box, which you can use to choose any of the available user containers in the selected domain. Under Computer Information, select Container, and then click Browse to display the Choose Computer Container dialog box, which you can use to choose any of the available computer containers in the selected domain. Click Next. On the Advanced Simulation Options page, select any advanced options for slow network connections, loopback processing, and sites as necessary, and then click Next. On the User Security Groups page, shown in Figure 11-41, you can simulate changes to security group membership to model the results on Group Policy. Any changes you make to group membership affect the previously selected user container. For example, if you want to see what would happen if a user in the designated user container is a member of the Administrators group, you could add this group to the Security Groups list. Click Next. Figure 11-41. Simulating security group changes. 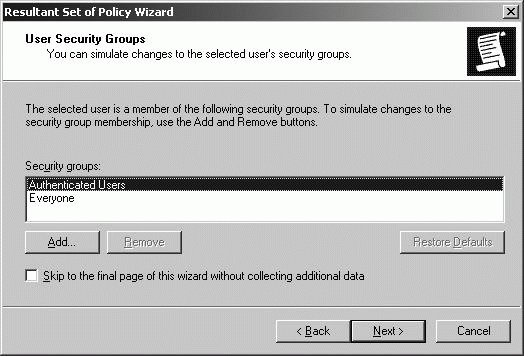 On the Computer Security Groups page, you can simulate changes to security group membership to model the results on Group Policy. Any changes you make to group membership affect the previously selected computer container. For example, if you want to see what would happen if a computer in the designated computer container is a member of the Domain Controllers group, you could add this group to the Security Groups list. Click Next. WMI filters can be linked to Group Policy Objects. By default, the selected users and computers are assumed to meet all the WMI filter requirements, which is want you want in most cases for planning purposes. Click Next twice to accept the default options. Click Next. The wizard gathers policy information. Click Finish. When the wizard finishes generating the report, expand the report nodes in the left pane to see results in the right pane. Computer and user policy information is listed separately. Computer policy information is listed under Computer Configuration. User policy information is listed under User Configuration Summary. You can determine the settings that would be applied by browsing the report (see Figure 11-42). Figure 11-42. Viewing the planning results. 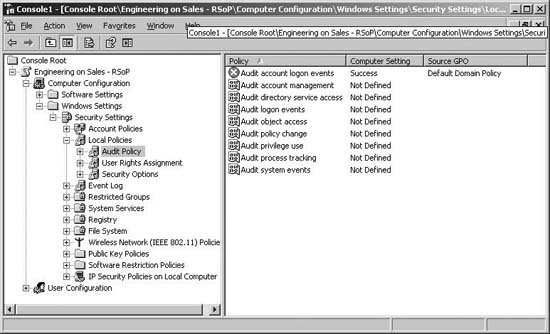
11.9.7. Configuring User and Computer Environments Using Group Policy The User Configuration and Computer Configuration areas of Group Policy are used to manage the user environment and computer environment respectively. In previous sections, I've discussed how to create and manage GPOs, how to configure policy settings, and how to use Administrative Templates. Now let's look at specific areas of policy that you can configure, including: Computer and user certificate enrollment Computer and user scripts Folder redirection Software installation Automatic Updates configuration
Working with each of these areas of policies is discussed in the sections that follow. 11.9.7.1. Enrolling computer and user certificates by using Group Policy Public Key Infrastructure (PKI) provides the components and services necessary to use public and private keys with digital certificates. Computers and users can use certificates for authentication and encryption. In Windows Server 2003, Microsoft Certificate Services provide the necessary components for issuing and managing digital certificates. A server designated as a certificate authority (CA) is responsible for issuing digital certificates and managing certificate revocation lists (CRLs). Servers running Windows Server 2003 can be configured as CAs by installing Microsoft Certificate Services. A CA used for autoenrollment must be configured as an enterprise root CA or an enterprise subordinate CA. Autoenrollment is a feature of Microsoft Certificate Services that can only be used when Active Directory is available to provide information required for validating the identity of users and computers. Establish an enterprise CA hierarchy by installing an enterprise root CA and installing one or more levels of enterprise subordinate CAs. There can be only one root CA in an enterprise. All other CAs in the hierarchy must be enterprise subordinate CAs. In an enterprise configuration, certificate servers are configured for automatic enrollment by default. This means authorized users and computers can request a certificate, and the CA can automatically process the certificate request so that the user and computers can immediately install the certificate.
Tip: Windows 2000 Active Directory supported autoenrollment of computer certificates using version 1 certificate templates. Windows XP Professional and Windows Server 2003 support autoenrollment of both user and computer certificates using version 2 certificate templates.
The way autoenrollment works is controlled by Group Policy. When you install enterprise CAs, autoenrollment policies for users and computers are enabled automatically. The policy for users is Autoenrollment Settings under User Configuration\Windows Settings\Security Settings\Public Key Policies. The policy for computers is Autoenrollment Settings under Computer Configuration\Windows Settings\Security Settings\Public Key Policies. You can edit a GPO and access the Autoenrollment Settings policy by completing the following steps: Open Active Directory Users And Computers. In the console tree, right-click the domain or OU you want to work with, and then select Properties. In the Properties dialog box, click the Group Policy tab. On the Group Policy tab, you can edit an existing GPO linked to the selected container by selecting it, and then clicking Edit. In the Group Policy Object Editor dialog box, expand either User Configuration\Windows Settings\Security Settings\Public Key Policies or Computer Configuration\Windows Settings\Security Settings\Public Key Policies as appropriate for the type of policy you want to review. Double-click Autoenrollment Settings to display the properties dialog box shown in Figure 11-43. By default, once you've configured enterprise CAs, Enroll Certificates Automatically is selected. If you want to automatically renew expired certificates, update pending certificates, and remove revoked certificates, select the related checkbox. To ensure version 2 certificate templates are requested and used, you can select the Update Certificates That Use Certificate Templates checkbox. Click OK. Figure 11-43. Viewing autoenrollment settings. 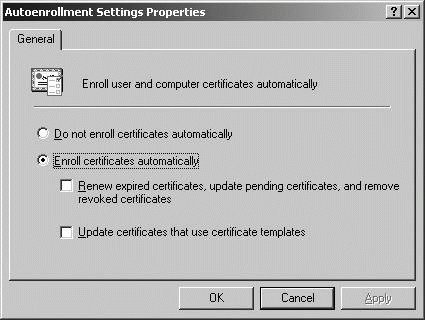
11.9.7.2. Configuring computer and user scripts by using Group Policy With Group Policy, you can configure computers scripts that are executed during startup or shutdown, and user scripts that are executed during logon or logoff. These scripts can be written as command-shell batch scripts ending with the .bat or .cmd extension, or as Windows Script Host scripts written in a scripting language, such as VBScript. With computer startup and shutdown scripts, you assign scripts to the GPO in which computer objects that should execute the scripts are located. To get started, you should copy the scripts you want to use to the Machine\Scripts\Startup or Machine\Scripts\Shutdown folder for the related policy. Policies are stored in the %SystemRoot%\Sysvol\Domain\Policies folder on domain controllers. You can assign a computer startup or shutdown script to use by completing the following steps: Open Active Directory Users and Computers. In the console tree, right-click the domain or OU you want to work with, and then select Properties. In the Properties dialog box, click the Group Policy tab. On the Group Policy tab, you can edit an existing GPO linked to the selected container by selecting it, and then clicking Edit. In the Group Policy Object Editor dialog box, expand Computer Configuration\Windows Settings\Scripts. To work with startup scripts, right-click Startup, and then select Properties. To work with shutdown scripts, right-click Shutdown, and then select Properties. Click Add to assign a script. In the Add A Script dialog box, click Browse. If you copied the computer script to the correct location in the policies folder, you should see the script in the default folder. Click the script, and then click Open. In the Script Parameters field, enter any command-line arguments to pass to the script. Click OK to close the Add A Script dialog box. During startup or shutdown, scripts are executed in the order in which they're listed in the properties dialog box. Use the Up or Down button to reposition scripts as necessary. Click OK to close the Startup or Shutdown Properties dialog box.
With user logon scripts, you assign scripts to the GPO in which user objects that should execute the scripts are located. To get started, you should copy the scripts you want to use to the User\Scripts\Logon or the User\Scripts\Logoff folder for the related policy. Policies are stored in the %System-Root%\Sysvol\Domain\Policies folder on domain controllers. You can assign a user logon or logoff script to use by completing the following steps: Open Active Directory Users and Computers. In the console tree, right-click the domain or OU you want to work with, and then select Properties. In the Properties dialog box, click the Group Policy tab. On the Group Policy tab, you can edit an existing GPO linked to the selected container by selecting it, and then clicking Edit. In the Group Policy Object Editor dialog box, expand User Configuration\Windows Settings\Scripts. To work with logon scripts, right-click Logon, and then select Properties. To work with logoff scripts, right-click Logoff, and then select Properties. Click Add to assign a script. In the Add A Script dialog box, click Browse. If you copied the user script to the correct location in the policies folder, you should see the script in the default folder. Click the script, and then click Open. In the Script Parameters field, enter any command-line arguments to pass to the script. Click OK to close the Add A Script dialog box. During logon or logoff, scripts are executed in the order in which they're listed in the properties dialog box. Use the Up or Down button to reposition scripts as necessary. Click OK to close the Logon or Logoff Properties dialog box.
11.9.7.3. Redirecting folders by using Group Policy Folder redirection allows you to redirect special folders to a central network location instead of using default locations on a user's computer. This ensures that administrators have a central location for backing up and maintaining user data. It also ensures that users have consistent access to their data regardless of where they log on. When you redirect the following special folders: Application Data Desktop My Documents My Pictures
a copy of the user's current special folder is made in the designated location, and from then on, the special folder is accessed from the designated location. When configuring redirection, you have two options: The network location to which you redirect folders must be configured as a shared folder. By default, folder redirection settings configure permissions on the redirected folder so that users have exclusive access to their folders (in most cases). The key exception is for Start Menu redirection, which works differently from redirection of other folders. Start Menu redirection does not copy the contents of a user's local Start Menu. Instead, users are redirected to a previously created, standard Start Menu. You can redirect a special folder to a single location by completing the following steps: Open Active Directory Users and Computers. In the console tree, right-click the domain or OU you want to work with, and then select Properties. In the Properties dialog box, click the Group Policy tab. On the Group Policy tab, you can edit an existing GPO linked to the selected container by selecting it, and then clicking Edit. In the Group Policy Object Editor dialog box, expand User Configuration node\Windows Settings\Folder Redirection. Right-click the special folder you want to redirect, and then select Properties. In the properties dialog box, similar to the one shown in Figure 11-44, the Target tab is selected by default. Figure 11-44. Configuring basic folder redirection. 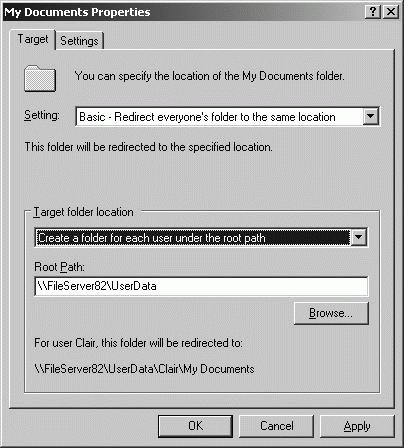 Choose Basic-Redirect Everyone's Folder To The Same Location on the Setting selection list. Use the Target Folder Location list options to specify how redirection should work. The options include:
Redirect To The User's Home Directory The folder is redirected to a subdirectory within the user's home directory. In Active Directory Users And Computers, you set the location of the user's home directory on the Profile tab.
Create A Folder For Each User Under The Root Path A folder is created for each user at the location you enter in the Root Path field. The folder name is the user logon name as specified by the %UserName% environment variable.
Redirect To The Following Location The folder is redirected to the exact location you enter in the Root Path field. Be sure to use an environment variable to customize the folder location for each user, such as \\FileServer82\UserData\%UserName%\mydocs.
Redirect To The Local User Profile Location The folder is redirected to a subdirectory within the user profile directory. In Active Directory Users And Computers, you set the location of the user's profile directory on the Profile tab. Click the Settings tab. By default, the Grant The User Exclusive Rights To . . . checkbox is selected. This gives users full rights to access their data in the special folder, which typically is what you want. By default, the Move The Contents Of . . . To The New Location checkbox is selected. This moves the data in the special folder from the user's system to the designated location. Again, this typically is what you want. Click OK to enable redirection of the designated special folder.
Redirect a special folder based on group membership by completing the following steps: Open Active Directory Users And Computers. In the console tree, right-click the domain or OU you want to work with, and then select Properties. In the Properties dialog box, click the Group Policy tab. On the Group Policy tab, you can edit an existing GPO linked to the selected container by selecting it and then clicking Edit. In the Group Policy Object Editor dialog box, expand User Configuration node\Windows Settings\Folder Redirection. Right-click the special folder you want to redirect, and then select Properties. In the properties dialog box, the Target tab is selected by default. Choose Advanced - Specify Locations For Various User Groups on the Setting selection list. As shown in Figure 11-45, a Security Group Membership panel is added to the properties dialog box. You configure redirection separately for each security group. Figure 11-45. Configuring advanced folder redirection. 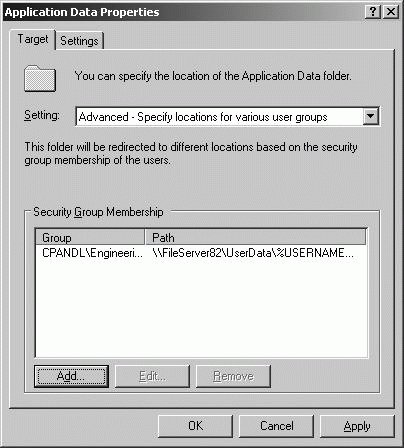 Click Add to specify the redirection settings for the first security group. In the Specify Group And Location dialog box, shown in Figure 11-46, click Browse. Use the Select Group dialog box to find a security group to add. Figure 11-46. Setting a security group's redirection options.  Configure the Target Folder Location list options as discussed previously. Set a Root Path as necessary for the type of redirection. Click OK to close the Specify Group And Location dialog box. Repeat Steps 9-12 as necessary to configure redirection for other security groups. Click the Settings tab. By default, the Grant The User Exclusive Rights To . . . checkbox is selected. This gives users full rights to access their data in the special folder, which typically is what you want. By default, the Move The Contents Of . . . To The New Location checkbox is selected. This moves the data in the special folder from the user's system to the designated location. Again, this typically is what you want. Click OK to enable redirection of the designated special folder.
If you need to remove redirection, you can do so by completing the following steps: Open Active Directory Users And Computers. In the console tree, right-click the domain or OU you want to work with, and then select Properties. In the Properties dialog box, click the Group Policy tab. On the Group Policy tab, you can edit an existing GPO linked to the selected container by selecting it, and then clicking Edit. In the Group Policy Object Editor dialog box, expand User Configuration node\Windows Settings\Folder Redirection. Right-click the special folder you want to redirect, and then select Properties. In the properties dialog box, the Target tab is selected by default. On the Settings tab, review the Policy Removal options. Two options are available:
Leave The Folder In The New Location When Policy Is Removed The folder and its contents remain at the redirected location and current users are still permitted to access the folder and its contents at this location.
Redirect The Folder Back To The Local Userprofile Location When Policy Is Removed The folder and its contents are copied back to the original location. The contents aren't deleted from the previous location, however. If you changed the Policy Removal options, click Apply. Select the Target tab. To remove all redirection definitions for the special folder, use the Setting selection list to choose Not Configured. To remove redirection for a particular security group, select the security group in the Security Group Membership panel, and then click Remove. Click OK.
11.9.7.4. Distributing software by using Group Policy Group Policy provides a limited solution for deploying software called Software Installation policy. Software Installation policy is not designed to replace enterprise solutions, such as Systems Management Server (SMS), but it can be used to automate the deployment and maintenance of software. Only computers running Windows 2000 and Windows XP Professional or later can use Software Installation policy. Server versions of Windows don't use it. 11.9.7.4.1. Understanding software deployment Software deployed through Group Policy is referred to as managed software. In Group Policy, Software Installation policy can be configured through Computer Configuration\Software Settings\Software Installation and User Configuration\Software Settings\Software Installation. This allows you to deploy software on a per-computer basis, a per-user basis, or both. Per-computer applications are available to all users of a computer. Per-user applications are available to individual users.
Tip: Non-Windows Installer files can only be installed on a per-user basis.
Before you deploy software through policy, you should set up a distribution point. A distribution point is a shared folder that is available to the computers, users, or both to which you are deploying software. With basic applications, copy the installer package file and all required application files to the share and configure permissions so these files can be accessed. With other applications, such as Microsoft Office, perform administrative installations to the share by running the application's Setup program with the /a parameter and designate the share as the install location. Administrative installs can be patched and redeployed through Software Installation policy. In most cases, when you configure Software Installation policy, you will not want to use existing GPOs. Instead, you will want to create GPOs that configure software installation, and then link these GPOs to the appropriate containers in Group Policy. This makes it must easier to redeploy software and apply patches. You can deploy software in three key ways:
Computer assignment You can assign the software to client computers so it is installed when a client computer starts. This technique requires no user intervention, but does require a restart to install software. Installed software is available to all users on a computer. (Not available with Non-Windows Installer files.)
User assignment You can assign the software to users so it is installed when a user logs on. This technique requires no user intervention, but does require the user to log on to install or advertise software. The software is associated with the user only. (Not available with Non-Windows Installer files.)
User publishing You can publish the application so users can install it manually through Add Or Remove Programs. This technique requires the user to explicitly install software or activate the install. The software is associated with the user only.
Tip: When you use user assignment or user publishing, you can advertise the software so a computer can install the software when it is first used. With advertisements, the software can be installed automatically in several situations: when the user accesses a document that requires the software; when a user opens a shortcut to the application; or when another application requires a component of the software.
You can update applications deployed through Software Installation policy in two key ways: Each task is performed in a slightly different way. 11.9.7.4.2. Deploying software Software Installation policy uses either Windows Installer Packages (.msi) or ZAW Down-level Application Packages (.zap) files. File permissions on these application installer packages must be set so the appropriate computer accounts, the appropriate user accounts, or both, have Read access.
Tip: Software Installation policy is applied only during foreground processing of policy settings. This means per-computer application deployments are processed at startup and per-user application deployments are processed at logon.
You can customize installation using transform (.mst) files. Transform files modify the installation process according to the settings you've defined, and in this way, allow you to configure applications for various types of computers and users. Once you have your Windows Installer file and have copied all the necessary files to a network share, you can configure software installation through Group Policy by completing the following steps: Open Active Directory Users And Computers. In the console tree, right-click the domain or OU you want to work with, and then select Properties. In the Properties dialog box, click the Group Policy tab. On the Group Policy tab, you can edit an existing GPO linked to the selected container by selecting it and then clicking Edit. For a per-computer software deployment, access Computer Configuration\Software Settings\Software Installation. For a per-user software deployment, access User Configuration\Software Settings\Software Installation. Right-click Software Installation and choose New Package. Click Open. In the Deploy Software dialog box, shown in Figure 11-47, select one of the following deployment methods, and then click OK: Figure 11-47. Choosing the type of deployment. 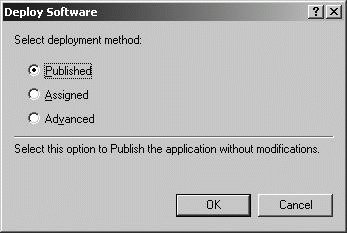 Published to publish the application without modifications Assigned to assign the application without modifications Advanced to deploy the application using advanced configuration options
Once you've configured the software policy, the application will be deployed to all computers or users as appropriate. By default, per-computer software packages are made available when a computer starts up, and per-user software packages are made available when a user logs on. You can use the Gpupdate command-line utility to force restart or logoff. Once you have your ZAP file and have copied all the necessary files to a network share, you can configure software installation through Group Policy by completing the following steps: Open Active Directory Users And Computers. In the console tree, right-click the domain or OU you want to work with, and then select Properties. In the Properties dialog box, click the Group Policy tab. On the Group Policy tab, you can edit an existing GPO linked to the selected container by selecting it, and then clicking Edit. Non-Windows Installer files can be installed only on a per-user basis. Access Software Installation under User Configuration\Software Settings\Software Installation. Right-click Software Installation and choose New Package. In the Files of Type list, select ZAW Down-Level Applications Packages (*.zap) as the file type. Click Open. In the Deploy Software dialog box, select one of the following deployment methods, and then click OK:
Once you've configured the software policy, the application is advertised to all users as appropriate. By default, per-use software packages are applied only when a user logs on. You can use the Gpupdate command-line utility to force logoff. 11.9.7.4.3. Viewing and setting software deployment options You can view and set the general options for a software package by completing the following steps: Open Active Directory Users And Computers. In the console tree, right-click the domain or OU you want to work with, and then select Properties. In the Properties dialog box, click the Group Policy tab. On the Group Policy tab, you can edit an existing GPO linked to the selected container by selecting it, and then clicking Edit. For a per-computer software deployment, access Computer Configuration\Software Settings\Software Installation. For a per-user software deployment, access User Configuration\Software Settings\Software Installation. Right-click the package you want to work with and select Properties. Using the properties dialog box, you can now review or modify software deployment options (see Figure 11-48). Figure 11-48. Viewing the configured software deployment options. 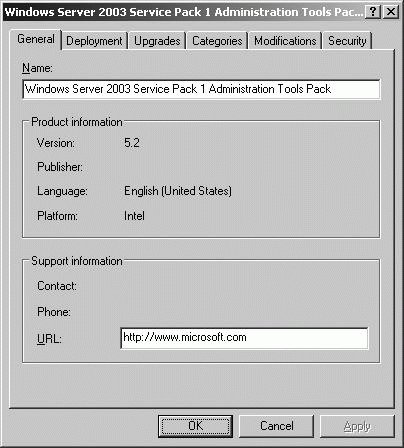 On the Deployment tab, shown in Figure 11-49, you can change the deployment type and configure the following deployment and installation options:
Auto-Install This Application By File Extension Activation Advertises any file extensions associated with this package for install-on-first-use deployment. This option is selected by default.
Uninstall This Application When It Falls Out Of The Scope Of Management Removes the application if it no longer applies to the user.
Do Not Display This Package In The Add/Remove Programs Control Panel Prevents the application from appearing in Add/Remove Programs, which prevents a user from uninstalling an application.
Install This Application At Logon Configures full installation, rather than advertisement, of an application when the user logs on. This option cannot be set when you publish a package for users.
Installation User Interface Options The default setting, Maximum, ensures that the user sees all setup screens and messages during installation. With the Basic option, the user sees only error and completion messages during installation. Click OK. Figure 11-49. Changing deployment options. 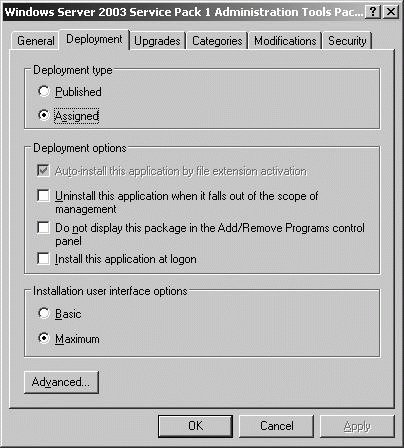
11.9.7.4.4. Applying patches and service packs to deployed software When an application uses a Windows Installer package, you can patch a deployed application or apply a service pack by completing the following steps: Obtain an .msi file or .msp (patch) file containing the patch or service pack to be applied. Copy the .msi or .msp file and any new installation files to the folder containing the original .msi file. Overwrite any duplicate files as necessary. Open Active Directory Users And Computers. In the console tree, right-click the domain or OU you want to work with, and then select Properties. In the Properties dialog box, click the Group Policy tab. On the Group Policy tab, you can edit an existing GPO linked to the selected container by selecting it, and then clicking Edit. For a per-computer software deployment, access Computer Configuration\Software Settings\Software Installation. For a per-user software deployment, access User Configuration\Software Settings\Software Installation. Right-click the package you want to work with, and then select All Tasks Redeploy Application. Open Active Directory Users And Computers. In the console tree, right-click the domain or OU you want to work with, and then select Properties. In the Properties dialog box, click the Group Policy tab. On the Group Policy tab, you can edit an existing GPO linked to the selected container by selecting it and then clicking Edit. Access User Configuration\Software Settings\Software Installation. Right-click the package, and then select All Tasks Remove. Copy the new .zap file and all related files to a network share and redeploy the application.
11.9.7.4.5. Upgrading previously deployed software You can upgrade a previously deployed application to a new version by completing these steps: Obtain a Windows Installer file for the new software version and copy it along with all required files to a network share. Alternately, you can perform an administrative installation to the network share. Open Active Directory Users And Computers. In the console tree, right-click the domain or OU you want to work with, and then select Properties. In the Properties dialog box, click the Group Policy tab. On the Group Policy tab, you can edit an existing GPO linked to the selected container by selecting it, and then clicking Edit. For a per-computer software deployment, access Computer Configuration\Software Settings\Software Installation. For a per-user software deployment, access User Configuration\Software Settings\Software Installation. Right-click Software Installation and choose New Package. Create an assigned or published application using the Windows Installer file for the new software version. Click Add on the Upgrades tab. Establish an upgrade relationship between the current application and the previously deployed application. You have two choices: If both applications are in the current GPO, you'll be able to select the previously deployed application in the Package To Upgrade list. If you want to establish a relationship with a package in a different GPO, select A Specific GPO, click Browse, and then use the Browse For A Group Policy Object dialog box to select the GPO. Then select the previously deployed application in the Package To Upgrade list.
Choose an upgrade option:
Uninstall The Existing Package, Then Install The Upgrade Package This option completely reinstalls the application with the new version.
Package Can Upgrade Over The Existing Package This option performs an in-place upgrade over the existing installation. Click OK to close the Add Upgrade Package dialog box. If you want to make this a required upgrade, select the Required Upgrade For Existing Packages checkbox. Click OK.
11.9.7.5. Configuring automatic updates for network clients by using Group Policy Computers running Windows 2000 or later can use Automatic Updates to maintain the operating system. Automatic Updates is an automatic distribution and installation mechanism for critical updates, security updates, update rollups, and service packs. Policy settings for Automatic Updates are found under Computer Configuration\Administrative Templates\Windows Components\Windows Update and under User Configuration\Administrative Templates\Windows Components\Windows Update. Using Group Policy to manage Automatic Updates allows you to configure settings for all computers that apply a particular GPO or all users that apply a particular GPO. This allows you to have a standard Automatic Updates configuration for all computers and users in a site, domain, or OU. To specify how Automatic Updates works for computers, follow these steps: Open Active Directory Users And Computers. In the console tree, right-click the domain or OU you want to work with, and then select Properties. In the Properties dialog box, click the Group Policy tab. On the Group Policy tab, you can edit an existing GPO linked to the selected container by selecting it, and then clicking Edit. In the Group Policy Object Editor dialog box, expand Computer Configuration\Administrative Templates\Windows Components\Windows Update. Double-click Configure Automatic Updates. Use the Disabled or Enabled settings to either prevent or allow the use of Automatic Updates for the computers affected by the current GPO. If you enable Automatic Updates, you have additional configuration options, as shown in Figure 11-50. The options are used as follows:
2 - Notify For Download And Notify For Install Windows notifies the current user before retrieving any updates and then notifies the user again prior to installing.
3 - Auto Download And Notify For Install Windows automatically retrieves all updates according to the detection frequency and notifies users to install.
4 - Auto Download And Schedule For Install Windows automatically downloads updates according to the detection frequency and schedules the installation according to a specific schedule.
5 - Allow Local Admin To Choose Setting This option allows the local administrators to configure Automatic Updates using the Automatic Updates tab of the System utility. Local administrators are unable, however, to disable Automatic Updates through the System utility. Set a schedule as necessary. Click OK. Figure 11-50. Configuring Automatic Updates through Group Policy. 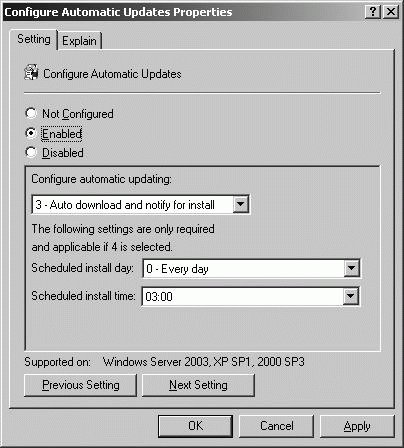
Most Automatic Updates are installed only when the system is shut down and restarted. However, some Automatic Updates can be installed immediately without interrupting system services or requiring system restart. To ensure the latter type of updates are immediately installed, complete the following steps: Open Active Directory Users And Computers. In the console tree, right-click the domain or OU you want to work with, and then select Properties. In the Properties dialog box, click the Group Policy tab. On the Group Policy tab, you can edit an existing GPO linked to the selected container by selecting it, and then clicking Edit. In the Group Policy Object Editor dialog box, expand Computer Configuration\Administrative Templates\Windows Components\Windows Update. Double-click Allow Automatic Updates Immediate Installation. Select Enabled, and then click OK.
By default, only users with local administrator privileges receive update notification. You can allow any user logged on to a computer to receive update notifications by completing the steps: Open Active Directory Users and Computers. In the console tree, right-click the domain or OU you want to work with, and then select Properties. In the Properties dialog box, click the Group Policy tab. On the Group Policy tab, you can edit an existing GPO linked to the selected container by selecting it, and then clicking Edit. In the Group Policy Object Editor dialog box, expand Computer Configuration\Administrative Templates\Windows Components\Windows Update. Double-click Allow Non-Administrators To Receive Update Notifications. Select Enabled, and then click OK.
11.9.8. Configuring Computer Security Settings Using Group Policy As discussed in the section of Chapter 5 titled, "Implementing Secure Network Administration Procedures," security templates can be used to configure computer security settings. Create and configure security templates using the Security Templates snap-in. Apply security templates using the Security Configuration And Analysis snap-in. The Security Configuration And Analysis snap-in can also be used to analyze computer security. Security templates affect only computer configuration settings, which are located under Computer Configuration in a GPO. After you create a security template, you can deploy the security configuration to all computers in a site, domain, or OU. To do this, import the security template into the appropriate GPO, which is what ensures that the security template is applied to every computer object in the GPO. To import a security template into a GPO, you can use the following technique: Open Active Directory Users And Computers. Right-click the domain or OU into which you want to import a security template, and then select Properties. On the Group Policy tab, click the GPO you want to work with in the Group Policy Object Links list, and then click Edit. Under Computer Configuration, expand Windows Settings Security Settings. In the Import Policy From dialog box, select the security template to import, and then click Open.
The next time Group Policy is refreshed, the imported policy is applied. To force a computer to refresh policy, you can restart the computer or run the Gpupdate command-line utility on the computer.
Tip: To prepare for Exam 70-294, you should review the section of Chapter 5 titled, "Implementing Secure Network Administration Procedures."
11.9.9. Troubleshooting Group Policy and Group Policy Objects Many problems with Group Policy are due to the way policy is inherited and processed. As discussed previously, in "Managing Policy Inheritance and Processing," administrators can use a variety of techniques to modify the way inheritance works and policy is processed, which can lead to unanticipated results when Group Policy is applied. 11.9.9.1. Troubleshooting the application of Group Policy security settings When you are trying to determine why policy is not being applied as expected, one of the first things you should do is examine the Resultant Set of Policy for the user, computer, or both experiencing problems with policy settings. In the Resultant Set Of Policy snap-in, you can determine the GPO from which a setting is applied for the purposes of troubleshooting using Logging Mode. To determine applicable GPOs and last refresh, you can run the Resultant Set Of Policy Wizard by following these steps: Type mmc at a command prompt. Click File Add/Remove Snap-in. Click Close, and then click OK. In the Resultant Set Of Policy snap-in, right-click the Resultant Set Of Policy node, and then select Generate RSoP Data. Click Next. Select Logging Mode, and then click Next. On the Computer Selection page, shown in Figure 11-51, select This Computer to view information for the local computer. To view information for a remote computer, select Another Computer, and then click Browse. In the Select Computer dialog box, type the name of the computer, and then click Check Names. Once the correct computer account is selected, click OK. Figure 11-51. Select the computer to review. 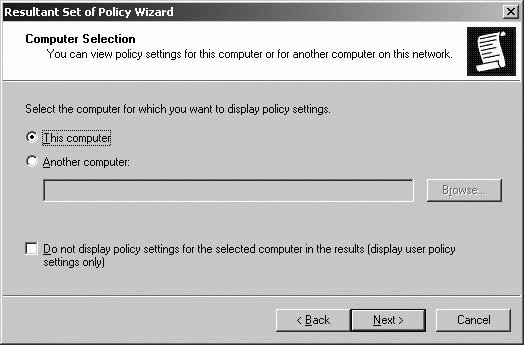 On the User Selection page, shown in Figure 11-52, select the user whose policy information you want to view. You can view policy information for any user that has logged on to the computer. Click Next. Figure 11-52. Select the user to review. 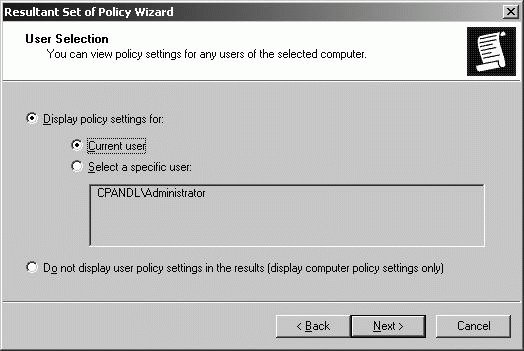 Click Next. The wizard gathers policy information. Click Finish. When the wizard finishes generating the report, expand the report nodes in the left pane to see results in the right pane. Computer and user policy information is listed separately. Computer policy information is listed under Computer Configuration. User policy information is listed under User Configuration Summary. You can determine the settings being applied by browsing the report (see Figure 11-53). Figure 11-53. Viewing resultant set of policy. 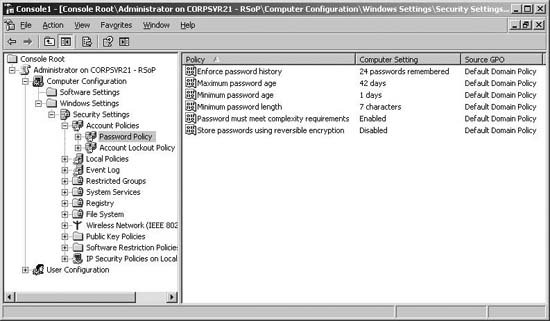
If you add the Resultant Set Of Policy snap-in to a new console and run the Resultant Set Of Policy Wizard again in planning mode to view how settings should be applied based on the container in which a user, computer, or both are located. You can compare the settings between the planning and logging mode to see whether there are discrepancies between how you think policy is being applied and how it is actually being applied. Using the Gpresult command-line utility, you can view resultant set of policy as well. Gpresult provides details on: The last time Group Policy was applied The domain controller from which the policy was applied The complete list of applied GPOs The complete list of GPOs not applied due to filters The security group memberships for the computer and user Details on special settings applied for folder redirection, software installation, disk quota, IPSec, and scripts
The basic syntax for Gpresult is: gpresult /s ComputerName /user Domain\UserName
where ComputerName is the name of the remote computer for which you want to log policy results and Domain\UserName indicates the remote user for which you want to log policy results. For example, to view the RSoP for techpc34 and the user wrstanek in the CPANDL domain, you would type the following command: gpresult /s techpc34 /user cpandl\wrstanek
You can view more detailed output using one of the two verbose options: /v turns on verbose output and result are displayed for policy settings in effect only. /z turns on verbose output with settings for policy settings in effect and all other GPOs that have the policy set.
Because Gpresult output can be fairly long, you should direct the output to a file, as shown in this example: gpresult /s techpc34 /user cpandl\wrstanek /z > rsopsave.log
11.9.9.2. Restoring the Default Domain Policy and Default Domain Controller Policy GPOs If the Default Domain Policy or Default Domain Controller Policy GPO becomes corrupted, Group Policy does not function properly. You can resolve this problem by using Dcgpofix to restore the default GPOs to their original, default state. Only Domain Admins or Enterprise Admins can run Dcgpofix. By default, Dcgpofix restores both the Default Domain Policy and Default Domain Controller Policy GPOs. This means you will lose most changes made to these GPOs as a result of the restore process.
Tip: The only exceptions are for Remote Installation Services (RIS), Security Settings, and Encrypting File System (EFS), which are maintained separately and not affected by the restore operation. Nondefault Security Settings are not maintained, however, such as security settings configured by Microsoft Exchange, security settings configured as a result of a migration from Windows NT to Windows 2000, and security settings configured through Systems Management Server (SMS).
To restore the Default Domain Policy and Default Domain Controller Policy GPOs, follow these steps: Log on to a domain controller in the domain in which you want to fix default Group Policy. Type dcgpofix at the command prompt.
You can also restore only the Default Domain Policy or the Default Domain Controller Policy GPO. To restore only the Default Domain Policy, type dcgpofix /target: domain. To restore only the Default Domain Controller Policy, type dcgpofix /target: dc. 11.9.9.3. Refreshing Group Policy manually Group Policy is refreshed automatically at a specific interval. On domain controllers, Group Policy is refreshed every five minutes by default. On member servers and workstations, Group Policy is refreshed every 90 to 120 minutes by default. You can refresh Group Policy manually using Gpupdate. Gpupdate replaces the SECEDIT /refreshpolicy tool provided in Windows 2000. You can refresh both the Computer Configuration settings and the User Configuration settings in Group Policy on the local computer by typing gpupdate at a command prompt. By default, only policy settings that have changed are processed and applied. You can change this behavior by adding the /Force parameter. This forces a refresh of all policy settings. Another way to use Gpupdate is to selectively refresh Group Policy: To refresh only Computer Configuration settings, type gpupdate/target:computer at the command prompt. To refresh only User Configuration settings, type gpupdate /target:user at the command prompt.
Gpupdate can also be used to log off a user or restart a computer after Group Policy is refreshed. This is useful because some group policies are applied only when a user logs on or when a computer starts up. To log off a user after a refresh, add the /Logoff parameter. To restart a computer after a refresh, add the /Boot parameter. 11.9.9.4. Troubleshooting GPOs and the Sysvol The Windows Server 2003 Resource Kit includes a Group Policy verification tool called Gpotool. You can use it to troubleshooting problems with the server-side health of Group Policy. By default, if you type gpotool at a command prompt, Gpotool verifies the consistency, permissions and version numbers of all GPOs in the current logon domain. If any problems are found, a verbose listing of the GPO in question is provided, along with the specific issues and errors. Discrepancies found may be due to problems with File Replication Service (FRS), which is responsible for replicating the Sysvol files on domain controllers. You can use Gpotool to check permissions on the Sysvol using the /checkacl option, such as: gpotool /checkacl
Gpotool doesn't check permissions on subfolders within the Sysvol. Gpotool checks only the permissions on the Sysvol folder itself. You can use Gpotool to check the state of a GPO on specified domain controllers. This is useful for determining the status of a GPO stored on particular domain controllers. The syntax for checking the state of a GPO on specified domain controllers follows: gpotool /gpo:"GPOName" /domain:DomainName /dc:DomainControllers /verbose
where GPOName is the name of the GPO to check, DomainName is the name of the domain, and DomainControllers is a comma-separated lists of DCs to check, such as: gpotool /gpo:"Default Domain Policy" /domain:cpandl.com /dc:corpsvr01,corpsvr02 /verbose
If the GPOs are found to have no problems, an OK status is returned. If there are problems, the results show the errors or discrepancies.
|