Section 8.1. Planning and Implementing Server Roles and Server Security
8.1. Planning and Implementing Server Roles and Server SecurityThe Windows operating system has workstation and server versions. Generally, computers running Windows XP Professional or other workstation operating systems are configured as clients, and computers running Windows Server 2003 are configured as servers. While computers acting as clients have general-purpose roles in the enterprise as user machines, most servers have general-purpose roles and specific roles for which they are configured, allowing the servers to act as domain controllers, name servers, file servers, print servers, etc. From the general to the specific, each role brings with it different security considerations. A computer's baseline security configuration prepares it for a general role in the enterprise. A computer's role-specific security configuration prepares it to act in a specific role. 8.1.1. Evaluating and Selecting the Operating System to Install on Computers in an EnterpriseSelecting the operating system to install on computers is a key decision that administrators must make. Computers should be configured with the operating system that is appropriate for the role they will fill as clients or servers. Every organization should have specific guidelines for choosing which operating system to use when; those guidelines should include specifics on hardware requirements, duty life, and upgrade frequency. Prior to purchasing or requisitioning computers, administrators should have a list of hardware requirements for each role the computers will fill and should configure the computers accordingly. 8.1.1.1. Choosing client operating systemsBefore choosing an operating system for a client computer, administrators should ask themselves what is the minimum configuration to satisfy security requirements. In most cases, the answer to this question will have to do with:
Why are these issues important? When a client computer can act as an Active Directory client, the computer can join a domain and take advantage of directory services. When a client computer has a computer account, administrators have better control over security and can manage the account as they manage any other type of account. For these reasons, every client configured on a Windows network should be able to act as an Active Directory client and have a computer account. Both workstation and home user versions of the Windows operating system are available. In most cases, clients that connect directly to the network or connect through remote access should be configured with a workstation version of the Windows operating system. This ensures that the client computer can access the network as an Active Directory client and that it has a computer account, and can take advantage of all the features that are offered, including security enhancements (available only on workstation versions of Windows). Workstation versions of Windows include Windows NT Workstation, Windows 2000 Professional, and Windows XP Professional. Although Windows NT Workstation computers can be part of a domain, only Windows 2000 Professional and Windows XP Professional have all the latest capabilities. Windows Vista is the latest workstation version of the Windows operating system. Home user versions of Windows include Windows 95, Windows 98, and Windows Me. While Windows 95, Windows 98, and Windows Me computers can be configured as Active Directory clients, they are not best suited to the task. Clients running these operating systems do not become members of the domain in the same way as computers running workstation versions of the Windows operating system, which makes it more difficult to manage security for these computers. Clients running these operating systems also cannot take advantage of many of the current security enhancements. Windows XP Home Edition is another home user version of Windows. Unlike Windows 95, Windows 98, and Windows Me, however, Windows XP Home Edition does not have an Active Directory client and cannot join a domain. Because of this, computers that will be used in the enterprise should not use Windows XP Home Edition. Table 8-1 provides a summary of operating system support for Active Directory.
8.1.1.2. Choosing server operating systemsWindows Server 2003 is available in multiple editions, including Windows Server 2003, Web Edition; Windows Server 2003, Standard Edition; Windows Server 2003, Enterprise Edition; and Windows Server 2003, Datacenter Edition. Each edition is designed for a specific purpose. Windows Server 2003, Web Edition is designed specifically to provide web services for enterprise Intranets and Internet web sites. While this edition includes the Microsoft .NET Framework, Microsoft Internet Information Services (IIS), ASP.NET, and network load-balancing features, it lacks many other features, including Active Directory. Tip: Lack of Active Directory means a server running Windows Server 2003, Web Edition cannot be configured as a domain controller. It does not mean that the server cannot be a member of a domain. Servers running Windows Server 2003, Web Edition can be members of a domain. Windows Server 2003, Standard Edition is designed specifically for small or branch office use, and is a direct replacement for Windows NT 4.0 Server and Windows 2000 Server. Servers running this edition should be used to provide the day-to-day needs of the average business, and to provide services and resources to other systems in the enterprise. Windows Server 2003, Enterprise Edition is designed specifically for larger organizations and where functional needs surpass those of Windows Server 2003, Standard Edition. It is a direct replacement for Windows NT Server 4 Enterprise Edition and Windows 2000 Advanced Server. Servers running this edition can be used in large-scale deployments and in clustering configurations. Windows Server 2003, Datacenter Edition is designed specifically for large-scale data centers where high availability and high scalability are requirements, and for use with business-critical and mission-critical applications that require high availability and high scalability. It is a direct replacement for Windows 2000 Datacenter Server. Table 8-2 provides an overview and comparison of each edition of Windows Server 2003. With the exception of Web Edition, all other editions of Windows Server 2003 support both 32-bit and 64-bit computing. 32-bit versions of Windows Server 2003 are designed for x86-based processors. 64-bit versions of Windows Server 2003 are designed for Intel Itanium (IA-64) and 64-bit extended systems.
When you look beyond supported components, maximum RAM, and maximum processors, you'll find each edition of Windows Server 2003 supports the same core features and administration tools, allowing you to manage servers running the various editions using the same tools and techniques. The way in which a server is used in the enterprise largely depends on the roles for which the server is configured. 8.1.2. Planning and Implementing Server RolesServers are generally assigned to be part of a workgroup or a domain. A workgroups is a loose grouping of computers in which each individual computer is managed separately. A domain is a tight grouping of computers in which each computer can be managed collectively using Active Directory and Group Policy. When you install a server running Windows Server 2003, you can configure the server to be:
The differences between these configurations are subtle but important. Member servers are a part of a domain but don't store directory information. Domain controllers store directory information, provide authentication, and offer directory services for a domain. Standalone servers aren't part of a domain and are instead members of a workgroup. Standalone servers have their own security database for authenticating logon requests. Like Windows 2000, Windows Server 2003 uses a multimaster replication model where any domain controller can process directory changes, and then replicate those changes to other domain controllers. This differs from the Windows NT single master replication model in which the primary domain controller stores a master copy and backup controllers store backup copies of the master. Additionally, while Windows NT distributed only the Security Account Manager (SAM) database, Windows Server 2003 distributes its entire data store of directory information. Domains that use Active Directory are referred to as Active Directory domains . Although you could deploy an Active Directory domain with only one domain controller, you more typically deploy multiple domain controllers to ensure availability of directory services, should one or more of the domain controllers fail. In an Active Directory domain, any member server can be promoted to a domain controller by installing the Active Directory component on the server. Similarly, you can demote domain controllers and make them member servers, by removing the Active Directory component on the server. You promote and demote domain controllers using the Active Directory Installation Wizard (dcpromo). To start this wizard, click Start Tip: DNS must be available on the network before you can install a domain controller in a new domain. In addition to having a role as a domain controller, servers can have other roles as well. These additional roles are based on the services for which the servers are configured. Any server can support one or more of roles described in Table 8-3.
After installing a server, you can add or remove server roles using the Manage Your Server console, the Configure Your Server wizard, or the Add/Remove Programs utility. You access Manage Your Server from the Administrative Tools menu. Click Start To add or remove a role using Manage Your Server, follow these steps:
8.1.3. Planning a Secure Baseline InstallationSecurity should be a primary consideration when you set up a network, add computers to a network, and configure computers. You should select clients and servers based on specific manageability, supportability, and security requirements. Prior to deploying clients and servers, you should develop a comprehensive deployment plan that includes detailed instructions for establishing a secure baseline installation for each anticipated client and server configuration. The baseline installation should provide a secure starting point for the final configuration. For clients and servers with strict/high security requirements, you may need to build on the baseline installation by modifying settings, installing additional security components, or making other such changes to strengthen security as appropriate. 8.1.3.1. Planning a strategy to enforce system default security settings on new systemsCreating a security plan for clients and servers is not something individual administrators should do alone. More typically, a security plan for clients and servers is part of larger enterprise effort and one that is designed to ensure that security settings meet or exceed a specific set of minimum security requirements. As an administrator, you need a careful understanding of the security capabilities of the Windows operating system, and you must be familiar with the default security settings so that you know what settings can and should be changed to enhance security for computers configured in specific roles as clients or servers. When creating a security strategy for clients and servers, you'll need to determine which specific security features to use; often, you'll do this in accordance with the objectives and requirements of the organization's enterprise-wide security policy. Many organizations also have specifically assigned security teams that are responsible for security policy throughout the enterprise. Typically, enterprise-wide security policies:
If your organization doesn't have enterprise-wide security policies or specific security requirements for networked computers, you should work toward establishing such, and the effort should be managed by a designated security team. This team should include users, administrators, and managesall of which should have a strong understanding of security, the organization's structure and resources, and how security can be implemented to meet the organization's needs. The security policy developed by the security team should view security as an ongoing effort, and one that, like software deployment, has an ongoing life cycle. The security policy should include:
Most security plans should cover access controls, authentication, and auditing. Access controls are used to manage access to resources and determine who has access to what. Authentication mechanisms are used to verify a user's identity prior to providing access to resources. Auditing is used to monitor access and use of privileges. Techniques for preventing unauthorized access to the network and resources also should be covered in the security plan. Network security can be enhanced using firewalls, proxies, and Network Address Translation (NAT). Resource access can be more tightly controlled using encrypted passwords, certificates, and hardware devices such as smart card scanner. Data can be protected using NTFS security and the Encrypting File System (EFS). After developing a plan to secure the organization's infrastructure, the security team needs to develop a plan to implement the security recommendations and requirements. As appropriate for an individual's need to know to ensure enforcement and implementation, parts of the implementation plan should be distributed throughout the organization. It is the responsibility of the security team to ensure that the implementation plan is followed and that the messaging related to security policy are expressed in ways that get maximum organizational involvement. Not everyone will adhere to the security plan. Not everyone will understand the need to implement security in a certain way. Because of this, you'll need an ongoing monitoring and management effort to ensure that security is implemented as expected. Part of the management effort should include ongoing instruction for all personnel as to the importance of and the need for security. 8.1.3.2. Identifying client and server operating system default security settingsAs an administrator, you should have a strong understanding of the default security settings for Windows Server 2003 and Windows XP Professional. A strong understanding of the default security settings helps you determine what settings may need changes to enhance security when a computer is deployed in a specific role. Windows Server 2003 and Windows XP Professional are the primary operating systems for use on networks as servers and clients. Both operating systems are designed with security in mind. Whether these computers are part of a workgroup or domain, security is largely dependent on:
8.1.3.2.1. Identifying default security for filesystem permissionsFilesystem permissions are available and applicable only when you format a computer's drives using NTFS. Under NTFS, many different levels of permissions can be set to control access to files and folders. As discussed in Chapter 2 under "Configuring Filesystem Permissions," both basic and advanced permissions can be used with NTFS, all files and folders have specific owners that can be changes, and certain permissions are inherited from parent folders. You can modify permissions, ownership, and inheritance using a file or folder's Properties dialog box, which is accessible by right-clicking the file or folder, selecting Properties, and then clicking the Security tab (see Figure 8-1). Figure 8-1. Manage permissions on the Security tab.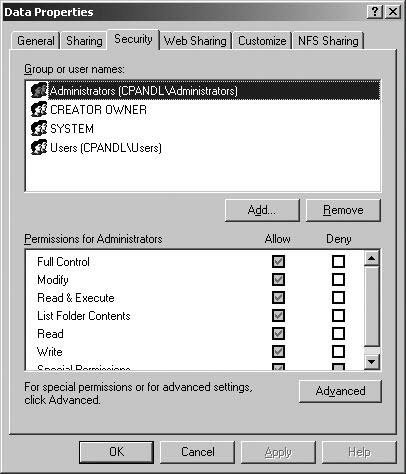 When you install a computer running Windows Server 2003 or Windows XP Professional in an Active Directory domain and format the system drive using NTFS, the Setup program configures the computer's system drive with a specific default set of permissions. Table 8-4 summarizes the default permissions for the system drive (domains only). If the computer has other drives, Setup doesn't grant any special permissions on these additional drives. Instead, Setup grants Full Control on the entire drive to the Everyone group; it is up to the administrator to configure appropriate permissions.
Tip: If a user's profile is stored on the computer, the user has Full Control over the Documents and Settings/%UserName% folder. This is the location of the user's profile and home folder. As Everyone and Authenticated Users are implicit groups, administrators cannot add or remove members from these groups. 8.1.3.2.2. Identifying default security for share permissionsAs discussed in Chapter 2 under "Configuring Access to Shared Folders," shares are used to share folders over the network, and several administrative shares are created automatically each time the operating system is started. While the administrative shares that are available depend on the system configuration, the key ones that administrators work with are the hidden drive shares . These special shares for the root of each available drive letter on the computer are named with the drive letter followed by a dollar sign ($). Drive shares are available to members of the Administrators group, and the permissions for these shares cannot be modified. When you create a new folder share on a computer running Windows Server 2003, you can configure specific permissions by choosing one of the available configuration options:
Once you share a folder, it is available to users automatically and can be accessed using a network drive. You can manage the permissions on the shared folder by right-clicking the share, selecting Properties, and then using the options of the Share Permissions tab. While under Windows Server 2003, the Everyone group has Read permissions on a share by default, and Windows 2000 (all service packs) and Windows XP computers (prior to Service Pack 2) grant the Everyone group Full Control by default. Because of this, you must modify the share permissions to properly control access. When you share folders on NTFS volumes, share permissions provide the top-level access control and NTFS permissions provide the base-level access controls. In other words, share permissions determine the maximum allowed access level. If a user has Read permission on a share, the most the user can do is perform read operations. If a user has Change permission on a share, the most the user can do is perform Read and Change operations. If a user has Full Control permission, the user has full access to the share. However, in any case, filesystem permissions can further restrict or block access. 8.1.3.2.3. Identifying default security for Registry permissionsThe Registry contains configuration details for system components, services, and applications. The Registry is organized into a formal grouping of keys, subkeys, and value entries. Root keys form the primary branches of the Registry. The two primary root keys are HKEY_LOCAL_MACHINE (HKLM) and HKEY_USERS (HKU). Other root keys in the Registry are logical subtrees of the two primary root keys. When you install applications and configure Windows settings, changes are made to the Registry. Access to the Registry is controlled by a separate set of security permissions. The default security permissions for the Registry are as follows:
You can view and manage the Registry using the Registry Editor (regedit.exe). To start the Registry Editor, type regedit at a command prompt. 8.1.3.2.4. Identifying default security for Active Directory permissionsIn Active Directory, objects are used to represent users, groups, computers, printers, and other resources. Use Active Directory permissions to specify who can access and manage the objects in the Active Directory database. As an administrator, one of your primary duties is to create and manage directory objects. Permissions for creating and managing objects can be delegated to nonadministrators as well. Create new domains in Active Directory by running the Active Directory Installation Wizard (dcpromo) and assigning the first domain controller in the new domain. During the configuration of the domain and the domain controller, the operating system establishes default security for several key groups. The default security permissions for Active Directory are as follows:
Windows Server 2003 includes many other built-in groups as well, which all have a specific default set of permissions. Security groups are the primary way to manage Active Directory permissions. Typically, when individuals need to perform specific management tasks in the domain, you'll handle this by making the user a member of the appropriate security group. If no security group is available to meet a specific need, you can create additional security groups and configure permissions as appropriate for those groups. In a few special situations, you might want to delegate permissions to individuals that should be allowed to perform specific tasks in a domain or organizational unit. Delegation is useful if you want to give someone limited administrative privileges. Delegate control to grant a user permission to manage users, groups, computers, organizational units, or other objects stored in Active Directory. To delegate administration, you can use the following technique:
On rare occasions, you may need to review or manage the specific set of Active Directory permissions assigned to an object. You can do this by using the Advanced Features view in Active Directory Users And Computers. The Advanced Features view gives you access to additional advanced properties for objects, including those for published certificates and Active Directory permissions. To view or manage Active Directory permissions for an object, you can use the following technique:
8.1.3.2.5. Identifying default security for account policiesIn Active Directory domains, Group Policy is used to manage security settings for users and computers, each of which is managed with a separate set of policies:
The most important default security settings to be aware of are those for password policy, account lockout policy, and Kerberos policy that should be managed using the highest precedence Group Policy Object (GPO) linked to a domain. By default, the highest precedent GPO linked to a domain is the Default Domain Policy GPO. While previous versions of Windows did not define specific password and account lockout policies, Windows Server 2003 does assign specific default settings to these policies. Password policies control how passwords are managed, whether they expire, and when they expire. In Group Policy, the following password policies are stored under Computer Configuration\Windows Settings\Security Settings\Account Policies\Password Policy:
Account lockout policies control whether and how accounts are locked out if successive invalid passwords are provided. In Group Policy, the following password policies are stored under Computer Configuration\Windows Settings\Security Settings\Account Policies\Account Lockout Policy:
Kerberos policies control the way Kerberos authentication is used in a domain. In Group Policy, the following Kerberos policies are stored under Computer Configuration\Windows Settings\Security Settings\Account Policies\Kerberos Policy:
You can access the Default Domain Policy GPO using the Group Policy editing tools. If you are using the Group Policy Management Console, the Default Domain Policy GPO is accessible when you click the domain name in the console tree. You then need to right-click the Default Domain Policy node and select Edit. If you want only to work with security settings in the Default Domain Policy GPO, you can use the Domain Security Policy console, which is found on the Administrative Tools menu. Tip: Policy settings can be enabled, disabled, or not configured. Enabled policy settings are active and applied. Disabled policy settings are inactive and not applied or enforced. Not configured policy settings are not being used. Each GPO has a specific inheritance precedence. Everyone who logs on to the local machine is affected by Local Group Policy. Active Directory-based policy settings are applied in this basic order: site, domain, organizational unit (OU). By default, when policy is set at one level, the setting applies to all objects at that level and to all objects in the levels below due to inheritance. 8.1.3.2.6. Identifying default security for local policiesWhen working with Group Policy, you'll also want to carefully manage local policies. In Group Policy, the following Local policies are stored under Computer Configuration\Windows Settings\Security Settings\Local Policies:
In the default configuration, all related policies are Not Defined. This means you must configure Audit Policy to enable auditing. You may also need to configure user rights assignments as well as security options. The best way to manage local policies for a domain is to use the policies that apply to your organization's domain controllers, member servers, and workstations. For example, all domain controllers are placed in the Domain Controllers OU by default. This means any security setting applied to this OU will apply to all domain controllers automatically. You can access the Default Domain Controllers Policy GPO using the Group Policy editing tools. If you are using the Group Policy Management Console, you'll see the Default Domain Controllers Policy GPO when you click the Domain Controllers node in the console tree. You then need to right-click the Default Domain Controllers Policy and select Edit. If you want only to work with security settings in the Default Domain Policy GPO, you can use the Domain Security Policy console, which is found on the Administrative Tools menu. 8.1.4. Planning Security for Servers That Are Assigned Specific RolesHardening servers to ensure that they are secure involves deploying specific security configuration baselines using Group Policy and creating custom security templates to enhance security as necessary to support various server roles. Creating a secure baseline provides a starting point for ensuring the security of computers on the network. Creating role-specific security templates ensures enforcement of security policy based on a computer's role on the network. Windows Server 2003 Service Pack 1 includes the Security Configuration Wizard, which you can use to create a security policy that can be applied to any server on the network. The wizard can be used to create a new security policy, to edit or apply an existing security policy, or to rollback the last applied security policy. The wizard does not install components or set up a server to perform specific roles. 8.1.4.1. Deploying the security configuration for servers that are assigned specific rolesIn an Active Directory domain, a computer's baseline security can be configured using Group Policy. During startup, a computer processes computer policy settings according to the GPOs that apply to the computer. A history of the registry-based settings that are applied to the computer are stored in %AllUsersProfile%\Ntuser.pol. Because of the object-based hierarchy used by Active Directory, multiple GPOs can apply. When Group Policy is set for a computer, everyone who logs on to the computer is affected by the policy settings. When multiple policies are in place, the policies are applied in the following order:
Tip: You can use the acronym LSDO to remember the order in which policies are applied. LSDO stands for Local, Site, Domain, and Organizational Unit. If there are conflicts among the policy settings, the settings applied later have precedence by default, meaning they overwrite previously applied settings. The cumulative affects of policy settings in multiple GPOs are determined by inheritance- and policy-processing rules. When you apply a policy setting in a top-level GPO, the lower-level GPOs inherit the setting, unless inheritance is blocked or overridden. Because of this, a setting in a top-level GPO can affect every user and computer throughout the enterprise. The end result of inheritance and policy processing is referred to as the Resultant Set of Policy (RSoP). By determining the RSoP for a user or computer, you can determine the specific policy settings that are being applied to that user or computer. To determine what policies apply to a computer, you must first determine where the related computer object is stored in Active Directory. By default, workstations and member servers are placed in the Computers container within Active Directory, and domain controllers are placed in the Domain Controllers OU. In this default configuration, workstations and member servers are only affected by site and domain GPOs, while domain controllers are affected by site and domain GPOs as well as any GPOs applied to the Domain Controllers OU. The highest precedence GPO applied to the Domain Controllers OU by default is the Default Domain Controllers Policy GPO. The best way to apply a specific secure baseline to workstations and member servers is to create new organizational units in the domain, configure the appropriate policy settings for the related OU GPOs, and then move the computer objects into the OUs you've created. In this way, you associate a GPO containing your secure baseline with the computers placed in the GPO. As a rule, each type of computer that requires a different security configuration should have its own OU. Following this, you might use the following OUs to implement role-specific security configurations:
In Group Policy, the primary security settings you'll want to manage for computers are stored under Computer Configuration\Windows Settings\Security Settings and include:
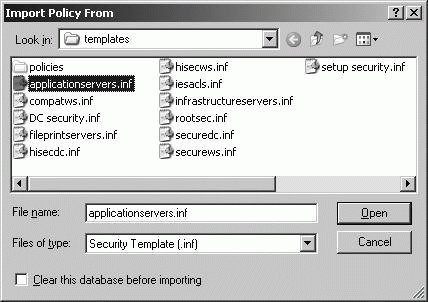
These are the same areas of policy that are managed using security templates. 8.1.4.2. Creating custom security templates based on server rolesTo deploy security configurations, you can use security templates that contain customized sets of group policy definitions that are used to apply essential security settings. Security templates are stored as .INF files in the %SystemRoot%\Security\Templates folder. Windows Server 2003 installations include a standard set of security templates that can be imported into any GPO. Table 8-5 summarizes the standard templates you'll work with the most.
When you are configuring computer security, you'll use both the Security Templates snap-in and the Security Configuration And Analysis snap-in. Use the Security Templates snap-in to view and create security templates. Use the Security Configuration And Analysis snap-in to apply templates and to compare the settings in a template to the existing settings on a computer. You can use the following technique to access these tools:
You should create a custom security template for each server role you've identified in the organization. Rather than starting from scratch, you should use the standard templates as a starting point for your role-specific security configurations. Do this by creating a copy of a template and then modifying it to meet the security requirements of the server role. You can create a copy of a template and modify it by completing these steps:
You can create a new template without initial settings by completing the following steps:
8.1.4.3. Configuring security for servers that are assigned specific rolesOnce you've created your role-specific security templates, you can deploy the security configurations. To deploy a security template through Group Policy, you import the security template into a GPO and in this way, apply the security template to every computer object in the GPO. One way to import a security template into a GPO is to follow these steps:
The imported policy is applied to computers in the OU the next time Group Policy is refreshed. You can force the computer to refresh by restarting it or by running the Gpupdate command-line utility. To apply a security template to an individual computer, you can use the Security Configuration And Analysis snap-in. This snap-in can also be used to compare the settings in a template to the effective settings on a computer. In either case, Security Configuration And Analysis uses a working database to store the settings in the template that you are applying. You can create a database and apply a template using the following technique:
To compare a computer's current security settings to a particular template, you can use the following technique:
Before you apply a template, you may want to create a rollback template. To do this, use the following syntax with the secedit command-line utility: secedit /generaterollback /cfg filename /rbk filename /log filename where /cfg filename sets the name of the security template for which you are creating a rollback template, /rbk filename sets the name of a security template into which the reverse settings should be stored, and /log filename sets the name of an optional log file to use, such as: secedit /generaterollback /cfg hisecws.inf /rbk rev-hisecws.inf /log rollback.log In the previous example, you are creating a rollback template for the Hisecws.inf template. While a rollback template allows you to remove the settings applied with a template, it does not recover settings for access control lists on files or the Registry. These settings must be recovered manually. |
 Run. Type dcpromo in the Open field, and then click OK.
 Programs
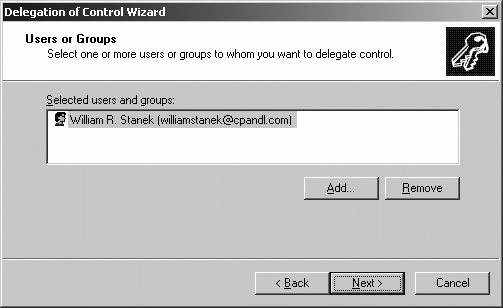


EAN: 2147483647
Pages: 95