Mapping Your Networking Capabilities and Infrastructure
Windows Vista provides a whole new way to navigate and manage the networking features of your computer. In this section, you’ll learn about these features, including Network Center, Network List, Network Map, and Network Connections.
Using Network Center
When you want to work with the networking features of your computer, you’ll start with Network Center. You can access Network Center by following these steps:
-
Click Start, and then click Control Panel.
-
In Control Panel, under the Network And Internet heading, click View Network Status And Tasks.
This displays Network Center, as shown in Figure 12-1.

Figure 12-1: Network Center shows that you are connected to a network that in turn has connectivity to the Internet.
Once you’ve accessed Network Center, you can use it to manage your general network settings and network status. When you are connected to a network, Network Center provides an overview of your networking configuration and allows you to determine your network status and view or change settings.
The three main areas in Network Center are:
-
Status Provides a visual overview of the network infrastructure. The map depicts whether you are connected to a network and whether you can access the Internet on that network. Clicking View Full Map displays an expanded Network Map, as described in the “Using Network Map” section later in this chapter.
-
Network Details Provides details about the network to which the computer is currently connected. These details include the connections being used and whether the network has Internet access. Using the links provided, you can manage the connections in use and the networks to which those connections are linked, as described in the “Viewing and Managing Your Networks” section later in this chapter.
-
General Provides a summary of the computer’s firewall, detection, and sharing settings. Depending on the configuration, several options are provided, including Block, Allow, and View Sharing Settings. You’ll learn how to manage general settings in the next section, “Managing General Networking Settings.”
The sections that follow discuss using Network Center to manage settings, diagnose and repair connectivity issues, and manage your network status.
Managing General Networking Settings
In Network Center, the settings in the General panel allow you to block or allow connections to your computer. If you click Block, the computer’s firewall blocks all access to the network. While access is blocked, you will be unable to access other computers on the network or on the Internet, and other computers will be unable to access your computer.
To unblock the computer, you need to click Allow. Clicking Allow sets the computer’s firewall to its normal configuration. In this configuration, you can access other computers on the network or on the Internet, and other computers can access your computer, if allowed by the firewall configuration.
| Tip | To configure Windows Firewall from Network Center, click View Sharing Settings. This link opens the Windows Firewall dialog box, which you can use to manage the Windows Firewall configuration. |
Diagnosing and Resolving Network Connectivity Issues
When you are disconnected from a network, Network Center displays a modified view, as shown in Figure 12-2. Based on this view of your network configuration, you know at a glance that you are not connected to a network or the Internet.

Figure 12-2: Network Center shows that you are not connected to a network or the Internet.
To resolve this problem, you should check the network cable that connects to your computer as well as any wireless adapters. If your network cable or wireless adapters are properly connected, you can click Diagnose Internet Connection in the left pane to start the new Windows Networks Diagnostics Tool. This tool uses the Network Diagnostics Framework to help you recover from and troubleshoot problems with network connections.
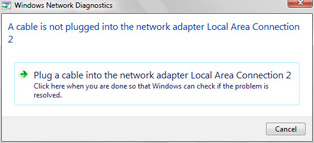
The Windows Networks Diagnostics Tool offers step-by-step advice on resolving your network connectivity problem. For example, in Figure 12-3, the tool advises that you should connect a network cable to the computer’s network adapter. When you plug in the cable and then click the diagnostics box, the tool will validate the repair. If a problem is detected, the tool continues troubleshooting the connection. Otherwise, you’ll see a prompt confirming that the problem has been repaired.

Figure 12-3: The Windows Networks Diagnostics Tool offers step-by-step advice.
Viewing and Managing Your Networks
In Network Center, you can browse computers and devices on the network by clicking Browse The Network in the left pane. While browsing the network, you use Network view. In a domain, options on the Network view toolbar allow you to search Active Directory, connect to a network, or return to Network Center. In a workgroup, options on the Network view toolbar allow you to connect to a network or return to Network Center. If you double-click a computer while browsing, you’ll be able to see devices associated with the computer, such as printers.
In Network Center, you can create network connections by clicking Connect To in the left pane and then clicking Create A New Connection in the Connect To A Network dialog box. This opens the Connect To A Network Wizard, shown in Figure 12-4. You can use this wizard to add a network, create a virtual private network (VPN) connection or create a dial-up connection.

Figure 12-4: Connecting to a new network
When you connect to a network in a new location, a network profile is created. Windows can save settings in this location and automatically use these settings the next time you connect to this network. Sometimes, you can connect to one network in multiple ways. For example, you might be able to connect to a network by plugging in a cable, by using a wireless connection, or both. Or your computer might have multiple network adapters and those adapters might be connected to different networks or to the same network. You can determine the devices and connections associated with the current network by following these steps:
-
Click Start, and then click Control Panel.
-
In Control Panel, under the Network And Internet heading, click View Network Status And Tasks.
-
If you have a valid connection to the network, click Personalize under Network Details.
-
The Personalize Settings dialog box, shown in Figure 12-5, provides details about the network to which you are currently connected.

Figure 12-5: The Personalize Settings dialog box -
The Network text box shows the name of the profile associated with the network. You can change the profile name by typing a new name.
-
The Category text box shows the category of the network to which you are connected as either private or public. You can switch the category from private to public or vice versa by clicking Switch Category.
-
The Connections In Use list shows the connections being used to connect to the current network.
-
You can manage connections by selecting them and then clicking one of these buttons:
-
Disconnect Allows you to disconnect a wireless connection from a network. This button is available only when you are using a wireless connection.
-
Properties Displays the connection’s Status dialog box, which you use to get details about the TCP/IP configuration and to manage the TCP/IP configuration.
-
Diagnose Starts the Windows Networks Diagnostics Tool for troubleshooting.
-
Click OK to close the Status dialog box.
-
Using Network List
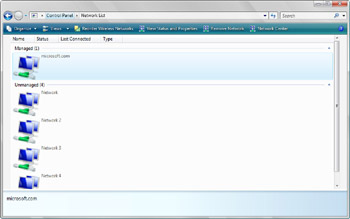
Network List displays a list of all the networks you’ve accessed from the computer. Managed and unmanaged networks are listed separately, as shown in Figure 12-6. You can access Network List by following these steps:
-
Click Start, and then click Control Panel.
-
In Control Panel, under the Network And Internet heading, click View Network Status And Tasks.
-
In Network Center, click Network List under See Also in the left pane.

Figure 12-6: Using Network List
Network List has several different views. You can access these views by clicking the Views button and then selecting the desired view. The view you’ll use most often is the Details view.
Using the Details view of the Network List, you can quickly determine the following information:
-
Name The name of the profile associated with the network.
-
Status The status of your connection to the network as either connected (and active) or disconnected (and inactive).
-
Last Connected The data and time you last connected to the network.
-
Type The type of network, such as managed or unmanaged.
The Network List toolbar allows you to work with networks in several different ways. The option buttons are used as follows:
-
Reorder Wireless Networks Click Reorder Wireless Networks to set the preference order for using wireless networks. To change the order, drag a network entry up or down the list. You can also add or remote network profiles.
-
View Status And Properties Click View Status And Properties to display a Status dialog box for a selected network. As discussed in the “Viewing and Managing Your Networks” section of this chapter, you can then manage the network’s profile name and connection configuration.
-
Remove Network Click Remove Network to remove and delete the profile associated with the network. When prompted, confirm that you want to delete this information by clicking OK.
Note You can return to Network Center by clicking the Network Center button on the toolbar. Right-clicking a network entry displays a shortcut menu with Properties, Delete, and Rename options.
Using Network Map
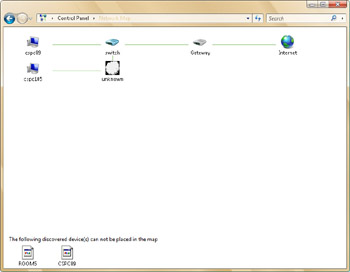
Network Map uses the neighbor detection functionality built into the Next Generation TCP/IP stack to display an expanded view of your network. As Figure 12-7 shows, the expanded Network Map view includes your computer, the computers near your computer, and the devices near your computer. You can access Network Map by following these steps:
-
Click Start, and then click Control Panel.
-
In Control Panel, under the Network And Internet heading, click View Network Status And Tasks.
-
In Network Center, under Network Map, click View Full Map.

Figure 12-7: Using Network Map
If you have questions about your network infrastructure and have permission to browse the network, you can use Network Map to get a better understanding of how you are connected to the network and what devices are near you.
| Note | Sometimes Network Map will detect devices or computers near you but will not be able to place the devices on the map. If this happens, you’ll see a list of discovered but not mapped devices in the lower portion of the Network Map window. |
Viewing and Managing Network Connections
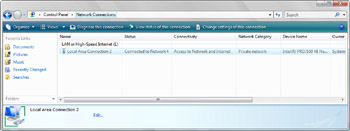
Network Connections displays a list of all network connections configured for use on the computer, as shown in Figure 12-8. You can quickly obtain a list of open network connections by completing the following steps:
-
Click Start, and then click Control Panel.
-
In Control Panel, under the Network And Internet heading, click View Network Status And Tasks.
-
In the left pane in Network Center, click Manage Network Connections.

Figure 12-8: Using Network Connections
Network Connections has several different views. You can access these views by clicking the Views button and then selecting the desired view. The view you’ll use most often is the Details view.
Using the Details view of Network Connections, you can quickly determine the following information:
-
Name The name of the network connection.
-
Type The type of connection, such as LAN or High-Speed Internet.
-
Status The status of the connection, such as Connected or Disabled.
-
Device Name The manufacturer and type of network adapter.
-
Phone # Or Host Address The phone number associated with a dial-up connection or the host address associated with a remote access connection.
-
Owner The owner of the connection, such as System.
If you select a connection, the Network Connection toolbar allows you to work with connections in several different ways. The option buttons are used as follows:
-
Diagnose This Connection Starts the Windows Networks Diagnostics Tool for troubleshooting.
-
View Status Of This Connection Displays the connection’s Status dialog box, which can be used to get details about the TCP/IP configuration and to manage the TCP/IP configuration.
-
Change Settings Of This Connection Displays the connection’s Properties dialog box, which can be used to manage the TCP/IP configuration.
Tip If you right-click a connection, a shortcut menu will provide an expanded set of options.
EAN: 2147483647
Pages: 101