Crafting Page Design with Layout Tables
As you learned in Chapter 9, Working with Tables, tables consist of rows and columns . Each row or column contains one or more cells . Each cell , in turn , has its own border, as well as the table itself. By default, the table borders are visible. However, by turning off table border display, your visitor sees only the text and images you ve placed within the table cells, not the borders. The table thus becomes a tool for designing an entire Web page. The heightened level of control lets you precisely position elements in a way that helps boost your business s identity.
Templates Are for Tables Too!
If you want a jump-start in using tables for page layout, shop through FrontPage s page templates. Choose File, New to open the New task pane. Under the heading New Web Site, click More Web Site Templates. In the General tab, click Personal Web Site. When the Web site has been created, double-click index.htm. This page uses a table for layout (see Figure 11-1). You can use such a table-based template as a starting point for your own page, saving time in brainstorming layouts and in starting to execute them, too.
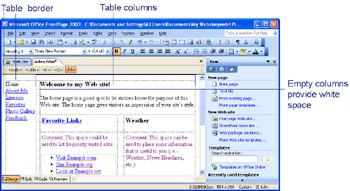
Figure 11-1: You can use a template as a starting point for creating a layout table.
| Aha! | Editing Tables Is a Snap |
Creating Your Own Layout Table
FrontPage gives you several options for creating layout tables. If you love to draw and miss using pencil and paper to design pages, you ll love FrontPage s table pencil for instantly drawing tables (see Going Back to the Drawing Board with Layout Tables later in this chapter). You can insert a table from scratch using the Table menu, too. On the other hand, if you haven t used Web page tables very often, and you want a jump-start to create an effective layout quickly, the quickest and easiest way to use a table for page layout is by using the Layout And Tables task pane to insert a layout table.
Conveying a Message with a Pre-designed Layout Table
FrontPage gives you a selection of pre-formatted table layouts that provide you with a head start on your design. These table layouts enable you to choose and preview tables that have different background colors assigned to them. The type fonts also provide visual interest by conveying a particular impression (businesslike, high-tech, and so on). To insert a layout table and preview the available layouts, use the Layout Tables And Cells task pane. Just follow these steps:
-
Switch to Design View, if necessary, by clicking the Design button.
-
Position the cursor at the spot in the current Web page where you want the table to appear. If you want the layout table to control the design of an entire page, open a new blank page in Design View by clicking the Create A New Normal Page button.
-
Select Table, Layout Tables And Cells.
-
When the Layout Tables And Cells task pane appears, scroll down to the Table Layout section (see Figure 11-2 ).
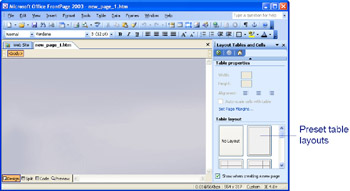
Figure 11-2: Choose a predetermined layout table template. -
When the layout table templates appear, scroll through the miniature layout table templates.
-
Click a template to add it to the current page .
Controlling Layout by Creating a Table from Scratch
Of course, you don t need to use one of the pre-designed layout tables in order to design a Web page with a table. You might need to emulate the layout of your annual report or company newsletter, for instance, and you don t see a pre-designed layout table that does the trick. In that case, you can always create your own layout table from scratch by using aspects of the FrontPage interface you already started to use in Chapter 9, Working with Tables. It s a good choice if you aren t comfortable with the table pencil icon for drawing tables (described in the following section), or if you want complete control over the arrangement of your table. Here s all you need to do:
-
Select Table, Insert, Table.
-
When the Insert Table dialog box appears (see Figure 11-3), select the option next to the Enable Layout Tools for this table.
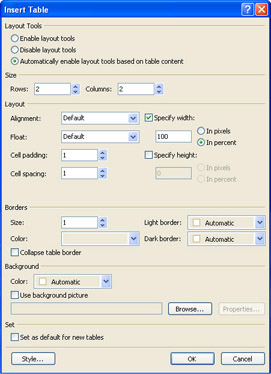
Figure 11-3: The Insert Table dialog box lets you create a table and activate layout tools. -
In the Borders section of Insert Table, change the size to 0.
-
Set the number of rows and columns for your table, and specify other layout options such as the alignment of cell contents.
-
Click OK. The table appears in Page View.
| Aha! | Add Extra White Space |
Going Back to the Drawing Board with Layout Tables
FrontPage gives you a way to create tables that s interactive and truly has a hands-on feel ”you can draw tables directly in Design View by dragging a table pencil icon across the screen. One advantage of drawing a table is speed: you move your mouse a few times, and you have an instant layout table. Another is that tables and cells you draw with the table pencil have their border width set to zero automatically. Plus, it s fun to see the table appear as you draw it. You can draw a table or cell from one of two starting points, which are both depicted in Figure 11-4:
-
From the Layout Tables And Cells task pane, which appears when you select Table, Layout Tables And Cells.
-
From the drawing-specific Tables toolbar, which appears when you choose Table, Draw Table, or when you choose View, Toolbars, Tables.
In either case, FrontPage displays two table drawing tools. Click Draw Layout Table, then drag within Page View to create a new table. Click Draw Layout Cell, then drag within Page View to draw an individual cell within a table.
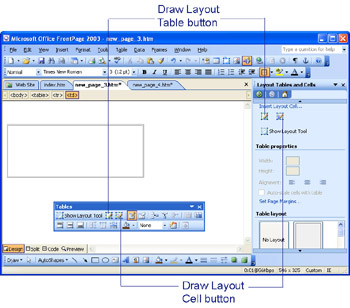
Figure 11-4: FrontPage s table drawing tools are found in the task pane or in the Tables toolbar.
| Aha! | Sketch Your Table on Paper |
Once the Draw Layout Table and Draw Layout Cell buttons are visible, drawing a table is easy ”so easy that it s worth trying it out a few times so you can get the dimensions just the way you want them. Let s say you want to create a layout table with two columns and one row, which is a common choice for designing a Web page. Follow these steps:
-
Switch to Design View, if necessary. Then click Draw Layout Table, in either the task pane or the Tables toolbar.
-
Pass your mouse pointer over Page View. Notice that the pointer turns into a pencil icon after you click on either Draw Layout Table or Draw Layout Cell. Click in Page View, hold down your mouse button, and drag down to the right. Release the mouse button, and a table with a green border around it is created (see Figure 11-5).
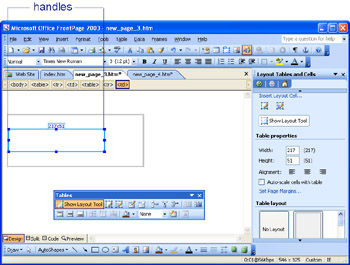
Figure 11-5: You can quickly draw and resize tables or individual cells. -
Notice that, after you draw a table, four resize handles appear at the corners. Click and drag any of these handles in order to resize the table, in case you didn t draw it exactly right the first time.
-
Click Draw Layout Cell.
-
Click in the upper left-hand corner of the table you just drew. Drag down and to the right to draw a cell.
-
Release the mouse button. The cell appears outlined in color , with a white background (see Figure 11-6 on the following page). If you need to resize the cell, click and drag one of its handles.
-
Repeat steps 5 and 6 until you have drawn all of the cells you need.
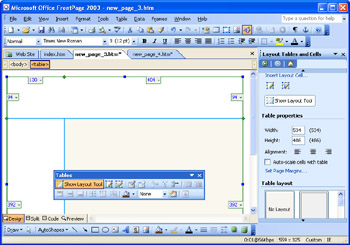
Figure 11-6: You can draw a layout cell within a table you have drawn.
You can now click within each of the cells you have drawn and insert text, images, and other contents as necessary.
| Note | If you click Draw Layout Cell before you have drawn a table, FrontPage automatically creates a table to enclose the cell that you draw. |
Adapting to Content Changes by Adjusting Cells
Whether you draw or insert individual table cells, you may not always get it right the first time. One of your co-workers changes the size of your corporate logo, or an editor adds a few critical words. Not to worry: you can accommodate the changes by adjusting the cell properties with controls in the Layout Tables And Cells task pane. Follow these steps:
-
Make sure you are in Design View and that the Layout Tables And Cells task pane is visible.
-
Click the cell in the layout to highlight its border and resize handles.
-
Click Cell Formatting... in the task tane to display the dimensions and characteristics of the selected cells. The data appears under the heading Borders And Dimensions in the task pane (see Figure 11-7).
-
Change the data in the Size and Alignment boxes to adjust the cell. You can also click and drag any of the cell handles to resize the cell; the data in the Size And Alignment section of the task pane changes accordingly .
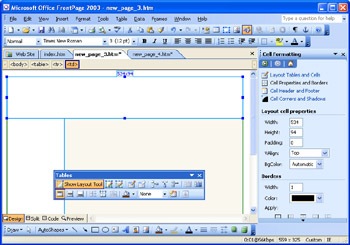
Figure 11-7: You can change cell characteristics from the task pane or by dragging cell handles.
| |
White space is essential in corporate communications. The empty areas on a page direct the viewer s eye to important words or images. White space is impossible to add on a Web page unless you add a spacer.
| Lingo | A spacer is a table column or row, or a blank image ”an image file, usually saved in GIF format ”that has no contents. Spacers are commonly used by Web designers to add extra space between parts of a table, or parts of a Web page. Because spacer images, when created by graphics programs, can be assigned a specific height or width in pixels, they can give designers a great deal of control over the look of a page, especially one that has been designed using tables. |
If you want to add just a few points or pixels of space, you can adjust cell spacing or cell padding. But to add large amounts of space, such as a quarter or half an inch, consider adding an extra column or row to the table as a spacer. FrontPage gives you the option to automatically add a spacer as part of its layout table tools, as described in the next section.
| |
Ensuring Table Visibility by Autostretching
As you already know, the width of a table, or the cells within it, can be specified as either a fixed measurement, such as a definite number of pixels, or as a percentage of the width of the page or the table itself. Tables often need to be a constant width. One or more of the cells may contain a graphic image, such as a paid advertisement, that has to be displayed at the correct size. But using tables that have a fixed width is risky. Anyone who views the page that contains the table can resize his or her Web browser so that it s narrower than the table. As a result, the table s contents aren t completely visible, and the table itself may become distorted .
FrontPage s Autostretching feature enables you to change a table from fixed to variable width. Autostretching is the process of inserting a spacer image along either the bottom row, or rightmost column of a table. This last column or row is of variable, rather than fixed, width. Thus, it can change size, depending on the size of the browser window. To autostretch a table, follow these steps:
-
Create a layout table, either by drawing it or by using the Layout Tables And Cells task pane, as described earlier in this chapter.
-
Click Show Layout Tool in the Tables toolbar to display the layout tools. Click the size box next to the row or column where you want to add the spacer image, and choose Use Column (or Row) Spacer Image to add the spacer.
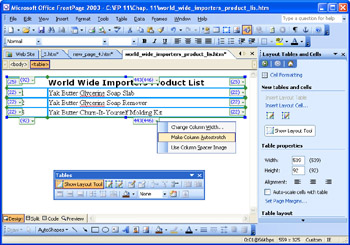
As you can see in the image above, the column on the right contains a small amount of text (a product number), and is wider than it needs to be. The column on the right needs to stretch to accommodate a narrow browser window. To make the column autostretch, click the size box for one of the cells in the column, and choose Make Column Autostretch from the shortcut menu. A new row containing two new columns appears at the bottom of the table. The columns aren t easy to see, because they are only three pixels in height (you can see this if you click carefully on the new column on the left, which contains a spacer image).
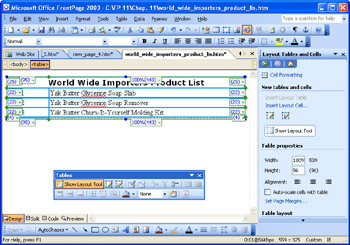
The column on the left has shrunk to fit the available text. If the viewer narrows his or her browser window, the table will stretch accordingly so all of the contents remain visible (see Figure 11-8).

Figure 11-8: Autostretching keeps all of a table s contents visible, regardless of the browser window size.
Duplicating Precise Layouts with a Tracing Image
Suppose you need to duplicate the printed page s layout on the Web, or the layout of another Web page that s especially complicated. For layouts that are complex and need to be duplicated with precision, FrontPage gives you a powerful new tool. Now you can load an image of the layout you want to copy, and keep that image visible in the background while you reconstruct a new Web page on top of it. Such a procedure is called image tracing . A tracing image appears in the background of FrontPage s Display View, and you create the new page by manipulating elements in the foreground. The tracing image is only used during the Web page creation process, as a model you follow when working on a page. It doesn t show up in the final Web page. When you re finished, the Web page should represent a close approximation of the original design you were attempting to duplicate. Layout tools such as layout tables and layers (described in this chapter), should enable you to duplicate the design fairly closely.
Suppose you have an image that you want to trace in order to duplicate its layout. Microsoft s own home page provides a good example, because it uses a table layout with a complex arrangement of rows and columns, and embedded photos. The following steps assume that you have captured an image of the home page and saved it in one of the Web page formats supported by FrontPage (GIF, JPEG, or PNG):
-
Open a new blank Web page in Design View.
-
Select View, Tracing Image, Configure.
-
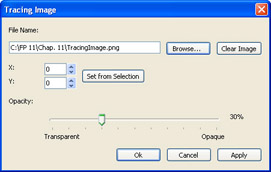
In the Image Tracing dialog box, either enter the path that points to the image in the File Name box, or click Browse and locate the file on your hard disk.
-
Move the Opacity slider to the left (say, to 30%) to reduce the opacity of the tracing image. The lower the Opacity setting, the fainter the image appears in the background.
-
Click OK.
-
You can now use the Draw Table tool to create a table, as well as individual cells within it. Click View, Toolbars, Tables to display the Tables toolbar. Then click Draw Table.
-
Click and drag the table pencil over the appropriate segments of the Web page to duplicate the table cells, as shown in Figure 11-9.
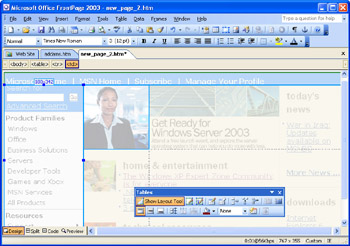
Figure 11-9: Draw table cells and layers over the tracing image to duplicate the layout. -
When your layout is complete and you no longer need the tracing image as a model, select View, Tracing Image, Configure. In the Tracing Image dialog box, click Clear Image, then click OK.
You ll notice that, if your tracing image extends to the edges of FrontPage s Design View, you won t be able to draw out to the edges. If that s the case, you can adjust the positioning of the tracing image within Design View: Select View, Tracing Image, Configure. Click the up or down arrows next to X and Y to move the X and Y coordinates of the tracing image. X moves the image from side to side, and Y moves the image up and down. Click Apply to adjust the image without closing the Tracing Image dialog box, so you can continue to make adjustments if you need to.
| Note | The image you use for tracing can be in GIF, JPEG, PNG, TIFF, or BMP format. To obtain a tracing image, you can scan a printed booklet and save it in one of these formats. You can also use a graphics program to capture an image of a Web page and save it as a tracing image. |
EAN: 2147483647
Pages: 179