Getting to Work with Sites and Folders
In FrontPage 2003, you can work with individual pages, or with collections of pages known as Web sites. The first time you start FrontPage, you ll be in Page view. This view is intended to help you design and code individual pages. While this might be all you require if you design individual home pages, you will most likely need to begin working with FrontPage sites and folders almost immediately.
| Lingo | A FrontPage Web site is a home page, its associated pages, folders and other files created in FrontPage and stored on a Web server or on a computer s hard drive. A FrontPage Web site also contains files and folders that support FrontPage-specific functionality that allows the site to be opened, copied , edited, and administered in FrontPage. In documentation, and in this book, you may also see a FrontPage Web site referred to as a FrontPage Web or simply a web . |
Typically, your first task will be to create the sites that you will use to store home pages, associated pages and other related files. If you do this, the next time you start it, FrontPage opens the last site you worked with for editing. You also have quick access to recently used sites by choosing File, Recent Sites, then selecting the site you want to open .
Until it is published, a FrontPage Web site is a work in progress. It exists on a computer s hard disk, but generally isn t available for browsing. Use folders to organize the pages and related files in a site, but keep in mind that this folder structure will also be used when the site is published. Don t implement a folder structure that is difficult to maintain. Instead, use a structure that is logical and intuitive to anyone who may work with the site now or in the future.
| Aha! | When working with folders and files, you can use the Ctrl key to select multiple files or folders individually. Click the first file or folder you want to select, hold down the Ctrl key, then click individually on other files or folders that you want to select. Use the Shift key to select a group of contiguous files or folders. Click the first file or folder you want to select, hold down the Shift key, then click the last file or folder. |
Creating FrontPage Web Sites
FrontPage makes it easy to create new Web sites. When you create a FrontPage Web site, you can specify the location of the Web site as:
-
A folder on your local hard drive, such as C:\MyWebStuff\TestWeb1\.
-
A network share specified using a UNC path , such as \\IntranetServer03\WebDev\.
-
A directory on a remote web server specified as a URL, such as http://www.microsoft.com/support/ .
Usually, you ll want to create the Web site on your local hard drive first, and then publish it later to a network share or remote web server. If you do this, you ll have a local development copy that you can easily author and design, and a separate finished version that can be browsed when you make the site available to others. The default location for local FrontPage sites is My Documents\My Web Sites.
You can create a new site quickly by completing the following steps:
-
Click the down arrow to the right of the New tool (shown in Figure 2-3) on the Standard toolbar, and then select Web Site.

Figure 2-3: The New tool is located in the FrontPage standard task bar. -
Using the Web Site Templates dialog box shown in Figure 2-4, specify the type of Web site you want to create. Usually, you will want to base your new Web site on one of the following Web templates or wizards:
-
Empty Web Site Creates the necessary folders and files for a new Web site, but doesn t create pages or open any pages for editing.
-
One page Web Site Creates a new Web site with a single page ready for editing.
-
Corporate Presence Wizard Starts a wizard that helps you create a Web site designed for a company that plans to offer products or services.
-
Customer Support Web Site Creates a customer support Web site, complete with discussion areas. This site could also be used for general or technical support.
-
Discussion Web Site Starts a wizard that helps you create a Web-based discussion group.
-
Personal Web Site Creates a personal Web site complete with About Me, Favorites, Feedback, Interests, and Photo Gallery pages.
-
Project Web Site Creates a Web site that helps you manage individual or team-based projects, includes knowledge base and requirements discussion areas.
-
SharePoint Team Site Creates a team Web site that you can use to manage collaboration and document sharing.
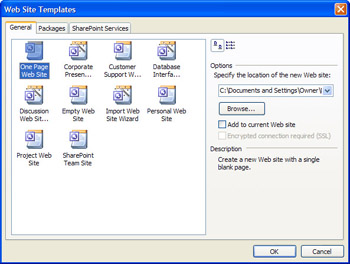
Figure 2-4: Select the Web site template you want to use as the basis of the new site.
-
-
If you want to specify the location of the site, set the location for the Web site using the field provided in the Options area of the dialog box, or click the Browse button to find a location. The location can be a URL, network path, or local folder.
-
Click OK. If the folder doesn t exist at the given location, FrontPage creates the folder and adds the necessary file and folder structures for a FrontPage Web site. If the folder exists at the given location, FrontPage converts the folder to a FrontPage 2003 Web site.
| Note | If you are creating a new site on a server, you may be prompted to provide logon information. Be sure to use the user name and password for an account that is authorized to access the server you are working with. |
Opening, Closing, and Saving Web Sites
FrontPage sites that you ve worked with recently are accessible by clicking File, Recent Sites, and then selecting the site you want to work with. You can also open a site by completing these steps:
-
Click the down arrow to the right of the Open tool (shown in Figure 2-5) on he Standard toolbar, then select Open Site. Or choose File, Open Site. This displays the Open Site dialog box.

Figure 2-5: The Open tool appears on the standard FrontPage toolbar, but may appear as a folder with the Earth inside it. This indicates that this tool was last used to open a site. -
If you know the location of the web you want to open, type this location in the Site Name field. Otherwise , use the Look In list box or other options to browse for available webs.
-
When you find the site you want to use, click Open. Each open site is managed in a separate instance of FrontPage. Use the Windows taskbar to switch between the FrontPage instances that are running.
When you are finished working with a site, you can close it and save your work by choosing File, Close Site. If you ve made changes to any files in the site, you are prompted to save the changes. You can avoid individual prompts for each file by choosing File, Save All, and then choosing File, Close Site.
Bringing Existing Web Pages and Sites Into FrontPage
Web sites that you ve created in other authoring environments, as stand-alone folders, or on a remote server, can be retrieved, stored locally and converted to a FrontPage Web site. To do this, you ll use the Import Web Site Wizard. This wizard can import Web sites using:
-
Extensions If FrontPage Server Extensions or Microsoft SharePoint Team Services are installed on the remote server, you can use the extensions to transfer the Web site from the remote location. Using extensions should help ensure that all the files FrontPage needs are transferred with their source code intact.
-
DAV Web distributed authoring and versioning (WebDAV) is a protocol for authoring and publishing files using a standard set of permissions. If the remote server is WebDAV-compliant, you can use this technology to retrieve Web sites that you want to import. Again, this technique should ensure the files are transferred with their source code intact.
-
FTP File Transfer Protocol (FTP) is a standard Internet protocol for transferring files. To import files using this protocol, the remote server must be running FTP server software. Typically, you ll use this protocol if the remote server isn t compatible with FrontPage, FrontPage Server Extensions, SharePoint Team Services, or WebDAV.
-
File System File system allows you to transfer a Web site s files using the operating system. If the files are stored on a local disk drive, or are accessible on a network share to which you have access, you can use this option to directly transfer files.
-
HTTP Hypertext Transfer Protocol (HTTP) is a standard Internet protocol for transferring files over the World Wide Web. If you can t access files any other way, you can use this technique to retrieve files from a remote server. The files may not be transferred with their complete source code, however. Instead, you may get the source as viewed in an end-user s browser.
To import an existing Web site into FrontPage, follow these steps:
-
Choose File, Import. Then, in the Import dialog box, choose From Site to start the Import Web Site Wizard.
-
Choose the import technique. As Figure 2-6 on the following page shows, the options are:
-
FrontPage Server Extensions or SharePoint Team Services
-
DAV
-
FTP
-
File System
-
HTTP

Figure 2-6: Determine the transfer technology, then specify the location of the import files.
-
-
Type the path to the Web site or folder you want to import, or click Browse to use the New Publish Location dialog box to find the Web site or folder you want to import. Note the following:
-
When importing from files on a local drive or network share, you can type the path to a local file system, such as C:\docs\supportsite, or the UNC file path to a network server, such as \\InternetServer03\docs\testsite.
-
When importing from a Web site, click Browse, then in the New Publish Location dialog box, click the Search The Web tool on the dialog box s toolbar. This starts Internet Explorer. Browse to the source Web site, then close Internet Explorer. The URL is entered in the Site Name field. Click Open.
-
-
If you are using extensions, or the file system, you can transfer the root folder and any associated subsites in that folder by selecting Include Subsites.
-
Click Next. The Web site is given a default save location. You can change this by:
-
Typing a new location Set the location for the Web site using the field provided, or click the Browse button to find a save location.
-
Selecting Add To Current Web Site Add the Web site s files and folders to the current site. If any files or folders being imported have the same name as files or folders in the current Web site, FrontPage will warn you. You ll be able to replace the existing file by clicking Yes, or keep the existing file by clicking No.
-
-
With extensions, DAV, and HTTP, you can make a secure SSL connection to the remote server by selecting Secure Connection Required (SSL). Click Next.
-
If you are importing from a Web server using HTTP, you can set import limits. You can choose to limit according to levels of folders and subfolders , or total kilobytes. You can also limit the transfer to text and images. Click Next.
-
Click Finish to begin the import process.
Deleting Web Sites
If you no longer need a FrontPage Web site, you can delete it. Instead of deleting the site using Windows Explorer or another tool, you should use FrontPage. If you delete the site using FrontPage, you have more control over how the site s files are deleted and can be sure references to the site are removed from FrontPage.
To delete a site in FrontPage, follow these steps:
-
Open the site for editing in FrontPage, then change to the Folders view, or access the Folder List panel.
-
Right-click the top-level folder for the web, then select Delete.
-
In the Confirm Delete dialog box, select one of the following deletion options:
-
Remove FrontPage Information From This Web Site Only Removes folders and files used by FrontPage Server Extensions and SharePoint Team Services, but doesn t remove standard pages or files from the site. You may want to use this option if you discover you are publishing to a server that doesn t support FrontPage Server Extensions or SharePoint Team Services.
-
Delete This Web Site Entirely Deletes the entire contents of the site. The contents of the site are not placed in the recycle bin and cannot be recovered from the recycle bin once they are deleted.
-
-
Click OK.
Creating Folders
Sometimes you may want to create subfolders for files and pages within a site. To do this, follow these steps:
-
Change to the Folders view, or access the Folder List panel.
-
Right-click any open space, point to New, then select Folder.
-
FrontPage creates a new folder with the folder name highlighted for editing. Enter a name for the folder.
| Note | You can move pages, images, and other files into the new folder. When you do this, you don t have to worry about breaking links within pages. FrontPage automatically updates all references to the files. |
Hiding Folders
All folders and files are accessible to users that access your site in FrontPage and browse your published site unless you specify otherwise. One way to block user access is to hide folders so that they aren t listed in FrontPage and then ensure that directory browsing is disabled on the Web server when the Web site is published.
| Note | In FrontPage 2003, hidden folders are visible by default in FrontPage 2003. This is a change from previous versions. |
Creating Hidden Folders
To create a hidden folder, use the underscore as the first character of the name. The underscore tells FrontPage the folder is private and shouldn t be listed when browsing folders in FrontPage. You still need to tell the Web server that the folder shouldn t be browsed and may also need to change the folder permissions so that it cannot be accessed.
Displaying Hidden Folders
If you want to show or hide the hidden folders in FrontPage, you ll need to follow these steps:
-
Choose Tools, Site Settings. This displays the Site Settings dialog box.
-
On the Advanced tab, select Show Hidden Files and Folders.
-
Click OK. When FrontPage prompts you to refresh the site, click Yes. When you refresh a site, FrontPage updates the views of the site using the new settings.
| Aha! | When you create a new site, a hidden folder called _private is created automatically. This folder is typically used to store form results that you do not want people browsing the web site to see. Visitors to the site aren t allowed to view the contents of this or any other hidden folder as long as directory browsing is disabled. _private is the only hidden folder displayed in FrontPage regardless of the hidden folder settings. |
Renaming Folders
When you work with Web site folders, you should perform all of your editing tasks in FrontPage, especially when renaming folders. The main reason is that you don t have to worry about breaking links within pages. FrontPage automatically updates all references to the files in the folders ”as long as those files are in the current Web site.
To rename a folder, follow these steps:
-
Right-click the folder in the Folder view or Folder List pane, then select Rename.
-
The folder name is highlighted for editing. Edit the filename. When you are finished, press Enter.
Deleting Folders
When you delete a folder in FrontPage, the folder and all its contents are removed. The contents of the folder are not placed in the recycle bin and cannot be recovered from the recycle bin afterward. To delete a folder, follow these steps:
-
Change to the Folders view, or access the Folder List panel.
-
Right-click the folder you want to delete, then select Delete. You can use Shift+Click and Ctrl+Click to select multiple folders.
-
In the Confirm Delete dialog box, select Yes or Yes To All to delete the selected folder or folders.
EAN: 2147483647
Pages: 179