Viewing Web Site Files and Folders in Different Ways
FrontPage 2003 also provides different ways to view and work with Web sites. Views you can choose from include:
-
Folders Lists all files and folders associated with the current Web site. You can sort file and folder listings by name , title, size , type, modification date, editor and comments. Double-clicking a folder allows you to browse its contents. Double-clicking a file opens it for editing.
See Also For more information on working with Web site files and folders, see the section of Chapter 2 entitled Getting to Work with Web Sites and Folders.
-
Remote Web Site Lets you publish local files to a remote Web site. You can view the publish status, quickly synchronize files, optimize HTML source as you publish pages, and more.
-
Reports Enables you to manage and analyze site content, using reports. Site Summary, the top-level report, provides a summary entry for all available reports. Click a report title to access the report details.
Aha! Access Individual Reports
Use the Reports selection menu to access individual reports directly. You ll find this selection menu in the upper left corner, just below the row of tabs. -
Navigation Displays the navigation structure of the Web site. Typically, this structure branches out from the site s home page. To view various levels of the site hierarchy, expand the view by clicking the plus nodes (+). Later, you can collapse the view by clicking the minus nodes (-).
-
Hyperlinks Allows you to see links to and from selected pages. To take advantage of this view, select a page in any of the other views, then access this view.
-
Tasks Enables you to create and manage to-do list tasks for the current Web site. Tasks are listed by status, name, assignment, priority, association, modification date and description. Right-click in the viewing area and select Add Task to create a new task.
Figure 1-2 shows a Web site being edited in FrontPage. Look in the lower left corner of Figure 1-2, and you ll see a row of buttons in the status area. These buttons are available whenever you work with Web sites. You can switch Web site views just as you do with page views ”click the button for the view you want to use. If you want to use the Folders view, you click Folders. For the Remote Web Site view, you click Remote Web Site, and so on.
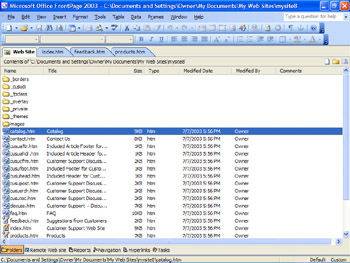
Figure 1-2: FrontPage 2003 also provides many different ways to view and work with Web sites.
Designing Pages with Ease and Precision
As shown previously in Figure 1-1, the Design view allows you to see markup tags, as well as the layout of page content. When working in the Design view, there are many tools that can help you quickly design great-looking pages. The design tools you ll use the most are:
-
Reveal Tags for selecting tags and editing tag properties
-
Quick Tag Selector for faster editing of tags and their contents
-
Rulers and Grids for precise positioning
-
Preview In Browser and Page Size for checking the final product
These design tools are discussed in the sections that follow.
Revealing Tags for Quick Selection and Editing
Regardless of which markup language you are using, FrontPage clearly delineates tags. For example, an opening tag, such as <p>, precedes the element you are defining, and a closing tag, such as </p> follows the element ”except in the case of empty elements that have only an opening tag. With Reveal Tags enabled, you can:
-
Click the opening or closing tag to select the entire element you are defining, including its contents. You can then cut, copy or delete the selected element and its contents.
-
Double-click the opening or closing tag to display a style or properties dialog box for the element. You can then customize the way the element is used.
To see markup tags when you are working in Design view, choose View, and then Reveal Tags. A check mark next to this option on the menu indicates that the feature is enabled. You can quickly turn this feature on or off by pressing Ctrl+/.
Editing Faster with the Quick Tag Selector
Another important design feature is the quick tag selector, which enables you to perform a variety of editing tasks quickly. When you are working with Web pages in Design view, choose View, and then Quick Tag Selector (see Figure 1-3) to enable this feature. A check mark next to this option on the menu indicates that the feature is enabled.

Figure 1-3: You can use the Quick Tag Selector to edit tags and their contents quickly.
Here s how the Quick Tag Selector works:
-
Click on the opening or closing tag of the element you want to work with.
-
Right-click the related entry for the tag you ve selected on the accessory toolbar area (the toolbar area below the quick access tabs).
-
Use the shortcut menu displayed to perform common editing tasks on the selected element. You can use these options as follows:
-
Select Tag Selects the tag and its contents ”the same as clicking the opening or closing tag in the layout area.
-
Select Tag Contents Selects the contents of the tag, and not the tag itself.
-
Edit Tag Displays the Quick Tag Editor in Edit Tag mode, which allows you to edit tag attributes directly. For example, with a paragraph tag, you could add the attribute align= center to center the paragraph.
-
Remove Tag Deletes the selected tag, but preserves the contents. For example, if you select a paragraph tag, then choose this option, FrontPage removes the opening <p> and closing </p> tags, but preserves the contents within the tags.
-
Insert HTML Displays the Quick Tag Editor in Insert HTML mode, which allows you to insert markup directly before the selected tag.
-
Wrap Tag Displays the Quick Tag Editor in Wrap Tag mode, which allows you to insert markup that should enclose the selected tag. For example, if you select a paragraph tag and then choose this option, you could type < div >< /div > to define a HTML division element that should contain the paragraph tag and all its contents.
-
Tag Properties Displays a style or properties dialog box for the selected tag. This is the same as double-clicking the tag.
-
Precisely Placing Elements with Rulers and Grids
When you are working with Web pages in Design view, you can also add rulers and grids, making it easier to place elements, such as images or tables, precisely. Select View, then Ruler And Grid, Show Ruler Or View, Ruler And Grid, or then Show Grid to toggle these features on or off.
FrontPage 2003 also supports snap-to-grid. When enabled, this feature aligns elements to grid lines, making it easier to position elements in rows or columns .
| Aha! | Get More Control Over Spacing and Grids |
Previewing Pages to Ensure Everyone Can Enjoy Them
When you design pages, you should always think about how the page will look to Joe Websurfer, and design page elements with that average Joe in mind. Back in the good old days of the Web, most pages were designed for 640x480-pixel screen resolution, because, as the thinking went, the average Joe had a system that used this display size. Fortunately, we ve come a long way since then, and most computers these days have screens with much higher resolutions . In fact, in many cases, an 800x600 screen is at the low end, and a 1024x768 resolution is more the norm ”despite what some of the Web design books might tell you. Keep this in mind when you re designing pages.
If you want to preview a page using a specific display size, FrontPage 2003 makes it easy. Choose File, Preview In Browser, then select the browser and display mode you want to use, such as Microsoft Internet Explorer 6.0 (800x600). Display modes you can choose from include:
-
640x480
-
800x600
-
1024x768
| Note | 640x480, 800x600 and 1024x768 are standard display sizes for Windows-based computers. These screen sizes don t take into account those used by other operating systems, or the screen sizes available with high-end displays on Windows-based computers. Apple computers use different screen sizes altogether, and other computers may use different screen sizes as well. High-end display resolutions can go up to 2048x1536 and beyond. |
One of my favorite Design view interface enhancements is the Page Size feature. With this feature, you can preview Web pages in a specific size without ever having to leave Design view. Best of all, FrontPage 2003 takes into account the screen space used by menus , toolbars and scrollbars when displaying the page at your chosen page size.
To take advantage of the Page Size feature, choose View, Page Size, and then select the page size you want to use. Page sizes you can choose from include:
-
536x196, the default page area available when screen size is 640x480.
-
600x300, the page area available when screen size is 640x480, and the browser is maximized.
-
760x420, the page area available when screen size is 800x600, and the browser is maximized.
-
795x470, the page area available when screen size is 832x624, and the browser is maximized.
-
955x600, the page area available when screen size is 955x600, and the browser is maximized.
| Note | One important thing to note about these page sizes is that they are set with Internet Explorer in mind. Different browsers might have different page sizes. To accommodate other browsers, you can define additional page sizes. Click View, Page, and then select Page Size, Modify Page Sizes. In the Modify Page Sizes dialog box, click Add to specify the pixel width and height of the new page size. |
EAN: 2147483647
Pages: 179