Maintaining SharePoint s SQL Server Database


Maintaining SharePoint's SQL Server Database

One of the most important components of any SharePoint implementation is the database itself. All functionality, configuration settings, and documents are stored within the various SQL databases, and great care should be taken to implement a robust maintenance plan.

Establishing a SQL Server Maintenance Plan

For SQL Server databases to perform at optimal levels, it is recommended that a SharePoint administrator conduct routine maintenance on each database. Some of these routine database tasks should involve rebuilding indexes, updating index statistics, and performing internal consistency checks and backups. These routine database maintenance tasks are often overlooked because they are redundant, tedious, and time consuming. Moreover, today's administrators are overwhelmed with many other tasks throughout the day. In recognition of these issues, Microsoft has provided a way to automate these daily database administrator (DBA) chores with a maintenance plan.

A maintenance plan performs a comprehensive set of SQL Server jobs that run at scheduled intervals. The maintenance plan conducts scheduled SQL Server maintenance tasks to ensure that databases are performing optimally, regularly backed up, and checked for anomalies. The Database Maintenance Plan Wizard can be used to automatically create and schedule these daily tasks. In addition, the Database Maintenance Plan Wizard is included with SQL Server, and the wizard can also configure log shipping.

A comprehensive maintenance plan includes these primary administrative tasks:

  • Run database integrity checks.

  • Update database statistics.

  • Perform database backups.

  • Ship transaction logs to another server.

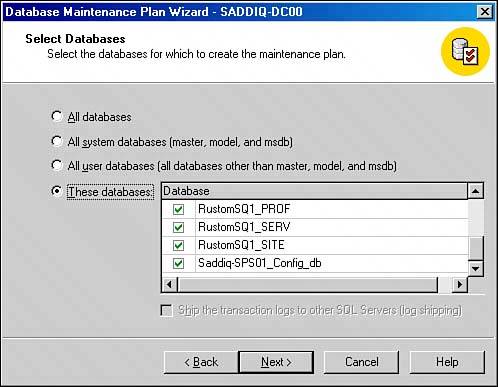
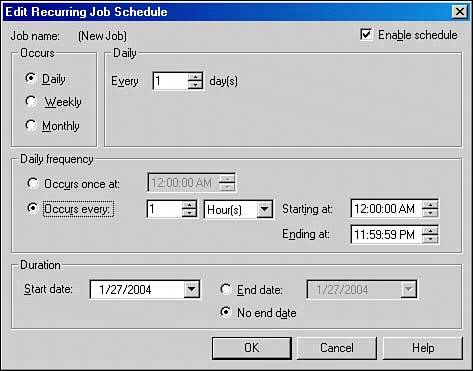
NOTE

Log shipping requires SQL Server Enterprise Edition and a minimum of two SQL Server computers or instances. A database maintenance plan can be created on either a single database or on multiple databases at the same time. However, the log shipping option is available only when a maintenance plan is created on a single database.


Creating a Maintenance Plan

Maintaining SQL databases is a core activity for SharePoint servers. A well-maintained system requires the use of a maintenance plan that can be followed on a defined basis. Follow these steps to start the creation of a maintenance plan on the SharePoint SQL Server databases:

1.

On the SharePoint database server, choose Start, Programs, Microsoft SQL Server, and Enterprise Manager.

2.

In Enterprise Manager, first expand the desired server group and then expand a server.

3.

Choose Tools, Database Maintenance Planner from the menu.

4.

In the Welcome to the Database Maintenance Plan Wizard screen, click Next.

5.

In the Select Databases screen, select the These Databases button.

6.

In the Database pane on the right-hand side, place a check mark on the SQL Server databases Master and MSDB and place a check mark on the SharePoint configuration and content databases.

7.

Click Next as shown in Figure 18.4.

Figure 18.4. Selecting the database in the Database Maintenance Plan Wizard.


8.

In the Update Data Optimization Information screen, check the Reorganize Data and Index Pages box.

9.

Select Reorganize Pages with the Original Amount of Free Space and click Next, as shown in Figure 18.5.

Figure 18.5. Updating data optimization information.


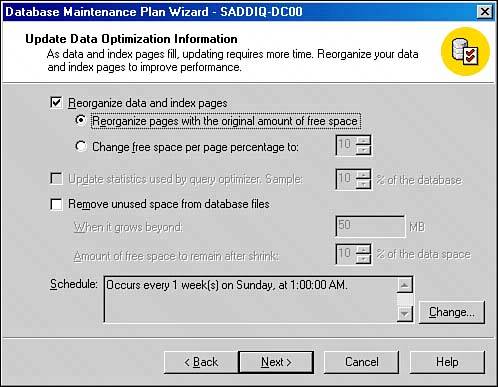
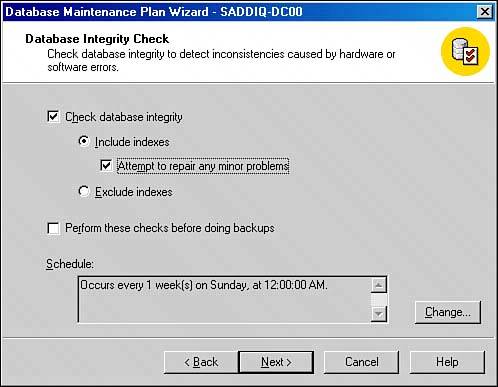
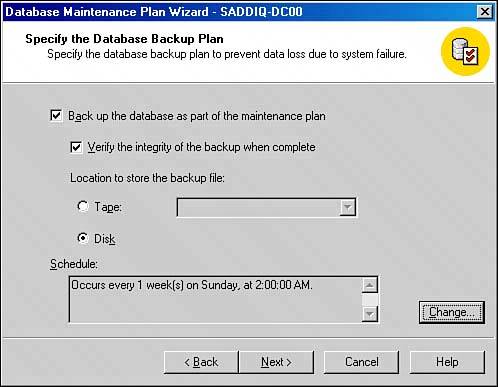
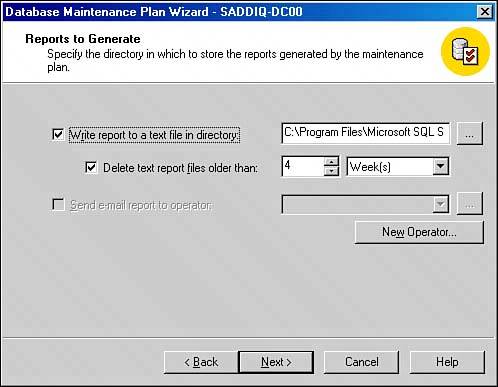
After the first set of steps has been initiated, an administrator can choose from several different options on the Update Data Optimization Information screen. This screen provides two major options: Reorganize Data and Index Pages and Update Statistics Used By Query Optimizer. If the Reorganize Data and Index Pages option is selected, then the Update Statistics Used By Query Optimizer option is unavailable. The purpose of SQL Server indexes is to reduce the amount of time queries take to retrieve data. The first option reorganizes data and index pages and re-creates indexes on SQL Server database tables, which in turn allows for faster data access. In addition, SQL Server requires that free space be allocated in tables to accommodate for optimal database growth. An administrator for SharePoint can either reorganize pages with the original amount of free space per table or change the amount of free space per page to a desired percentage. Determining a percentage is based on how much new data the administrator needs to be inserted in the database.

The Update Statistics option allows SQL Server to choose the best option for an execution plan on queries based on automatically analyzing distributed statistics. The Remove Unused Space from Database Files option removes unused space from the databases if required. This option is not recommended for production systems because SharePoint Portal databases have a tendency to grow, especially if they are document repositories. Constant shrinking of the database is resource intensive and ultimately reduces SQL Server performance.

After the intial steps for database creation are completed, an administrator is faced with options for database integrity checks. The Database Integrity Check screen identifies any integrity anomalies with SQL Server databases by firing a SQL Server T-SQL command. The integrity check can include or exclude indexes when examining tables and databases. In addition, the integrity check can automatically repair anomalies if discovered. The Perform These Checks Before Doing Backups option performs integrity checks on the database before doing backups. If the integrity check discovers an anomaly before a scheduled backup, the next database or transaction log backup will not start. With this option, a database administrator must decide what is more importanteither database integrity or database backups and recovery.

To continue the maintenance plan process from the Database Integrity Check screen, perform the following steps:

1.

In the Database Integrity Check screen, check the boxes Check Database Integrity, Include Indexes, and Attempt to Repair Any Minor Problems, as shown in Figure 18.6.

Figure 18.6. Selecting options for the database integrity check.


2.

In the Specify the Database Backup Plan screen, check the Back Up the Database as Part of the Maintenance Plan box. Also, check Verify the Integrity of the Backup When Complete. Select Disk to store the backup; then click Next as shown in Figure 18.7.

Figure 18.7. Specifying the database backup plan.


NOTE

The Specify the Database Backup Plan screen enables a database administrator to create a backup strategy on each database. Administrators are given many backup options. The first option allows administrators to decide whether they want to back up the database. The second option, Verify the Integrity of the Backup When Complete, fires a T-SQL command that verifies whether the backup was successful and accessible. The final option involves choosing a method for storing the database backup by either tape or disk.

3.

In the Specify Backup Disk Directory screen, select the Use the Default Backup Directory option. Check the Create a Subdirectory for Each Database box and also check the Remove Files Older Than option. Accept the default four-week retention period, and the BAK backup file extension as shown in Figure 18.8. Click Next.

Figure 18.8. Specifying the backup disk directory.


NOTE

In this example the SQL Server default backup directory is used. For SQL Server disaster recovery, the best practice is to back up databases to tape. If a tape backup device does not exist, databases should be backed up to a different disk on the local server or to a network drive.

If the DBA decides to back up to disk, the Specify Backup Disk Directory screen appears when using the maintenance wizard. In this screen, the DBA provides the backup destination directory. If multiple database backups are selected, it is also possible to create a subdirectory for each database. The final options include the database backup retention period and the backup file extension. The database backup retention period should be based on an organization's database service level agreement. It is typical for the backup file extension to be .bak.

4.

In the Specify the Transaction Log Backup Plan screen, which provides the option to create transaction log backups, check the Back Up the Transaction Log as Part of the Maintenance Plan box and then check the Verify the Integrity of the Backup When Complete box. Select the Disk option. However, this time, click the Change command button to change the default transaction log schedule.

5.

Set the transaction log backup to occur daily. Next, set the transaction log frequency to once an hour and then accept the remaining defaults. Click OK as shown in Figure 18.9.

Figure 18.9. Editing the recurring job schedule.


NOTE

If the preferred method of backup is Disk, the DBA has the same options as the Specify Backup Disk Directory screen. The only difference is that the default backup extension for a transaction log is .trn and not .bak.

6.

In the Specify Transaction Log Backup Disk Directory screen, select the Use the Default Backup Directory option. Check both the Create a Subdirectory for Each Database box and the Remove Files Older Than box. Accept the default four-week retention period and the TRN backup file extension. Click Next.

7.

The Reports to Generate screen provides the option to create a status report based on the outcome of the maintenance plan and save it to disk or email it to an operator. In addition, a report retention period can be set. On this screen, check the Write Report to a Text File in Directory box. Then check the Delete Text Report Files Older Than box and accept the default four-week retention. Click Next as shown in Figure 18.10.

Figure 18.10. Selecting a directory for maintenance plan reports.


8.

In the Maintenance Plan History screen, check the Write History to the msdb.dbo.sysdbmaintplan_history Table on This Server box. Next, check the Limit Rows in the Table To box. Accept the defaults and then click Next, as shown in Figure 18.11.

Figure 18.11. Selecting maintenance plan history options.


9.

The final screen is the Completing the Database Maintenance Plan Wizard. Insert the desired plan name and then click Finish to finish creating a maintenance plan for both the SQL Server and SharePoint databases, as shown in Figure 18.12.

Figure 18.12. Completing the Database Maintenance Plan Wizard.


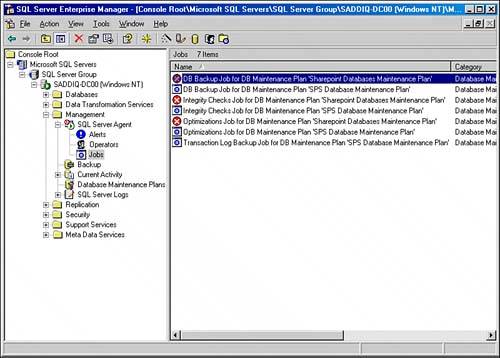
NOTE

If the SQL service is not running, a prompt may appear at this point indicating this. Start the SQL service to continue.


Viewing Maintenance Plans

All maintenance plans are stored in SQL Server as jobs. They require the SQL Server Agent to be running to launch the job at the scheduled interval. If the SQL Server Agent is off, the jobs will not commence. In addition, all jobs can be edited or changed for ongoing support or maintenance. Follow these steps to view the maintenance plan jobs in SQL Server Enterprise Manager:

1.

Choose Start, Programs, Microsoft SQL Server, Enterprise Manager.

2.

In Enterprise Manager, first expand the desired server group and then expand a server.

3.

Expand the Management Folder and then expand the SQL Server Agent.

4.

Click on Jobs to see a list of jobs created by the Maintenance Plan Wizard. The right-hand pane displays all the jobs created, as shown in Figure 18.13.

Figure 18.13. Viewing database maintenance plan jobs.


If the SQL Server Agent is not running, a dialog box appears stating that the SQL Server Agent on the target server is not running. The SQL Server Agent must be started for SQL Server jobs to commence. Follow these steps to start the SQL Server Agent:

1.

Choose Start, Programs, Microsoft SQL Server, Enterprise Manager.

2.

In Enterprise Manager, first expand the desired server group and then expand a server.

3.

Expand the Management Folder and then expand the SQL Server Agent.

4.

Right-click SQL Server Agent, and then click Start.


Microsoft SharePoint 2003 Unleashed
Microsoft SharePoint 2003 Unleashed (2nd Edition) (Unleashed)
ISBN: 0672328038
EAN: 2147483647
Year: 2005
Pages: 288

flylib.com © 2008-2017.
If you may any questions please contact us: flylib@qtcs.net