Optimizing Windows You can improve the performance of Windows in several ways, including optimizing virtual memory size and location, adjusting the location of temporary files, and defragmenting the hard disk. With Windows NT/2000/XP only, you can also optimize performance by adjusting the priority of applications versus background tasks . With Windows 9x/Me only, you can also optimize performance by adjusting the performance of the Windows disk cache, adjusting file and buffer size settings, and adjusting default memory configurations.  | Defragmenting the hard disk, adjusting file and buffer size settings, and adjusting default memory configurations are covered earlier in this chapter. See "Adjusting Disk Caching Settings in Windows" in Chapter 14, "Storage," to adjust disk cache settings in Windows 9x/Me. |
Most of these topics are covered in the following sections. Adjusting Virtual Memory If you run short of money, you can borrow some from the bank. However, there's a penalty: interest. Similarly, if your system runs short of memory, it can borrow hard disk space and use it as virtual memory . The penalty for this type of borrowing is performance: Virtual memory is much slower than real RAM memory. However, you can adjust how your system uses virtual memory to achieve better performance. Swapfile Setting in Windows 9x/Me Windows 9x/Me configures virtual memory through the System properties sheet of the Control Panel. You can access the System properties sheet in one of the following ways: -
Right-click My Computer and select Properties from the right-click menu. -
Click Start, Settings, Control Panel, and open the System icon. tip  | To minimize the need to use virtual memory, increase the memory in a Windows 9x/Me system up to 512MB of RAM, and even higher (when possible) on a system running Windows NT 4.0/2000/XP. |
Follow this procedure to view or set virtual memory options in Windows 9x/Me: -
Open the System properties sheet. -
Click the Performance tab. -
Click Virtual Memory (see Figure 18.29). Figure 18.29. The Virtual Memory dialog box in Windows 9x shows that this system has been set to use a fixed-size swapfile on the F: drive. (The default is an adjustable-size swapfile on C: drive.)  By default, Windows uses a variable- sized swapfile that can grow to the available disk space on the C: drive for virtual memory. You can make the following adjustments: -
Set the minimum and maximum sizes of the swapfile (including making the swapfile a fixed size). -
Set the swapfile to another drive. -
Disable the swapfile (not recommended). If you have two or more logical hard drive letters or two physical drives, you might want to set the swapfile to a drive letter other than the default. This can improve performance ( especially if you have two physical drives or if the second drive is faster than the original drive) and will prevent the C: drive from running out of space needed for additional program installations or temporary Internet files. To avoid disk thrashing (which slows down the system) caused by resizing the swapfile, you can set the swapfile to a fixed size. The swapfile should be set to about three times your system's available RAM; if your system has 64MB of RAM, set your swapfile to 192MB. Use a larger swapfile size if you routinely edit large database or graphics files. tip | | How large does your swapfile get? Before you change your swapfile size, run the Windows System Monitor, open the Memory Manager category, select Swapfile in Use and Swapfile Size and perform typical operations. Make sure you use a custom swapfile size that's larger than the swapfile you actually use during typical operations. |
If you make any changes to the swapfile, you need to restart your computer for the changes to take effect. Swapfile (Paging File) Setting in Windows NT/2000/XP When additional RAM is added to a computer running Windows NT/2000/XP, it is automatically used in place of the paging file . The Windows NT/2000/XP System Monitor can be used to determine whether more RAM should be added to a computer. Follow these steps to monitor performance with the System Monitor: -
Click the Start button. -
Click Run. -
Type perfmon and press Enter. Many different types of performance factors can be measured with the Windows NT/2000/XP Performance Monitor. To see if additional RAM is needed in a system, set up the Paging File % Usage and Pages/Sec counters: -
Right-click in the blank area beneath the graph and select Add Counters. -
Choose Paging File as the Performance Object, and then choose Paging File % Usage. -
Choose Memory as the Performance Object, and then choose Pages/Sec. -
Click Add. -
Click Close, and then open the normal program load for this computer. If the System Monitor indicates that the Paging File % Usage is consistently near 100% or the Memory Pages/Sec counter is consistently above 5, add RAM to improve performance (see Figure 18.30). Figure 18.30. This system has adequate memory at this time, as indicated by the low levels of usage of the Paging File % Usage and Memory Pages/Sec counters.  The performance of the paging file can be improved by -
Setting its minimum and maximum sizes to the same amount. -
Moving the paging file to a physical disk (or disk partition) that is not used as much as others. -
Using a striped volume for the paging file. A striped volume is identical areas of disk space stored on two or more dynamic disks that are referred to as a single drive letter. Create a striped volume with the Windows 2000/XP Disk Management tool or Windows NT 4.0 Disk Administrator tool. -
Creating multiple paging files on multiple physical disks in the system. -
Moving the paging file away from the boot drive. To adjust the location and size of the paging file with Windows NT/2000/XP: -
Right-click My Computer on the Windows desktop and select Properties or open the Control Panel and open the System icon. -
Click the Advanced tab. -
Click the Performance Options button. -
Click the Change button. -
Choose the minimum and maximum sizes you want to use for the paging file and its location (see Figure 18.31). Click Set, and then click OK to finish. Figure 18.31. The Virtual Memory dialog box of Windows 2000 enables you to set the size and location of virtual memory.  -
If you make any changes to size or location, you must restart the computer for the changes to take effect. Adjusting the Location for Temporary Files The default location for temporary files in Windows is the TEMP folder beneath the default Windows folder ( \Windows or \WinNT ). The location can be adjusted with a pair of SET statements. However, the method used to adjust the default setting varies with the version of Windows in use. tip | | Some applications use SET TEMP= location ; others use SET TMP= location (replace location with the actual drive and folder path ). Be sure to change both variables if you need to change the setting for temporary files. |
Temporary File Settings in Windows 9x/Me To change the location of temporary files to a drive other than the system drive, follow this procedure: -
Create a folder called TEMP in the root folder of the drive you want to use for your temporary files. You can use Windows Explorer/My Computer or the MKDIR command. For example, if the D: drive will be used for temporary files, you could use this command: MKDIR D:\TEMP . -
Change to the root folder of the system drive (usually C:) and open the Autoexec.bat file with Notepad or the command-prompt Edit program. -
If the SET TEMP= and SET TMP= statements are already present, edit them to refer to the drive and folder you want to use for temporary files. For example: SET TEMP= D:\TEMP SET TMP= D:\TEMP If there are no SET TEMP/SET TMP statements, add them using the drive and folder in place of D:\TEMP . -
Save the changes to Autoexec.bat . -
Restart the system to activate the changes. Temporary File Settings in Windows NT/2000/XP These versions of Windows don't have Autoexec.bat . Instead, they use the Advanced tab on the System properties sheet to set environmental variables such as SET TEMP and many others. Here's how to make the change (you must be logged on as Administrator): -
Create a folder called TEMP in the root folder of the drive you want to use for your temporary files. You can use Windows Explorer/My Computer or the MKDIR command. For example, if the D: drive will be used for temporary files, you could use this command: MKDIR D:\TEMP . -
Open the System properties sheet. You can right-click on My Computer and select Properties or open the System icon in Control Panel. -
Click the Advanced tab. -
Click Environmental variables. A new window opens. -
Click TEMP in the System variables window and click Edit. -
The Edit System Variable window opens (see Figure 18.32). Clear the variable value ( %SystemRoot%\TEMP ) and enter the drive and folder you used in step 1 (for example, D:\TEMP ). Click OK. Figure 18.32. Adjusting the location used for temporary files in Windows 2000. 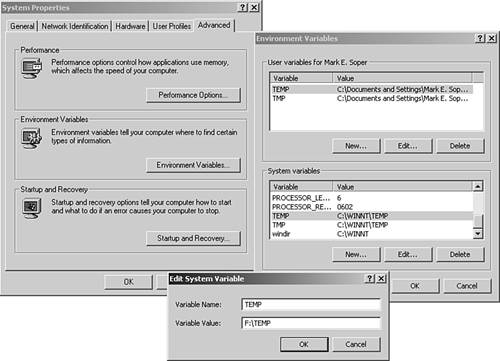 -
Repeat steps 56, selecting TMP instead of TEMP . -
Click OK in the Environment Variables window. -
Click OK on the System properties sheet. | | Use this same method to add, delete, or change other system variables. To change the location for individual users' temporary files, change the settings in the User variables window (top window). |
Application Response Settings NT/2000/XP Windows 2000/XP can be configured to use more memory for background services (non-active windows, printing, and so on) instead of the default ( application response improves performance for the foreground application). To make this change -
Open the System properties sheet and click Advanced. -
Click Performance options. -
Select Optimize Performance Options for Applications (default) or Background Services. | | A foreground application is the application you have clicked on and are actively using. For example, to write this text, I clicked on Microsoft Word; it becomes the foreground application. When I add a screen capture, I click on Adobe Photoshop, making it the foreground application. Other running programs such as email, Web browsers, and Microsoft Word become background applications. |
Windows NT 4.0 uses a slider to adjust the Application Performance from None ( balances background and foreground) to Maximum (much more performance for foreground than background) with a middle setting that provides slightly more performance for the foreground application than for background applications. |