Input Devices
| < Day Day Up > |
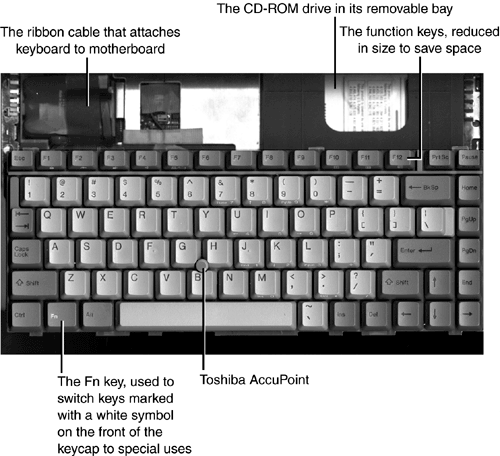
| Although portable computers can use the same keyboards, mice and other input devices used by desktop computers, portable users generally use the portable's integrated input devices. Integrated KeyboardsPortable systems feature keyboards that are designed to be compact in size and light in weight. Internally, the keyboard module attaches to the notebook's main portable computer circuitry with a relatively fragile ribbon cable. In most cases, the keyboard also integrates the primary pointing device (see Figure 12.1). Figure 12.1. A typical notebook computer with an integrated pointing device (Toshiba AccuPoint , a licensed version of the IBM TrackPoint II), reduced-size function keys, and the special Fn key that switches the normal function keys to special uses, such as power management. Portable keyboards also differ from desktop keyboards in their layout:
Because of the portable keyboard's design, it is vulnerable to a heavy touch while typing (easy does it!), abuse of the pointing device , and spills, dirt, and dust. Portable Keyboard ReplacementReplacing a portable keyboard requires the unit to be partially disassembled. Details vary from unit to unit (check with your vendor for the details of the particular model you are repairing), but the following is the basic procedure:
tip
If the keyboard has an integrated pointing device, such as the IBM TrackPoint II or similar device, this procedure will remove the pointing device but might not replace the buttons .
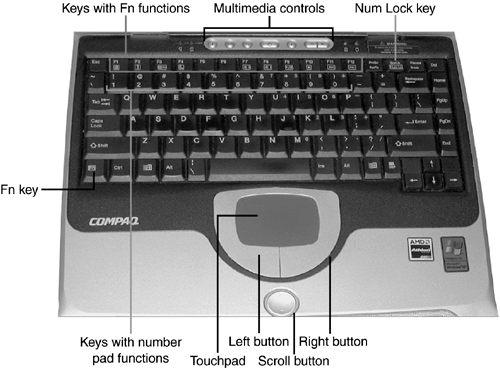
To install a replacement keyboard, reverse the steps. Mouse and Mouse Alternatives on Portable ComputersSome very old portable computers you might still encounter use clip-on trackballs that plug into standard PS/2 or serial mouse ports. Most recent portable computers use one of the following technologies as an alternative to a separate mouse, which can still be used. IBM TrackPoint II "Eraserhead" Pointing StickThis mouse alternative (originally called the TrackPoint II by IBM) enables the user to keep his or her hands on the keyboard at all times, pushing a small button shaped like a pencil eraser located in the middle of the keyboard to move the mouse pointer. Although this technology was developed by IBM for its portable computers, it has been licensed by several other vendors , including Toshiba and HP (refer to Figure 12.1). The mouse buttons for the TrackPoint are located beneath the spacebar; some systems use the conventional left and right buttons, but others use buttons arranged vertically, in which the top button corresponds to the left mouse button and the bottom button corresponds to the right mouse button. Newer systems might feature an additional button used to scroll the screen. The IBM UltraNav found on some recent-model IBM ThinkPad portables combines the features of a pointing stick and a touchpad ; use the System Setup dialog box in Windows to selectively disable either pointing device if desired. Some Dell computers also offer both pointing devices. TouchpadThis mouse alternative uses a square or rectangular touch-sensitive surface located beneath the spacebar. To move the mouse pointer, the user slides his or her finger on the surface. Clicking and double-clicking can be done by tapping on the trackpad surface with the finger or with the mouse buttons. The Mouse Properties sheet can be used to enable or disable clicking or other touchpad options. The mouse buttons for the touchpad are also located beneath the spacebar; if the buttons are arranged vertically, the top button corresponds to the left mouse button and the bottom button corresponds to the right mouse button. Newer systems might feature an additional button for scrolling the screen (see Figure 12.2). TrackballThis mouse alternative, found primarily on older portables, uses a ball similar in size to a mouse ball and is situated below the spacebar. The user rolls the trackball to guide the cursor. The mouse buttons for the trackball are also located beneath the spacebaras with other pointing devices, the buttons can be arranged horizontally or vertically. Replacing Portable Pointing DevicesPointing devices in portable computers are normally located in two places:
To replace defective pointing sticks, follow the steps listed in "Portable Keyboard Replacement," earlier in this chapter. If you need to replace the pointing device built into the palm rest (including buttons used by pointing sticks), you need to partially disassemble the portable computer. Details vary from unit to unit (check with your vendor for details), but the following is the basic procedure. To remove the palm rest
To remove a pointing device, such as a touchpad or others, from the palm rest
To replace the pointing device, follow these steps in reverse order to install a new pointing device into the palm rest and to reinstall the palm rest into the portable computer. |
| < Day Day Up > |
EAN: N/A
Pages: 310

