4.3. Using Export and Analyzing It with Microsoft Office Excel
| < Day Day Up > |
| Now that you have tried to import data, assume you need to go the other way and send data to Excel. This method has far fewer steps than the import method, but before attempting to export data, you need to answer a few questions. First, find out how many rows are being exported. If there are more than 65,536 rows, you need to break the table up into pieces before exporting it. Next, consider the importance of the data format. If the data must be in a particular format, you can export the data, have an Excel report read it, and present it in another sheet. Another option is to use VBA to automate Excel. In this case, neither of these is a problem. What if you need to put date information into the amortization table and email it to someone as an Excel worksheet? Sure, you could copy and paste from Access into Excel, format it, put in the formulas, etc. or you could take advantage of the power of a query in the database. Where possible, I attempt to draw comparisons between how you would handle something in Excel versus Access. In Excel, to add a payment date field that refers to the payment number, write a formula and copy it down to the end of your data. As new rows are added, continue to copy down the formulas. There is nothing stopping you from putting different formulas into every cell or not putting formulas in some cells. This can lead to problems with consistency. If you contrast that with the Access solution, you see how the database makes this easier. In an Access database, you can write queries that can have calculated fields. If you want to have a field for the date of a payment based on the payment number, you could do so very easily with a calculated field. Since you know that the payment number is in a field named Payment, add a parameter for the begin date to make the calculated field work by placing the name of the parameter you want in brackets ([BeginDate], for example). You can go one step further by going to Query To implement a calculated field with a parameter, click on the Queries tab on the database and double-click on the Create Query in Design View on the query list. This brings up the Show Table dialog box shown in Figure 4-14. Click on tbl_Amortization, Add, and Close. In the query's first column, enter the following code in the text box: PaymentDate: DateAdd("m",[Payment]-1,[BeginDate]) Then go to Query Figure 4-14. Dialog box allowing you to add one or more tables to a query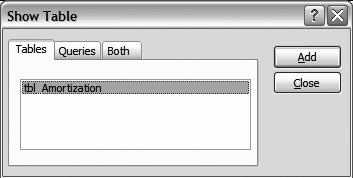 Figure 4-15. Dialog box allowing you to define parameters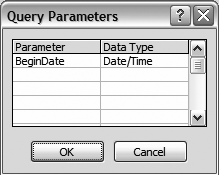 Figure 4-16. What the query should look like in design view with the calculated field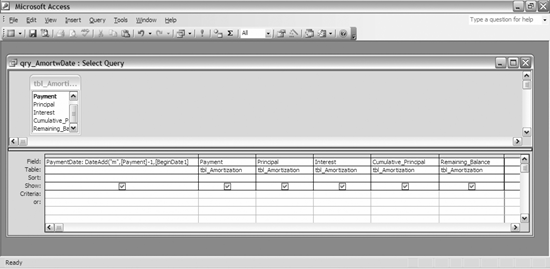 Take a moment and look at the DateAdd function that is being used in the query. This function adds a particular number of intervals to a date or time. You can add seconds, minutes, hours, days, months, years, etc. Here, the interval selected is "m" for month and the number is Payment 1, since we want the first payment to be the BeginDate, not a month later.
When you open this query, you are prompted for a date. The query gives you the date that each payment number refers to based on the begin date that you entered. If you attempt to enter a number instead of a date, Access stops you. However, if you don't declare the parameter, Access converts a number to a date. So, if you enter 1, it starts at December 31, 1899; 2 would be 1/1/1900, etc. However, I suggest declaring the parameter and making sure it is the right type, since it is unlikely that anyone would count the days from 1899 to determine what today is. Now that your query is done, go to File Let's say that you have Excel open already, and you just want the data you don't care about formatting, etc. You can select all records in Access (Ctrl+A is the shortcut) and copy and paste into Excel. That is most likely the easiest method. If you want to export the data for someone else to use and don't care to see the data, you can select File Consider next that you want to open it in Excel and do some things with the file, like run some formulas or review individual records. While you could do either of the other steps noted above and make it work, there is a very easy way to open up Excel, provide some basic formatting, and then save the new Excel workbook with the data. By using Tools Using the Analyze it feature from Microsoft Office Excel makes quick work of many common requests. For example, if you have a table of products and someone from the marketing department calls you and wants an up to date product list, you can click on the products table and go to Analyze it with Microsoft Office Excel, and it will create a report for you. |
 Parameters when in Design View of the query, where you can declare the parameter and data type. You will be prompted for the parameter either way. The benefit to declaring the parameter is that Access validates that the data type is correct before running the query.
| < Day Day Up > |
EAN: 2147483647
Pages: 132