| So far in this chapter, we have investigated how to expose SQL Server directly to client applications on external networks. Because SQL Server maintains valuable data, it's generally not a good idea to expose your installation to broad networks, such as the Internet, because of security issues. Additionally, exposing SQL Server directly to external networks limits scalability and performance and complicates server administration. The benefits of implementing a middle tier between the client application and SQL Server are as follows: A middle tier provides an extra layer of security that filters all incoming requests. You can use components of the operating system infrastructure, such as Internet Information Server (IIS), to provide better scalability and performance and to allow additional configuration, administration, and security options. You can implement a specialized data access layer that can be reused by multiple applications.
Figure 9-2 shows an example of a possible architecture for accessing SQL Server through an extra layer. Figure 9-2. Architecture for accessing SQL Server through a middle-tier component. 
A Service Interface represents a façade that is exposed to client applications. The Service Interface exposes a public interface that hides all the complexity of the internal implementation to access SQL Server. The Service Interface must also implement all necessary input validation. The Service Interface is supported by a data access component. The data access component implements the calls to SQL Server through a data access provider, such as OLE DB or ODBC. The Microsoft .NET Framework provides several technologies for creating a service interface. This chapter will focus on ASP.NET Web Services and Microsoft .NET Remoting. Tip  | For a more complete discussion of creating data access layers, refer to the guide titled "Designing Data Tier Components and Passing Data Through Tiers" from the Microsoft Patterns & Practices Developer Center Web site, http://msdn.microsoft.com/practices/guidetype/Guides/default.aspx?pull=/library/en-us/dnbda/html/boagag.asp. |
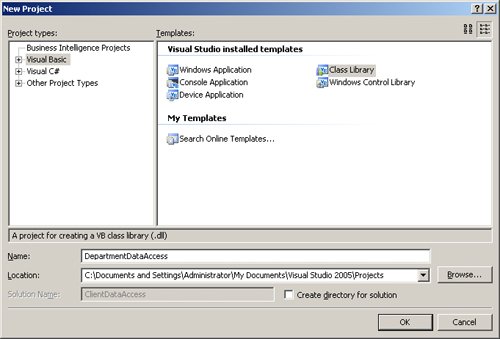
ASP.NET Web Services As an HTTP EndPoint, an ASP.NET Web Service also exposes a WSDL contract, but instead of exposing a stored procedure as a service, an ASP.NET Web Service allows you to expose application logic written in components as a Web service. ASP.NET Web Services are deployed and hosted inside Microsoft Internet Information Services (IIS) server. To view all the code in this section, open the Solution1.sln file in the 3tiers folder in the sample files. Individual components are in subfolders as noted in the text. In order to implement SQL Server access through the Internet but by connecting to a middle-tier ASP.NET Web Service, follow these steps: Creating a Data Access Component and a Service Interface 1. | Start by writing the data access component to connect to SQL Server. Open Visual Studio 2005 and create a new project, choosing the Class Library template in the New Project window. Name the project DepartmentDataAccess, as shown below, and click the OK button.
 | 2. | Replace the code in the Class1.vb file with the following code (remember to modify the connection string to match your own environment). This code is included in the sample files in the folder 3tiers\DepartmentDataAccess.
Imports System.Data.SqlClient Public Class DepartmentDataAccess Public Function GetAllDepartments() As DataSet Dim result As New DataSet Dim connectionString As String Dim selectCommand As String connectionString = "server=(local);database=AdventureWorks;uid=sa" selectCommand = "SELECT * FROM HumanResources.Department" Dim connection As New SqlConnection(connectionString) Dim adapter As New SqlDataAdapter(selectCommand, connection) adapter.Fill(result) Return result End Function End Class
The DepartmentDataAccess class, as an example, implements a single method called GetAllDepartments. It returns a DataSet object that contains all of the departments in the AdventureWorks company.
| 3. | From the Build menu in Visual Studio 2005, select Build DepartmentDataAccess. Visual Studio 2005 will compile the project into an assembly. This represents our Data Access Layer.
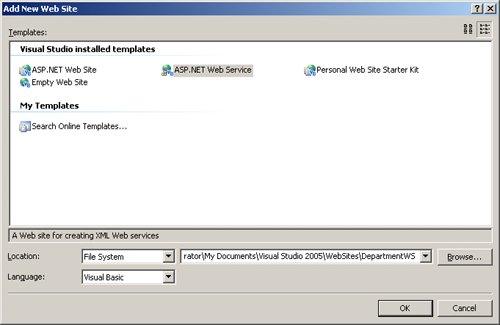
| 4. | Let's move on and create the service interface using an ASP.NET Web Service project. In Visual Studio 2005, select Add | New Website from the File menu. This code is included in the sample files in the 3tiers\webservice folder.
| 5. | Choose the ASP.NET Web Service template in the New Project window, as shown below. Leave all the other options set to their default values. Click the OK button.
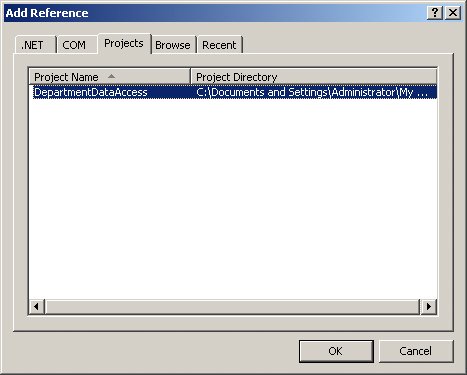
 | 6. | In the Solution Explorer window, right-click the Web Service project and select Add Reference from the context menu. (If Solution Explorer is not visible, you can select Solution Explorer from the View menu.)
| 7. | In the Add Reference window, shown below, select the Projects tab, select the DepartmentDataAccess project, and click the OK button
 | 8. | Under the HelloWorld function created by the Visual Studio template, enter the following code:
<WebMethod()> _ Public Function GetDepartments() As System.Data.DataSet Dim departmentsDL As New DepartmentDataAccess.DepartmentDataAccess() Return departmentsDL.GetAllDepartments() End Function
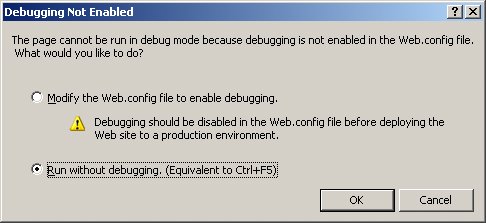
| 9. | Press F5 to compile the ASP.NET Web Service project and run it. If Visual Studio 2005 asks you if you would like to enable debugging, select the Run Without Debugging option, as shown here:
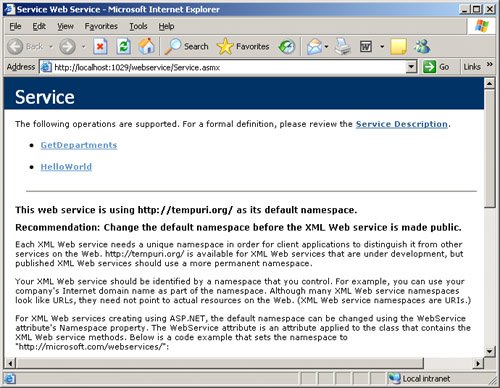
 | 10. | Internet Explorer will open a Web page where you can test your Web service, as shown below. Select the service GetDepartments.
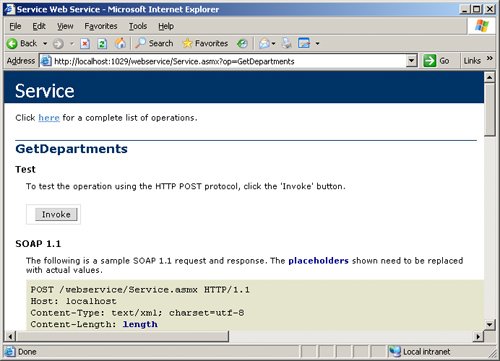
 | 11. | Internet Explorer will browse to the GetDepartments Web page, shown below. Click the Invoke button to execute the Web service.
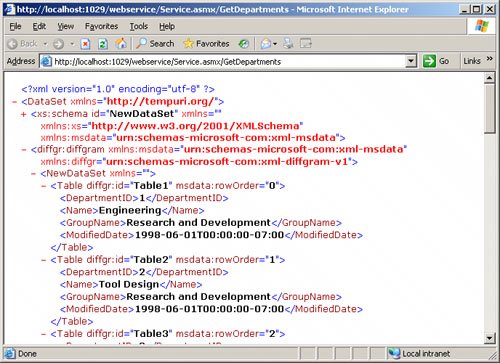
 | 12. | When the Web service is invoked, the ASP.NET code calls the data access component, retrieves the results as a dataset, and finally transforms the complete response in XML format, as shown here:
 |
Of course, client applications will not execute your Web service using the same test page as you just did. To write a client application that consumes this Web service, you could follow the same steps as described previously in the section titled "Creating a Reference from the Client Application to the HTTP Endpoint." Microsoft .NET Remoting The Microsoft .NET Framework provides different technologies to allow remote clients to connect to server-side components. If you use ASP.NET Web Services, as we did in the previous section of this chapter, your client applications will communicate using the SOAP format through a service interface. Microsoft .NET Remoting is another technology that allows remote applications to communicate with server-side components. Microsoft .NET Remoting allows you to configure the data format you would like to use or the communication protocol you would like to use. For example, instead of XML and SOAP, you can choose Binary or any custom format, and instead of HTTP or TCP, you can choose a custom protocol. The main difference between ASP.NET Web Services and .NET Remoting is that .NET Remoting follows an object-to-object remote procedure call (RPC) architecture instead of a service-oriented architecture. Creating a .NET Remoting Object We will build an example using the same code base as in the previous section. Repeat steps 1 through 4 from the previous section and then continue with the following steps: 1. | After you create the DepartmentDataAccess component, you must provide a service interface component. This example creates a .NET Remoting service interface. In Visual Studio 2005, choose Add | New Project from the File menu. The code for this example is included in the sample files in the 3tiers\Remoting folder.
| 2. | Choose the Class Library template on the New Project window and name the project DepartmentServiceInterface. Click the OK button.
| 3. | In the Solution Explorer window, right-click the DepartmentServiceInterface project and select Add Reference from the context menu.
| 4. | In the Add Reference window, select the Projects tab, select the DepartmentDataAccess project, and then click the OK button
| 5. | Replace the code in the Class1.vb file with the following code:
Public Class DepartmentServiceInterface Inherits MarshalByRefObject Public Function GetDepartments() As System.Data.DataSet Dim departmentsDL As New DepartmentDataAccess.DepartmentDataAccess() Return departmentsDL.GetAllDepartments() End Function End Class
| 6. | Build the project.
|
The last component that you need to build is a hosting application. When we created the ASP.NET Web Service, it was configured to be hosted and executed by a Web Server, such as Microsoft Internet Information Server (IIS). In the following example, we will configure our .NET Remoting object to be hosted by IIS as well. Configuring a .NET Remoting Object to Be Hosted by IIS 1. | Create and configure a virtual directory in IIS to host the assemblies.
| 2. | Create a web.config configuration file to configure the Remoting framework.
| 3. | Generate a proxy to the remote object.
| 4. | Create a client application that calls the remote object.
|
Creating and Configuring a Virtual Directory in IIS By using IIS as a hosting environment, our remoting application can leverage IIS's security, communication protocols, and internal request-handling mechanisms. Install the assemblies from the DepartmentServiceInterface component in an IIS Virtual Directory: 1. | Create a new directory called DepartmentRemote on the C drive.
| 2. | Inside C:\DepartmentRemote, create a new folder called bin.
| 3. | From the Start menu, select Settings | Control Panel. In Control Panel, double-click on Administrative Tools. In the Administrative Tools window, double-click the Internet Information Services icon.
| 4. | In the Internet Information Services management application, click the plus (+) sign to expand the computer node, then expand the Web Sites node, then right-click the Default Web Site node, as shown below:
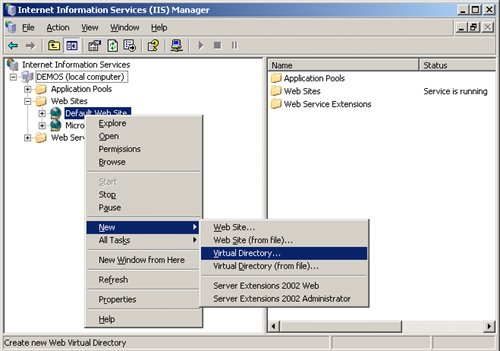 | 5. | From the context menu, choose New | Virtual Directory.
| 6. | Click the Next button on the Virtual Directory Creation Wizard welcome screen.
- 6.1. On the Virtual Directory Alias page, type DepartmentService as the alias name and click the Next button.
- 6.2. On the Web Site Content Directory page, type or browse to C:\DepartmentRemote in the Directory textbox and click the Next button.
- 6.3. On the Access Permissions page, uncheck all the checkboxes except the Execute checkbox. Click the Next button to move to the final step.
- 6.4. Click the Finish button.
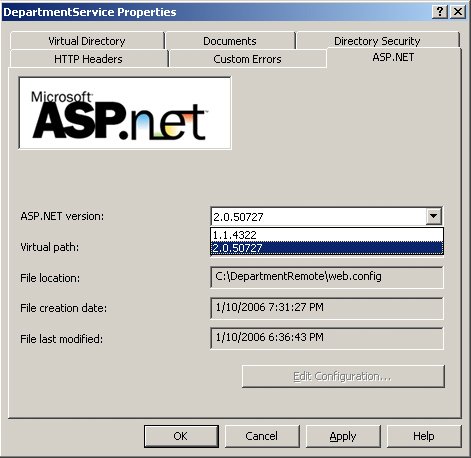
| 7. | Right-click on the newly created DepartmentRemote virtual directory and select Properties from the context menu
| 8. | In the DepartmentService Properties window, click on the ASP.NET tab and change the ASP.NET version to 2.X.X.X as shown below. (Numbers may vary depending on your installation, but make sure it is the same version as the Visual Studio you used to compile the assemblies.) Then click the OK button to close the window.
Tip | In Visual Studio, select About Microsoft Visual Studio from the Help menu to find the Visual Studio version number. |
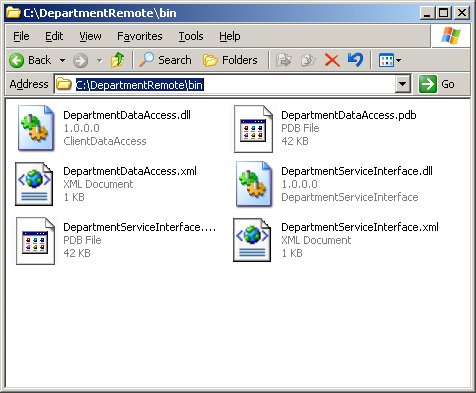
 | 9. | Using Windows Explorer, copy all the contents from the bin/debug subfolders from where you saved the DepartmentServiceInterface project (I used the Visual Studio 2005 default location: C:\Documents and Settings\Administrator\My Documents\Visual Studio 2005\Projects\DepartmentDataAccess\DepartmentServiceInterface) into the C:\DepartmentRemote\bin folder. The resulting files are shown here:
 |
Creating a Web.Config file to Configure the Remoting Framework 1. | Using Notepad, create a new file called web.config in the C:\DepartmentRemote directory.
| 2. | Edit the web.config file with the following XML code (included in the sample files as web.config in the 3tiers folder):
<configuration> <system.runtime.remoting> <application> <service> <wellknown mode="SingleCall" type="DepartmentServiceInterface.DepartmentServiceInterface, DepartmentServiceInterface" objectUri="department.soap" /> </service> </application> </system.runtime.remoting> </configuration>
| 3. | Save the web.config file
|
This XML file configures the remoting framework. It declares a new service called department.soap that corresponds to the DepartmentServiceInterface.DepartmentServiceInterface class inside the DepartmentServiceInterface assembly. The setting Mode="SingleCall" indicates that a new instance of this class will be created for each request. Generating a Proxy Class for the Remote Object To access our Service Interface component, client applications must create a proxy class. A proxy class is like a copy of the remote object; it declares the same methods and public interfaces, but when called by a client, it routes the call to the remote object. The Microsoft .NET Framework SDK provides the SOAPSuds tool that you can use to generate a proxy class. 1. | From the Start menu, select Programs | Microsoft .NET Framework 2.0 SDK | SDK Command Prompt. A DOS command prompt window opens.
| 2. | At the command prompt, type the following commands:
- cd \ to move to the root drive
- md ClientApp to create a new directory for the client application
- cd ClientApp to move to the ClientApp folder
- soapsuds -url:http://localhost/departmentservice/department.soap?wsdl -oa: DepartmentProxy.dll
|
The SOAPSuds utility downloads a service description file automatically generated by the remoting framework that describes each of the methods exposed by the DepartmentServiceInterface class. Based on this, SOAPSuds generates a new assembly called DepartmentProxy.dll with a class that client applications can use to call the remote service. Creating a Client Application that Calls the Remote Object We can use the DepartmentProxy.dll proxy class to call into the remote service. To create a client application and use the proxy class, follow these steps: 1. | Open Visual Studio 2005 and create a new project. Choose the Windows Application template on the New Project window. The code for this example is included in the sample files in the 3tiers\ClientApp folder
| 2. | Name the project ClientApp and click on the OK button.
| 3. | In the Solution Explorer window, right-click the ClientApp project and select Add Reference from the context menu.
| 4. | In the Add Reference window from the .NET tab, select System.Runtime.Remoting and click the OK button.
| 5. | Right-click the ClientApp project again to add another reference. In the Add Reference window, move to the Browse tab. Browse to the C:\ClientApp folder and select the DepartmentProxy.dll assembly, then click the OK button.
| 6. | Add a DataGridView control from the Toolbox to the Form1 form in design view.
| 7. | From the DataGridView Tasks smart tag, uncheck the Enable Adding, Enable Editing and Enable Deleting checkboxes.
| 8. | Press F4 to open the Properties window. Select the DataGridView control on the form and set the Dock property to Fill.
| 9. | Add the following code to the Form1_Load event handler.
Private Sub Form1_Load(ByVal sender As System.Object, _ ByVal e As System.EventArgs) Handles MyBase.Load Dim de As New DepartmentServiceInterface.DepartmentServiceInterface Dim departments As New DataSet departments = de.GetDepartments() DataGridView1.DataSource = departments.Tables(0) DataGridView1.AutoGenerateColumns = True End Sub
| 10. | Press the F5 key to build and run the application.
| 11. | The form loads and the DataGridView control displays a list of all the departments retrieved from SQL Server.
|
Even though it may seem complicated (it certainly is a lot of steps!), the overall architecture of our .NET Remoting example, shown in Figure 9-3, is fairly simple. Figure 9-3. Architecture of the .NET Remoting example. 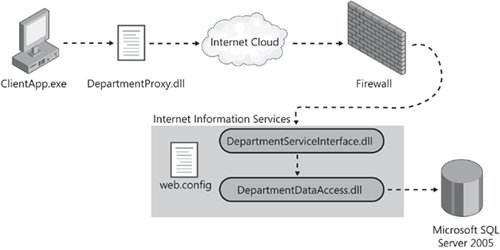
Both ASP.NET and .NET Remoting are middle-tier technologies that encapsulate a set of components and expose them as services through a Service Interface. You can use either of these solutions to deploy SQL Server in a safe environment on the backend, yet still allow remote clients to connect to your application and retrieve their data. |