The X Window System
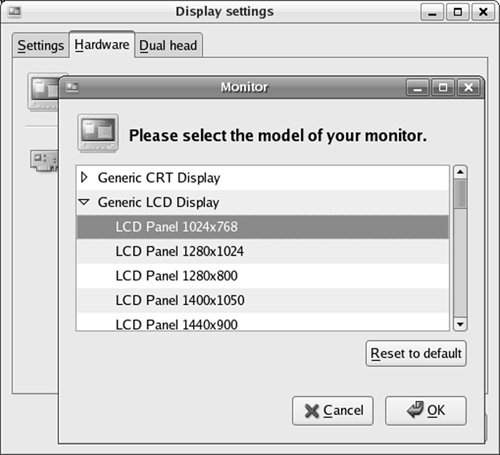
| If you specified a graphical desktop environment such as GNOME or KDE, you installed the X.org (x.org) implementation of the X Window System when you installed Linux. The X Window System release X11R7.0 comprises almost 20 rpm packages; the easiest way to install X.org on an already installed Linux system is to use pirut (page 483) and choose Base System system-config-display: Configures the DisplayThe system-config-display utility displays the Display settings window (Figure 3-20), which allows you to configure X.org, including the monitor type and video card. To run this utility, enter system-config-display on a command line. From KDE select Main menu: Administration Figure 3-20. The Display settings window, Settings tab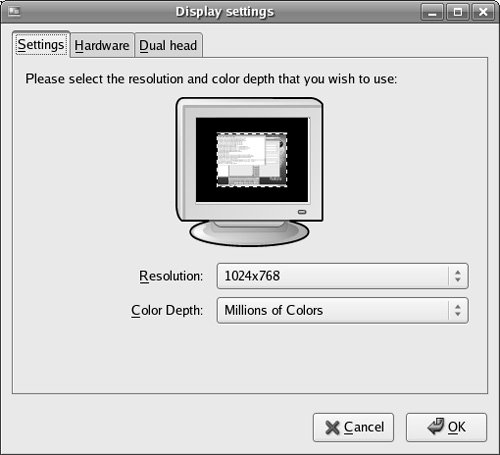 Figure 3-20 shows the Settings tab of the Display settings window, which allows you to specify the resolution and color depth for the monitor. Normally the system probes the monitor and fills in these values. If these values are missing, check the specifications for the monitor and select the appropriate values from the combo boxes. No harm is done if you specify a lower resolution than the monitor is capable of displaying, but you can damage an older monitor by specifying a resolution higher than the monitor is capable of displaying. A color depth of 8 bits equates to 256 colors, 16 bits to thousands of colors, and 24 or 32 bits to millions of colors. Next click the Hardware tab. The system normally probes for the monitor type and brand as well as the model of video card; these values appear next to the words Monitor Type and Video Card. You can manually select a monitor or video card. Figure 3-21 shows the Monitor window on top of the Hardware tab of the Display settings window. Figure 3-21. The Display Settings window, Hardware tab, Monitor window
Specifying a monitor To specify a monitor, click Configure across from the words Monitor Type; system-config-display displays the Monitor window. Scroll down until the name of the manufacturer of the monitor you are using appears and click the triangle to the left of that name; system-config-display opens a list of models made by that manufacturer. Scroll through the list of models. Click to highlight the model you are using and then click OK. If an appropriate model is not listed, scroll to the top of the list and click the triangle next to Generic CRT Display or Generic LCD Display, depending on the type of monitor you are setting up. From one of these lists, select the maximum resolution the monitor is capable of displaying. Click OK.
Specifying a video card To specify a video card, click Configure adjacent to the words Video Card; system-config-display displays the Video Card window. Scroll down until you see the manufacturer and model of the video card in your system. Click OK.
Specifying two monitors The Dual head tab allows you to specify a second video card that can drive a second monitor. Specify the monitor type, video card, resolution, and color depth as you did earlier. You can choose to have each monitor display a desktop or to have the two monitors display a single desktop (spanning desktops). Click OK to close the Display settings window. The system-config-display utility generates an xorg.conf file (discussed in the next section) with the information you entered. The xorg.conf FileThe /etc/X11/xorg.conf file comprises sections that can appear in any order. The format of a section is
where name is the name of the section. A typical entry occupies multiple physical lines but is actually just one logical line, consisting of a keyword followed by zero or more integer, real, or string arguments. Keywords in these files are not case sensitive; underscores (_) within keywords are ignored. Most strings are not case sensitive, and SPACEs and underscores in most strings are ignored. All strings must appear within double quotation marks. The Option keyword provides free-form data to server components and is followed by the name of the option and optionally a value. All Option values must be enclosed within double quotation marks. Boolean Options take a value of TRUE (1, on, true, yes) or FALSE (0, off, false, no); no value is the same as TRUE. You can prepend No to the name of a Boolean Option to reverse the sense of the Option. The following sections can appear in an xorg.conf file:
This chapter covers the sections you most likely need to work with: ServerLayout, InputDevice, Monitor, Device, and Screen. See the xorg.conf man page for more information. ServerLayout SectionThe ServerLayout section appears first in some xorg.conf files because it summarizes the other sections that are used to specify the server. The following ServerLayout section names the server single head configuration and specifies that the server comprises the sections named Screen0, Mouse0, Keyboard0, and DevInputMice. The term core in this file means primary; there must be exactly one CoreKeyboard and one CorePointer. The AlwaysCore argument indicates that the device reports core events and is used here to allow a non-USB mouse and a USB mouse to work at the same time. The result is that you can use either type of mouse interchangeably without modifying the xorg.conf file: Section "ServerLayout" Identifier "single head configuration" Screen 0 "Screen0" 0 0 InputDevice "Mouse0" "CorePointer" InputDevice "Keyboard0" "CoreKeyboard" InputDevice "DevInputMice" "AlwaysCore" EndSection Refer to the following sections for explanations of the sections specified in ServerLayout. InputDevice SectionThere must be at least two InputDevice sections: one specifying the keyboard and one specifying the pointer (usually a mouse). The format of an InputDevice section is
where id_name is a unique name for the device and drv_name is the driver to use for the device, typically keyboard or mouse. The system-config-display utility typically creates three InputDevice sections. The following section defines a keyboard device named Keyboard0 that uses the keyboard driver. The keyboard model is a 105-key PC keyboard. You can change pc105 to microsoft if you are using a U.S. Microsoft Natural keyboard, although the differences are minimal. Section "InputDevice" Identifier "Keyboard0" Driver "keyboard" Option "XkbModel" "pc105" Option "XkbLayout" "us" EndSection To change the language the keyboard supports, change the argument to the XkbLayout Option to, for example, fr for French. The next InputDevice section defines a mouse named Mouse0 that uses the mouse driver. The Device Option specifies a PS2 device. The ZAxisMapping Option maps the Z axis, the mouse wheel, to virtual mouse buttons 4 and 5, which are used to scroll a window. For more information refer to "Remapping Mouse Buttons" on page 239. When set to YES, the Emulate3Buttons Option enables the user of a two-button mouse to emulate a three-button mouse by pressing the two buttons simultaneously. Section "InputDevice" Identifier "Mouse0" Driver "mouse" Option "Protocol" "IMPS/2" Option "Device" "/dev/psaux" Option "ZAxisMapping" "4 5" Option "Emulate3Buttons" "no" EndSection The next InputDevice section is similar to the previous one except the Device Option specifies a USB mouse. See "ServerLayout Section" on page 72 for a discussion. Section "InputDevice" # If the normal CorePointer mouse is not a USB mouse then # this input device can be used in AlwaysCore mode to let you # also use USB mice at the same time. Identifier "DevInputMice" Driver "mouse" Option "Protocol" "IMPS/2" Option "Device" "/dev/input/mice" Option "ZAxisMapping" "4 5" Option "Emulate3Buttons" "no" EndSection Monitor SectionThe xorg.conf file must have at least one Monitor section. The easiest way to set up this section is to use the system-config-display utility, which either determines the type of monitor automatically by probing or allows you to select from a list of monitors. Caution: Do not guess at values for HorizSync or Vert-Refresh If you configure the Monitor section manually, do not guess at the scan rates (HorizSync and VertRefresh); on older monitors, you can destroy the hardware by choosing scan rates that are too high. The following section defines a monitor named Monitor0. The VendorName and ModelName are for reference only and do not affect the way the system works. The optional DisplaySize specifies the height and width of the screen in millimeters, allowing X to calculate the DPI of the monitor. HorizSync and VertRefresh specify ranges of vertical refresh frequencies and horizontal sync frequencies for the monitor; these values are available from the manufacturer. The dpms Option specifies the monitor is DPMS (page 1030) compliant (has built-in energy-saving features). Section "Monitor" Identifier "Monitor0" VendorName "Monitor Vendor" ModelName "Dell D1028L" DisplaySize 360 290 HorizSync 31.0 - 70.0 VertRefresh 50.0 - 120.0 Option "dpms" EndSection A Monitor section may mention DDC (Display Data Channel); DDC can be used by a monitor to inform a video card about its properties. If you omit or comment out the HorizSync and VertRefresh lines, X will use DDC probing to determine proper values. Device SectionThe xorg.conf file must have at least one Device section to specify the type of video card in the system. The VendorName and BoardName are for reference only and do not affect the way the system works. The easiest way to set up this section is to use the system-config-display utility, which usually determines the type of video card by probing. The following Device section specifies that Videocard0 uses the tdfx driver: Section "Device" Identifier "Videocard0" Driver "tdfx" VendorName "Videocard vendor" BoardName "Voodoo3 (generic)" EndSection Screen SectionThe xorg.conf file must contain at least one Screen section. This section binds a video card specified in the Device section to a display specified in the Monitor section. The following Screen section specifies that Screen0 comprises Videocard0 and Monitor0, both defined elsewhere in the file. The DefaultDepth entry specifies the default color depth (page 1025), which can be overridden in the Display subsection. Each Screen section must have at least one Display subsection. The following subsection specifies a color Depth and three Modes. The Modes specify the screen resolutions in units of dots per inch (dpi). The first Mode is the default; you can switch between Modes while X is running by pressing CONTROL-ALT-KEYPAD+ or CONTROL-ALT-KEYPAD. You must use the plus or minus on the numeric keypad when giving these commands. X ignores invalid Modes. Section "Screen" Identifier "Screen0" Device "Videocard0" Monitor "Monitor0" DefaultDepth 24 SubSection "Display" Depth 24 Modes "1024x768" "800x600" "640x480" EndSubSection EndSection If you omit or comment out the Depth and Modes lines, X will use DDC probing to determine optimal values. Multiple MonitorsX has supported multiple screens for a long time. X.org supports multimonitor configurations using either two graphics cards or a dual-head card. Both setups are usually configured the same way because the drivers for dual-head cards provide a secondary virtual device. Traditionally each screen in X is treated as a single entity. That is, each window must be on one screen or another. More recently the Xinerama extension allows windows to be split across two or more monitors. This extension is supported by X.org and works with most video drivers. When using Xinerama, you must set all screens to the same color depth. For each screen, you must define a Device, Monitor, and Screen section in the xorg.conf file. These sections are exactly the same as for a single-screen configuration; each screen must have a unique identifier. If you are using a dual-head card, the Device section for the second head is likely to require a BusID value to enable the driver to determine that you are not referring to the primary display. The following section identifies the two heads on an ATI Radeon 8500 card. For other dual-head cards, consult the documentation provided with the driver (for example, give the command man mga to display information on the mga driver): Section "Device" Identifier "Videocard0" Driver "radeon" VendorName "ATI" BoardName "Radeon 8500" EndSection Section "Device" Identifier "Videocard1" Driver "radeon" VendorName "ATI" BoardName "Radeon 8500" BusID "PCI:1:5:0" EndSection Once you have defined the screens, use the ServerLayout section to tell X where they are in relation to each other. Each screen is defined in the following form:
The ScreenNumber is optional. If it is omitted, X numbers screens in the order they are specified, starting with 0. The Identifier is the same Identifier used in the Screen sections. The Position can be either absolute or relative. The easiest way to define screen positions is to give one screen an absolute position, usually with the coordinates of the origin, and then use the LeftOf, RightOf, Above, and Below keywords to indicate the positions of the other screens: Section "ServerLayout" Identifier "Multihead layout" Screen 0 "Screen0" LeftOf "Screen1" Screen 1 "Screen1" 0 0 InputDevice "Mouse0" "CorePointer" InputDevice "Keyboard0" "CoreKeyboard" InputDevice "DevInputMice" "AlwaysCore" Option "Xinerama" "on" Option "Clone" "off" EndSection Two options can control the behavior of a multimonitor layout: Xinerama causes the screens to act as if they were a single screen and Clone causes each of the screens to display the same thing. gdm: Displays a Graphical LoginTraditionally users logged in on a textual terminal and then started the X server. Today most systems provide a graphical login. Red Hat Linux uses the GNOME display manager (gdm) to provide this functionality, even if you are bringing up a KDE desktop. Configuring gdmThe gdmsetup utility configures the login presented by gdm by editing the heavily commented /etc/gdm/custom.conf (FEDORA) or /etc/X11/gdm/gdm.conf (RHEL) file. By default, root can log in both locally and remotely. It is a good idea to disable remote root logins because, when a user logs in remotely using gdm, the password is sent in cleartext across the network. From GNOME you can select System: Administration Using kdmThe kdm utility is the KDE equivalent of gdm. There is no benefit in using kdm in place of gdm: Both perform the same function. Using gdm does not force you to use GNOME. The configuration file for kdm, /etc/X11/xdm/kdmrc, is heavily commented. You can edit the kdm configuration using the KDE control panel, but doing so removes the comments from the file. More Information
Web X.org X.org, freedesktop.org X.org documentation ftp.x.org/pub/X11R7.0/doc/html |
EAN: 2147483647
Pages: 383
- Article 358 Electrical Metallic Tubing Type EMT
- Article 386 Surface Metal Raceways
- Article 440: Air Conditioning and Refrigerating Equipment
- Example No. D8 Motor Circuit Conductors, Overload Protection, and Short-Circuit and Ground-Fault Protection
- Example No. D9 Feeder Ampacity Determination for Generator Field Control