Configuring User and Group Accounts
| More than a username is required for a user to be able to log in and use a system. A user must have the necessary files, directories, permissions, and usually a password to log in. At a minimum a user must have an entry in the /etc/passwd and /etc/shadow files and a home directory. The following sections describe several ways you can work with user accounts. Refer to page 373 and the NIS-HOWTO when you want to run NIS to manage the passwd database. system-config-users: Manages User AccountsThe system-config-users utility displays the User Manager window and enables you to add, delete, and modify system users and groups. To display the User Manager window, enter system-config-users on a command line. From KDE select Main menu: Administration Figure 16-1. The User Manager window, Users tab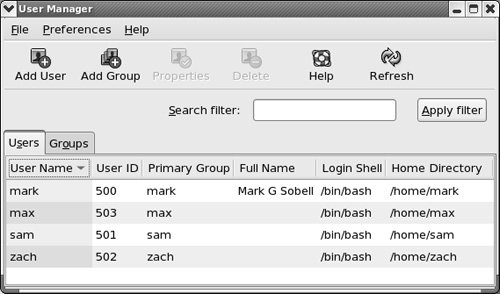
Search filter The Search filter, located just below the toolbar, selects users or groups whose names match the string, which can include wildcards, that you enter in the Search filter text box. The string matches the beginning of a name. For example, *nob matches nobody and nfsnobody, whereas nob matches only nobody. After you enter the string, click Apply filter or press RETURN. If you have only a few users, you will not need to use the Search filter.
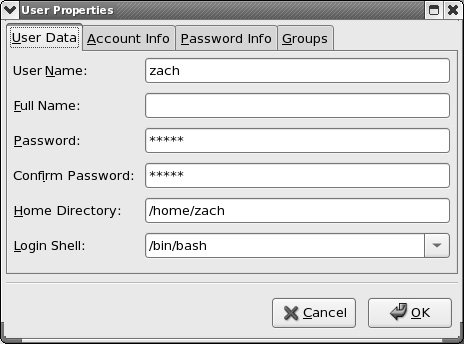
Adding a user To create a new user, click the Add User button on the toolbar. The User Manager displays the Create New User window, which gathers much of the same information as the User Data tab of the User Properties window (Figure 16-2). Enter the information for the new user and click OK. Once you create a user, you can modify the user to add/change/remove information. Figure 16-2. The User Properties window, User Data tab
Modifying a user To modify a user, highlight the user in the User Manager window and click Properties on the toolbar; the utility displays the User Properties window (Figure 16-2). The User Properties window has four tabs: User Data, Account Info, Password Info, and Groups. The User Data tab holds basic user information such as name and password. The Account Info tab allows you to specify an expiration date for the account and to lock the account so the user cannot log in. The Password Info tab allows you to turn on password expiration and specify various related parameters. In the Groups tab, you can specify the groups that the user is a member of.
Working with groups Click the Groups tab in the User Manager window to work with groups. To create a group, click Add Group on the toolbar and specify the name of the group. To change the name of a group or to add or remove users from a group, highlight the group and click Properties on the toolbar. Click the appropriate tab, make the changes you want, and click OK. See page 451 for more information on groups.
Help The User Manager provides extensive help. To access it, click Help on the toolbar. When you are done working with users and groups, close the window. useradd: Adds a User AccountThe useradd utility (and the link to it, named adduser) adds a new user account to the system. By default, useradd assigns the next highest unused user ID to a new account and specifies bash as the user's login shell. The following example creates the user's home directory (in /home), specifies the user's group ID, and puts the user's full name in the comment field: # useradd -g 500 -c "Alex Watson" alexBased on the /etc/login.defs file, the system creates a home directory for the new user. When useradd creates a home directory, it copies the contents of /etc/skel, which contains bash and other startup files, to that directory. For more information on adding and modifying user information, see the useradd and usermod man pages. Once you have added a user, use passwd to give the user a password. userdel: Removes a User AccountIf appropriate, back up the files belonging to the user before deleting them. The userdel utility deletes user accounts. The following command removes alex's account, his home directory, and all his files: # userdel -r alexTo turn off a user's account temporarily, you can use usermod to change the expiration date for the account. Because it specifies that his account expired in the past (December 31, 2005), the following command line prevents alex from logging in: # usermod -e "12/31/05" alexgroupadd: Adds a GroupJust as useradd adds a new user to the system, groupadd adds a new group by adding an entry for it in /etc/group (page 451). The following example creates a new group named rtfm: # groupadd -g 1024 rtfmUnless you use the g option to assign a group ID, the system picks the next available sequential number greater than 500. The o option allows the group ID to be nonunique if you want to have multiple names for the same group ID. The analogue of userdel for groups is groupdel, which takes a group name as an argument. You can also use groupmod to change the name or group ID of a group, as in the following examples: # groupmod -g 1025 rtfm # groupmod -n manuals rtfm The first example gives the previously created rtfm group a new group ID number. The second example renames the rtfm group manuals. Caution: Group ID cautions The groupmod utility does not change group numbers in /etc/passwd when you renumber a group. You must edit /etc/passwd and change the entries yourself. If you change the number of a group, files that are associated with the group will no longer be associated with the group. Instead, they may be associated with no group or with another group with the old group ID number. |
EAN: 2147483647
Pages: 383
- Chapter I e-Search: A Conceptual Framework of Online Consumer Behavior
- Chapter VI Web Site Quality and Usability in E-Commerce
- Chapter VII Objective and Perceived Complexity and Their Impacts on Internet Communication
- Chapter XIII Shopping Agent Web Sites: A Comparative Shopping Environment
- Chapter XVI Turning Web Surfers into Loyal Customers: Cognitive Lock-In Through Interface Design and Web Site Usability