System Operation
| This section covers the basics of how the system functions and how you can make intelligent decisions as a system administrator. It does not examine every aspect of system administration in the depth necessary to set up or modify all system functions. Instead, it provides a guide to bringing a system up and keeping it running from day to day. Booting the SystemBooting a system is the process of reading the Linux kernel (page 1039) into system memory and starting it running. Refer to "Boot Loader" on page 533 for more information on the initial steps of bringing a system up. As the last step of the boot procedure, Linux runs the init program as PID number 1. The init program is the first genuine process to run after booting and is the parent of all system processes. (That is why when you run as root and kill process 1, the system dies.)
initdefault The initdefault entry in the /etc/inittab file (page 452) tells init what runlevel to bring the system to (Table 11-1). Set initdefault to 3 to cause the system to present a text login message when it boots; set initdefault to 5 to present a graphical login screen (default).
Init Scripts: Start and Stop System ServicesThe first script that init runs is /etc/rc.d/rc.sysinit, which performs basic system configuration, including setting the system clock, hostname, and keyboard mapping; setting up swap partitions; checking the filesystems for errors; and turning on quota management (page 561). Tip: List the kernel boot messages To save a list of kernel boot messages, give the following command immediately after booting the system and logging in: $ dmesg > dmesg.bootThis command saves the kernel messages in a file named dmesg.boot. This list can be educational. It can also be useful when you are having a problem with the boot process. For more information refer to "dmesg: Displays Kernel Messages" on page 535.
rc scripts Next the /etc/rc.d/rc init script runs the scripts for the services that need to be started when you first bring the system up and that need to be started or stopped when the system goes from single-user to multiuser mode and back down again. The init (initialization) scripts, also called rc (run command) scripts, are shell scripts located in the /etc/rc.d/init.d directory and run via symbolic links in the /etc/rc.d/rcn.d directories, where n is the runlevel the system is entering. The /etc/rc.d/rcn.d directories contain scripts whose names begin with K (K15httpd, K72autofs, K30sendmail, and so on) and scripts whose names begin with S (S05kudzu, S10network, S13portmap, and so on). When entering a new runlevel, each K (kill) script is executed with an argument of stop, and then each S (start) script is executed with an argument of start. Each of the K files is run in numerical order. The S files are run in similar fashion. This setup allows the person who sets up these files to control which services are stopped and which are started, and in what order, whenever the system enters a given runlevel. Using scripts with start and stop arguments promotes flexibility because it allows one script to both start and kill a process, depending on the argument it is called with. To customize system initialization, you can add shell scripts to the /etc/rc.d/init.d directory and place links to these files in the /etc/rc.d/rcn.d directories. The following example shows several links to the cups script. These links are called to run the cups init script to start or stop the cupsd daemon at various runlevels: $ pwd /etc/rc.d $ ls -l */*cups -rwxr-xr-x 1 root root 2312 Jan 17 03:59 init.d/cups lrwxrwxrwx 1 root root 14 Jan 17 20:38 rc0.d/K10cups -> ../init.d/cups lrwxrwxrwx 1 root root 14 Jan 17 20:38 rc1.d/K10cups -> ../init.d/cups lrwxrwxrwx 1 root root 14 Jan 17 20:38 rc2.d/S55cups -> ../init.d/cups lrwxrwxrwx 1 root root 14 Jan 17 20:38 rc3.d/S55cups -> ../init.d/cups lrwxrwxrwx 1 root root 14 Jan 17 20:38 rc4.d/S55cups -> ../init.d/cups lrwxrwxrwx 1 root root 14 Jan 17 20:38 rc5.d/S55cups -> ../init.d/cups lrwxrwxrwx 1 root root 14 Jan 17 20:38 rc6.d/K10cups -> ../init.d/cups Each link in /etc/rc.d/rcn.d should point to a file in /etc/rc.d/init.d. For example, the file /etc/rc.d/rc1.d/K10cups is a link to the file named cups in /etc/rc.d/init.d. (The numbers that are part of the filenames of the links in the /etc/rc.d/rcn.d direc-tories may change from one release of the operating system to the next, but the scripts in /etc/rc.d/init.d always have the same names.) The names of files in the /etc/rc.d/init.d directory are functional. Thus, when you want to turn NFS services on or off, use the nfs script. When you want to turn basic network services on or off, run the network script. The cups script controls the printer daemon. Each script takes an argument of stop or start, depending on what you want to do. Some scripts also take other arguments, such as restart, reload, and status. Run a script without an argument to display a usage message indicating which arguments it accepts. Following are three examples of calls to init scripts. You may find it easier to use service (discussed next) in place of the pathnames in these commands: # /etc/rc.d/init.d/nfs stop # /etc/rc.d/init.d/network start # /etc/rc.d/init.d/network restart The first example stops all NFS processes (processes related to serving filesystems over the network). The second example starts all processes related to basic network services. The third example stops and then restarts these same processes. Tip: Maintain the links in the /etc/rc*.d hierarchy Refer to page 408 for information about using chkconfig to maintain the symbolic links in the /etc/rc*.d hierarchy. The /etc/rc.d/rc.local file is executed after the other init scripts. Put commands that customize the system in rc.local. Although you can add any commands you like to rc.local, it is best to run them in the background so that if they hang, they do not stop the boot process. service: Configures Services IRed Hat provides service, a handy utility that reports on or changes the status of any of the system services in /etc/rc.d/init.d. In place of the commands described at the end of the previous section, you can give the following commands from any directory: # /sbin/service nfs stop # /sbin/service network start # /sbin/service network restart The command /sbin/service status-all displays the status of all system services. The next section explores yet another way to configure system services. system-config-services: Configures Services IIThe system-config-services utility displays the Service Configuration window (Figure 11-2). This utility has two functions: It turns system services on and off, and it controls which services are stopped and started when the system enters and leaves runlevels 3, 4 (not used), and 5. Figure 11-2. The Service Configuration window, Background Services tab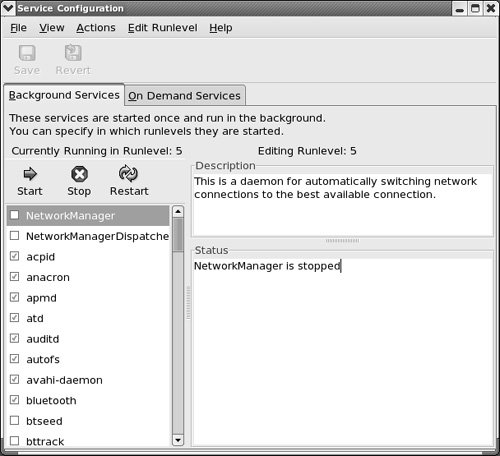 To run this utility, enter system-config-services from a command line in a graphical environment. From KDE select Main menu: Administration The system-config-services utility works with many of the services listed in /etc/rc.d/init.d as well as with those controlled by xinetd (page 425) and listed in /etc/xinetd.d (or as specified in /etc/xinetd.conf).
RHEL The RHEL and FEDORA versions of this utility arrange the information about services controlled by xinetd somewhat differently. The RHEL version displays all services in a single list. When you highlight a service that is controlled by xinetd, the notice xinetd is required for this service appears in the Description frame.
FEDORA The FEDORA version of system-config-services has two tabs. The Background Services tab lists all services except those controlled by xinetd, while the On Demand Services tab displays services controlled by xinetd. This section describes the FEDORA version of the utility. Background Services TabWhen you click the Background Services tab, the line below the note about background services displays the current runlevel (see Table 11-1 on page 404) of the system and the runlevel that you are editing. Services that are turned on at the run-level you are editing are indicated by a check mark in the box adjacent to the service. To change the runlevel you are editing, click Edit Runlevel on the menubar and then select the runlevel you want to edit. When you select Runlevel All, system-config-services displays a table listing runlevels 3, 4, and 5. Scroll to and highlight the service you are interested in. A short description appears in the Description frame and the status of the service appears in the Status frame. With a background service highlighted, click the toolbar or make a selection from Actions in the menubar to stop, start, or restart (stop and then start) the service. The system turns on (off) the service immediately; the change does not affect whether the service will run the next time you boot the system, enter another run-level, or reenter the current runlevel. These changes are equivalent to those you would make with the service utility (page 406). You can also use system-config-services to control the future execution of background services in runlevels 3, 4, and 5. Select the runlevel you want to affect, using the Edit Runlevel selection from the menubar. Click the box next to the service you want to configure. A check mark in the box indicates that the service will be on at the specified runlevel; the absence of a check mark indicates that it will be off. Click the Save button. When you enter that runlevel in the future, the service will be on or off as you specified. The current state of the service is not changed. On Demand Services TabThe On Demand Services tab allows you to turn xinetd-controlled services on or off. As with the Background Services tab, highlight a service to read a description of it. Click the box adjacent to a service to turn it on or off and then click the Save button. This action changes the yes/no parameter of the disable line discussed on page 426. When you click Save, the system restarts xinetd with the service status change you requested. This change affects all runlevels and will remain in effect through changes in runlevels and reboots unless you change it again. These changes are equivalent to those you would make with the chkconfig utility (see the next section). chkconfig: Configures Services IIIThe chkconfig character-based utility duplicates much of what system-config-services does: It makes it easier for a system administrator to maintain the /etc/rc.d directory hierarchy. This utility can add, remove, list startup information, and check the state of system services. It changes the configuration onlyit does not change the current state of any service. To see a list of all services, give the following command: $ /sbin/chkconfig --list NetworkManager 0:off 1:off 2:off 3:off 4:off 5:off 6:off NetworkManagerDispatcher 0:off 1:off 2:off 3:off 4:off 5:off 6:off acpid 0:off 1:off 2:off 3:on 4:on 5:on 6:off anacron 0:off 1:off 2:on 3:on 4:on 5:on 6:off apmd 0:off 1:off 2:on 3:on 4:on 5:on 6:off atd 0:off 1:off 2:off 3:on 4:on 5:on 6:off auditd 0:off 1:off 2:on 3:on 4:on 5:on 6:off autofs 0:off 1:off 2:off 3:on 4:on 5:on 6:off avahi-daemon 0:off 1:off 2:off 3:on 4:on 5:on 6:off bluetooth 0:off 1:off 2:on 3:on 4:on 5:on 6:off cpuspeed 0:off 1:on 2:on 3:on 4:on 5:on 6:off ... xinetd based services: chargen: off chargen-udp: off daytime: off daytime-udp: off echo: off echo-udp: off ...All services that run their own daemons are listed, one to a line, followed by their configured state for each runlevel. Following that list, chkconfig displays each of the xinetd-based services and its current status. You can check how a specific daemon is configured by adding its name to the previous command: $ /sbin/chkconfig --list sshd sshd 0:off 1:off 2:on 3:on 4:on 5:on 6:offIn the next example, chkconfig configures the /etc/rc.d directory hierarchy so that sshd will be off in runlevels 2, 3, 4, and 5 and then confirms the change. To make changes using chkconfig, you must work as root: # /sbin/chkconfig --level 2345 sshd off .# /sbin/chkconfig --list sshd sshd 0:off 1:off 2:off 3:off 4:off 5:off 6:off For convenience, you can omit the level 2345 part. When you specify an init script and on or off, chkconfig defaults to runlevels 2, 3, 4, and 5. The following command is equivalent to the first of the preceding commands: # chkconfig sshd offBoth ps and service confirm that even though chkconfig set things up so that sshd would be off in all runlevels, this daemon is still running. The chkconfig utility did not shut down sshd. In the following example, the second command line shows that when you give a service command followed by the name of an init script, you get the usage message from the script: # ps -ef | grep sshd root 697 1 0 Oct01 ? 00:00:00 /usr/sbin/sshd root 17185 21650 0 15:15 pts/4 00:00:00 grep sshd # /sbin/service sshd Usage: /etc/init.d/sshd {start|stop|restart|reload|condrestart|status} # /sbin/service sshd status sshd (pid 697) is running... With the preceding changes, when you reboot the system, sshd will not start. You can stop it more easily using service, however: # /sbin/service sshd stop Stopping sshd: [ OK ] # ps -ef | grep sshd root 17209 21650 0 15:16 pts/4 00:00:00 grep sshd # /sbin/service sshd status sshd is stopped Single-User ModeWhen the system is in single-user mode, only the system console is enabled. You can run programs from the console in single-user mode as you would from any terminal in multiuser mode. The difference is that few of the system daemons will be running. The scripts in /etc/rc.d/rc1.d are run as part of single-user initialization. See page 414 for instructions on bringing the system to single-user mode. With the system in single-user mode, you can perform system maintenance that requires filesystems to be unmounted or that requires just a quiet systemno one except you using it, so that no user programs interfere with disk maintenance and backup programs. The classical UNIX term for this state is quiescent. See "Backing Up Files" on page 540 for a discussion of one of the most important and often neglected areas of system administration. Going to Multiuser ModeAfter you have determined that all is well with the filesystems, you can bring the operating system up to multiuser mode. When you exit from the single-user shell, init brings the system to the default runlevelusually 5 (page 404). Alternatively you can give the following command in response to the Superuser prompt to bring the system to (textual) multiuser mode (use 5 to go to graphical [multiuser] mode): # /sbin/telinit 3The telinit utility tells init which runlevel to enter. The telinit executable is a symbolic link to the init executable but, by convention, running telinit is preferred to running init directly. When it goes from single-user to (textual) multiuser mode, the system executes the K (kill or stop) scripts and then the S (start) scripts in /etc/rc.d/rc3.d. For more information refer to "Init Scripts: Start and Stop System Services" on page 404. Use chkconfig (page 408) to stop one of these scripts from running when the system enters the new runlevel. Runlevel 2 is referred to as multiuser mode, and runlevel 3 is called extended multiuser mode. But because runlevel 2 is rarely used, this chapter uses the term multiuser to refer to runlevel 3. Runlevel 4 is not used, and runlevel 5 is graphics or X11 mode. Multiuser/Graphical modeMultiuser/graphical mode is the default state for a Red Hat Linux system. In this mode all appropriate filesystems are mounted, and users can log in from all connected terminals, dial-up lines, and network connections. All support services and daemons are enabled and running. Once the system is in multiuser/graphical mode, you will see a login screen on the console. Most systems are set up to boot directly to multiuser/graphical mode without stopping at single-user mode. Logging In
Textual login With a textual login, the system uses init, mingetty, and login to allow a user to log in; login uses PAM modules (page 438) to authenticate users. Once the system is in multiuser mode, init is responsible for spawning a mingetty process on each of the lines that a user can use to log in. When you enter your username, mingetty establishes the characteristics of your terminal. It then overlays itself with a login process and passes to the login process whatever you entered in response to the login: prompt. The login process uses PAM to consult the /etc/passwd file to see whether a username matches the username you entered. PAM then consults the /etc/shadow file to see whether a password is associated with the username. If it is, login prompts you for a password; if not, it continues without requiring a password. When your username requires a password, login verifies the password you enter by checking the /etc/shadow file again. If either your username or your password is not correct, login displays Login incorrect and prompts you to log in again. All passwords in the /etc/shadow file are encrypted or hashed using MD5 (page 1042). It is not feasible to recover an encrypted password. When you log in, the login process encrypts/hashes the password you type at the prompt and compares it to the encrypted/hashed password in /etc/shadow. If the two passwords match, you are authenticated.
Graphical login With a graphical login, the init process spawns gdm (the GNOME display manager) on the first free virtual terminal, providing features similar to mingetty and login. The gdm utility starts an X server and presents a login window. The gdm display manager then uses PAM to authenticate the user and runs the scripts in the /etc/gdm/PreSession directory. These scripts inspect the user's ~/.dmrc file, which stores the user's default session and language, and launch the user's session. Both GNOME and KDE desktop environments store the state of the last saved session and attempt to restore it when the user logs back in. With NIS, login compares your username and password with the information in the appropriate naming service instead of (or in addition to) the passwd and shadow files. If the system is configured to use both methods (/etc/passwd and NIS), it checks the /etc/nsswitch.conf file (page 435) to see in which order it should consult them. PAM (page 438), the Pluggable Authentication Module facility, allows you greater control over user logins than the /etc/passwd and /etc/shadow files do. Using PAM, you can specify multiple levels of authentication, mutually exclusive authentication methods, or parallel methods, each of which is by itself sufficient to grant access to the system. For example, you can have different authentication methods for console logins and for ssh logins. Likewise, you can require that modem users authenticate themselves via two or more methods (such as a smartcard or badge reader and a password). PAM modules also provide security technology vendors with a convenient way to interface their hardware or software products with a system. When the username and password are correct, login or the scripts in PreSession consult the appropriate services to initialize your user and group IDs, establish your home directory, and determine which shell or desktop manager you will be working with. The login utility/PreSession scripts assign values to the HOME, PATH, LOGNAME, SHELL, TERM, and MAIL variables. They look in the /etc/group file (page 451) to identify the groups the user belongs to. When login has finished its work, it overlays itself with the login shell, which inherits the variables set by login. In a graphical environment, the PreSession scripts start the desktop manager. During a textual login, the login shell assigns values to additional shell variables and executes the commands in the system startup shell scripts /etc/profile and /etc/bashrc. Some systems have additional system startup shell scripts. The actions performed by these scripts are system dependent, but they usually display the contents of the /etc/motd (message of the day) and /etc/issue files, let you know that you have mail, and set umask (page 420), the file-creation mask. After executing the system startup commands, the shell executes the commands from the personal startup shell scripts in your home directory. For a list of these scripts, refer to page 267. Because the shell executes the personal startup scripts after the system scripts, a sophisticated user can override any variables or conventions that were established by the system, whereas a new user can remain uninvolved in these matters. Logging OutWhen you see a shell prompt, you can either execute a program or exit from the shell. If you exit from the shell, the process running the shell dies and the parent process wakes up. When the shell is a child of another shell, the parent shell wakes up and displays a prompt. Exiting from a login shell causes the operating system to send init a signal that one of its children has died. Upon receiving this signal, init takes action based on the contents of the /etc/inittab file. In the case of a process controlling a line for a terminal, init informs mingetty that the line is free for another user. When you are at runlevel 5 and exit from a GUI, the GNOME display manager, gdm, initiates a new login display. Bringing the System DownThe shutdown and halt utilities perform the tasks needed to bring the system down safely. These utilities can restart the system, prepare the system to be turned off, put the system in single-user mode, and, on some hardware, power down the system. The poweroff and reboot utilities are linked to halt. If you call halt when the system is not shutting down (runlevel 0) or rebooting (runlevel 6), halt calls shutdown. (When you are running as other than Superuser, the link goes through consolehelper [page 394].) You must tell shutdown when you would like to bring the system down. This time can be expressed as an absolute time of day, as in 19:15, which causes the shutdown to occur at 7:15 P.M. Alternatively, you can give the number of minutes from the present time, as in +15, which means 15 minutes from now. To bring the system down immediately (recommended for emergency shutdowns only or when you are the only user logged in), you can give the argument +0, or its synonym, now. When shutdown times exceed 5 minutes, all nonroot logins are disabled for the last 5 minutes before shutdown. Calling shutdown with the r option causes the system to reboot (same as the reboot command except that reboot implies now). Adding the f option forces a fast reboot, in which filesystem checking is disabled (see the shutdown man page for details). Using h instead of r forces the system to halt (same as the halt command except that halt implies now). A message appears once the system has been safely halted: System halted. Most ATX systems turn off automatically after shutdown, however, so you will not see this message. Because Linux is a multiuser system, shutdown warns all users before taking action. This warning gives users a chance to prepare for the shutdown, perhaps by writing out editor files or exiting from networking applications. You can replace the default shutdown message with one of your own by following the time specification on the command line with a message: # /sbin/shutdown -h 09:30 Going down 9:30 to install disk, up by 10am. CONTROL-ALT-DEL: Reboots the SystemBy default the /etc/inittab file on an Intel-based computer contains the entry ca::ctrlaltdel:/sbin/shutdown -t3 -r now Caution: Do not turn the power off before bringing the system down Do not turn the power off on a Linux system without first bringing it down as described here. Like UNIX, Linux speeds disk access by keeping an in-memory collection of disk buffers that are written to the disk periodically or when system use is momentarily low. When you turn off or reset the computer without writing the contents of these disk buffers to the disk, you lose any information in the buffers. Running shutdown forces these buffers to be written. You can force the buffers to be written at any time by issuing a sync command. However, sync does not unmount filesystems, nor does it bring the system down. This entry allows any user[1] to reboot the computer safely by pressing the key sequence CONTROL-ALT-DEL (also referred to as the three-finger salute or the Vulcan death grip) from a textual login on the console. (Although it is not recommended, you can press CONTROL-ALT-F1 from a graphical session to switch to the system console and then use CONTROL-ALT-DEL.) Because of its hooks into the keyboard driver, this key sequence sends a SIGINT signal to the init process, which in response runs shutdown. Because it runs as root, init causes shutdown to run as root, even if an ordinary user initiates the key sequence. You can disable CONTROL-ALT-DEL by deleting the preceding line from /etc/inittab (or putting a # at the beginning of the line) and then sending init a HUP signal (kill HUP 1), which causes it to reread the /etc/inittab file.
consolehelper: Allows an Ordinary User to Run a Privileged CommandTwo executable halt files exist: $ file /sbin/halt /usr/bin/halt /sbin/halt: ELF 32-bit LSB executable, Intel 80386, version 1 (SYSV)... /usr/bin/halt: symbolic link to 'consolehelper'The file in /sbin runs the halt utility, whereas the file in /usr/bin is a link to console-helper. In root's PATH variable, /sbin normally precedes /usr/bin. Thus, when someone running as root gives a halt command, the shell executes /sbin/halt (the halt utility). Normally /sbin does not appear in an ordinary user's PATH; when an ordinary user gives a halt command, the shell follows the link from /usr/bin/halt and executes /usr/bin/consolehelper. What consolehelper does depends on how PAM is set up (see /etc/pam.d/halt for the modules it calls and /usr/share/doc/pam-*/txts/* for descriptions of the modules). Refer to "PAM" on page 438 for more information. As shipped by Red Hat, consolehelper does not require the root password; any user can give a halt command from the system console to shut the system down. Going to Single-User ModeBecause going from multiuser to single-user mode can affect other users, you must be Superuser to make this change. Make sure that you give other users enough warning before switching to single-user mode; otherwise, they may lose whatever they were working on. The following steps describe a method of manually bringing the system down to single-user modethe point where it is safe to turn the power off. You must be running as Superuser to perform these tasks.
Turning the Power OffOnce the system is in single-user mode, shutting it down is quite straightforward. Give the command telinit 0 (preferred) or halt to bring the system down. You can build a kernel with apm so it turns the machine off at the appropriate time. If your machine is not set up this way, turn the power off when the appropriate prompt appears or when the system starts rebooting. CrashA crash occurs when the system suddenly stops or fails when you do not intend it to. A crash may result from software or hardware problems or from a loss of power. As a running system loses power, it may behave in erratic or unpredictable ways. In a fraction of a second, some components are supplied with enough voltage; others are not. Buffers are not flushed, corrupt data may be written to the hard disk, and so on. IDE drives do not behave as predictably as SCSI drives under these circumstances. After a crash, you must bring the operating system up carefully to minimize possible damage to the filesystems. Frequently little or no damage will have occurred. Repairing a FilesystemAlthough the filesystems are checked automatically during the boot process if needed, you will have to check them manually if a problem cannot be repaired automatically. To check the filesystems manually after a crash, boot the system up in rescue mode (page 397). Do not mount any devices other than root, which Linux mounts automatically. Run fsck (page 470) on all local filesystems that were mounted at the time of the crash, repairing them as needed. Depending on how the system is set up, when fsck cannot repair a filesystem automatically, the system may enter emergency mode so you can run fsck manually. Make note of any ordinary files or directories that you repair (and can identify), and inform their owners that they may not be complete or correct. Look in the lost+found directory in each filesystem for missing files. After successfully running fsck, type exit to exit from the single-user shell and resume booting. If files are not correct or are missing altogether, you may have to recreate them from a backup copy of the filesystem. For more information refer to "Backing Up Files" on page 540. When the System Does Not BootWhen you cannot boot the computer from the hard drive, you can try to boot the system into rescue mode. For more information refer to "Rescue Mode" on page 397. If the system comes up in rescue mode, run fsck on the root filesystem and try booting from the hard drive again. When all else fails, go through the install procedure, and perform an "upgrade" to the current version of Linux. Red Hat Linux systems can perform a nondestructive upgrade and can fix quite a bit in the process. For more information refer to page 27. |
EAN: 2147483647
Pages: 383