Tutorial: Getting Started with emacs
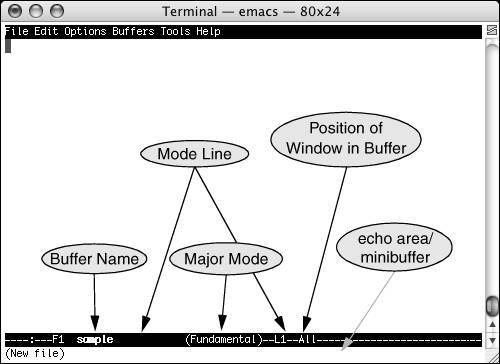
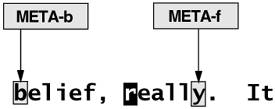
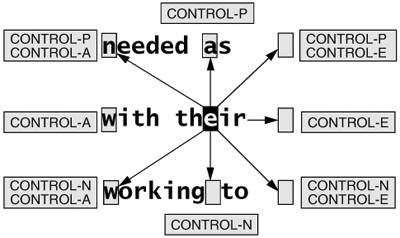
Tutorial: Getting Started with emacsThe emacs editor has many, many features, and there are many ways to use it. Its complete manual includes more than 35 chapters. Nevertheless, you can do a considerable amount of meaningful work with a relatively small subset of the commands. This section describes a simple editing session, explaining how to start and exit from emacs and how to move the cursor and delete text. Some issues are postponed or simplified in the interest of clarity. Starting emacsTo edit a file named sample using emacs as a text-based editor, enter the following command. The nw option, which must be the first option on the emacs command line, tells emacs not to use its X (GUI) interface. $ emacs -nw -q sample This command starts emacs, reads the file named sample into a buffer, and displays its contents on the screen or window. If no file has this name, emacs displays a blank screen with New File at the bottom (Figure 7-1). If the file exists, emacs displays another message (Figure 7-2, page 204). The q option tells emacs not to read the ~/.emacs startup file from your home directory. Not reading the startup file guarantees that you get standard, uncustomized behavior and is sometimes useful for beginners or for other users who want to bypass a .emacs file. Figure 7-1. The emacs welcome screen Figure 7-2. Sample buffer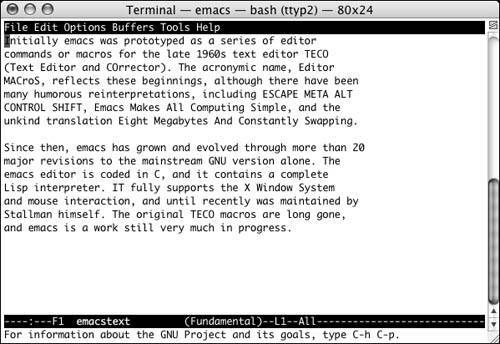 The screen starts with a single window. At the bottom of this window is a reverse-video titlebar called the Mode Line. At a minimum, the Mode Line shows which buffer the window is viewing, whether the buffer has been changed, what major and minor modes are in effect, and how far down the buffer the window is positioned. When you have more than one window, one Mode Line appears in each window. At the bottom of the screen, emacs leaves a single line open. This Echo Area, or Minibuffer, line is used for short messages and special one-line commands. A cursor is in the window or Minibuffer. All input and nearly all editing takes place at the cursor. As you type ordinary characters, emacs inserts them at the cursor position. If characters are under the cursor or to its right, they get pushed to the right as you type, so no characters are lost. Stopping emacsThe command to exit from emacs is the two-key sequence CONTROL-X CONTROL-C. You can give this command at almost any time (in some modes you may have to press CONTROL-G first). It stops emacs gracefully, asking you to confirm changes if you made any during the editing session. If you want to cancel a half-typed command or stop a running command before it is done, you can quit by pressing CONTROL-G. The emacs editor displays Quit in the Echo Area and waits for your next command. Inserting TextTyping an ordinary (printing) character pushes the cursor and any characters to the right of the cursor one position to the right and inserts the new character in the position just opened. Backspacing pulls the cursor and any characters to the right of the cursor one position to the left, erasing the character that was there before. Deleting CharactersDepending on the keyboard you are using and the emacs startup file, different keys may delete characters in different ways. CONTROL-D typically deletes the character under the cursor, as do DELETE and DEL. BACKSPACE typically deletes the character to the left of the cursor. Try each of these keys and see what it does. Tip: More about deleting characters If the instructions described in this section do not work, read the emacs info section on deletion. Give this command from a shell prompt: $ info emacs From info give the command m deletion to display a document that describes in detail how to delete small amounts of text. Use the SPACE bar to scroll through the document. Type q to exit from info. Start emacs and type a few lines of text. If you make a mistake, use the deletion characters discussed previously. The RETURN key inserts an invisible end-of-line character in the buffer and returns the cursor to the left margin, one line down. It is possible to back up past the start of a line and up to the end of the previous line. Figure 7-2 shows a sample buffer. Moving the CursorYou can position the cursor over any character in the emacs window and move the window so it displays any portion of the buffer. You can move the cursor forward or backward through the text (Figure 6-8, page 160) by various textual unitsfor example, characters, words, sentences, lines, and paragraphs. Any of the cursor-movement commands can be preceded by a repetition count (CONTROL-U followed by a numeric argument), which causes the cursor to move that number of textual units through the text. Refer to page 209 for a discussion of numeric arguments. Tip: Use the ARROW keys Sometimes the easiest way to move the cursor is by using the LEFT, RIGHT, UP, and DOWN ARROW keys. Moving the Cursor by CharactersCONTROL-F Pressing the RIGHT ARROW key or CONTROL-F moves the cursor forward one character. If the cursor is at the end of a line, these commands wrap it to the beginning of the next line. The command CONTROL-U 7 CONTROL-F moves the cursor seven characters forward (to the right). CONTROL-B Pressing the LEFT ARROW key or CONTROL-B moves the cursor backward one character. The command CONTROL-U 7 CONTROL-B moves the cursor seven characters backward (to the left). CONTROL-B works in a manner similar to CONTROL-F (Figure 7-3). Figure 7-3. Moving the cursor by characters Moving the Cursor by WordsMETA-f Pressing META-f moves the cursor forward one word. To press META-f hold down the META or ALT key while you press f. For more information see the tip "Activating the META key" on page 31. If you do not have either of these keys, press ESCAPE, release it, and then press f. This command leaves the cursor on the first character that is not part of the word the cursor started on. The command CONTROL-U 4 META-f moves the cursor forward one space past the end of the fourth word. See page 208 for more about keys. Tip: The META key You must configure Terminal to use the OPTION key as the META key. For more information see the tip "Activating the META key" on page 31. META-b Pressing META-b moves the cursor backward one word so the cursor is on the first letter of the word it started on. If the cursor was on the first letter of a word, META-b moves the cursor to the first letter of the preceding word. It works in a manner similar to META-f (Figure 7-4). Figure 7-4. Moving the cursor by words Moving the Cursor by LinesCONTROL-A CONTROL-E CONTROL-P CONTROL-N Pressing CONTROL-A moves the cursor to the beginning of the line it is on; CONTROL-E moves it to the end. Pressing the UP ARROW key or CONTROL-P moves the cursor up one line to the position directly above where the cursor started; the DOWN ARROW key or CONTROL-N moves it down. As with the other cursor-movement keys, you can precede CONTROL-P and CONTROL-N with CONTROL-U and a numeric argument to move up or down multiple lines. You can use pairs of these commands to move the cursor up to the beginning of the previous line, down to the end of the following line, and so on (Figure 7-5). Figure 7-5. Moving the cursor by lines Moving the Cursor by Sentences, Paragraphs, and Window PositionMETA-a, META-e META-{, META-} Pressing META-a moves the cursor to the beginning of the sentence the cursor is on; META-e moves the cursor to the end. META-{ moves the cursor to the beginning of the paragraph the cursor is on; META-} moves it to the end. (Sentences and paragraphs are defined starting on page 230.) You can precede any of these commands with a repetition count (CONTROL-U and a numeric argument) to move the cursor that many sentences or paragraphs. META-r Pressing META-r moves the cursor to the beginning of the middle line of the window. You can precede this command with CONTROL-U and a line number (here CONTROL-U does not indicate a repetition count but a screen line number). The command CONTROL-U 0 META-r moves the cursor to the beginning of the top line (line zero) in the window. You can replace zero with the line number of the line you want to move the cursor to or with a minus sign (), in which case the cursor moves to the beginning of the last line of the window (Figure 7-6). Figure 7-6. Moving the cursor by sentences, paragraphs, and window position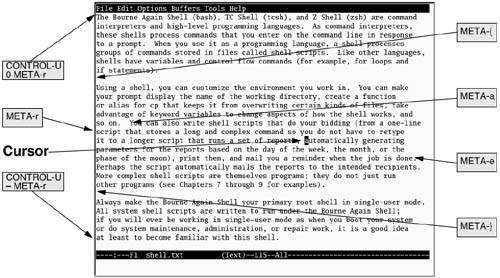 Editing at the Cursor PositionWith the cursor in the window you can type new text, pushing the existing text to the right. Entering new text requires no special commands once the cursor is positioned. If you type so many characters that the text in a line goes past the right edge of the window, emacs puts a backslash (\) near the right edge of the window and wraps the text to the next line. The backslash appears on the screen but is not saved as part of the file and is never printed. Although you can create an arbitrarily long line, some UNIX tools have problems with text files containing such lines. You can split a line at any point by positioning the cursor and pressing RETURN. Deleting text Pressing DELETE removes characters to the left of the cursor. The cursor and the remainder of the text on this line both move to the left each time you press DELETE. To join a line with the line above it, position the cursor on the first character of the second line and press DELETE. Press CONTROL-D to delete the character under the cursor. The cursor remains stationary, but the remainder of the text on the line moves left to replace the deleted character. See the tip "More about deleting characters" on page 203 if either of these keys does not work as described here. Saving and Retrieving the BufferNo matter what happens to a buffer during an emacs session, the associated file does not change until you save the buffer. If you leave emacs without saving the buffer (this is possible if you are insistent enough), the file is not changed and the session's work is discarded. Backups As mentioned previously, emacs prompts you about unsaved changes to the buffer contents. As it writes a buffer's edited contents back to the file, emacs may optionally first make a backup of the original file contents. You can choose to make no backups, one level (default), or an arbitrary number of levels. The one-level backup filenames are formed by appending a ~ character to the original filename. The multilevel backups append .~n~ to the filename, where n is the sequential backup number, starting with 1. The version-control variable dictates how emacs saves backups. Saving the buffer The command CONTROL-X CONTROL-S saves the current buffer in its associated file. The emacs editor confirms a successful save with a message in the Echo Area. Visiting another file If you are already editing a file with emacs and want to edit another file (also called visiting a file), you can copy the new file into a new emacs buffer by giving the command CONTROL-X CONTROL-F. The emacs editor prompts you for a filename, reads that file into a new buffer, and displays that buffer in the current window. Having two files open in one editing session is more convenient than exiting from emacs, returning to the shell, and then starting a new copy of emacs to edit a second file. Tip: Visiting a file with CONTROL-X CONTROL-F When you use CONTROL-X CONTROL-F, emacs partially completes the path to the filename you are to enter. Normally it is the path to the working directory, but in some situations emacs may display a different path, such as the path to your home directory. You can edit this path if it is not pointing to the directory you want. |
EAN: 2147483647
Pages: 234