Workflow Plug-in Assemblies
As you learned in Chapter 8, the Microsoft CRM workflow module allows you to create powerful business rules that help automate your sales, marketing, and customer service processes. In addition to the default workflow actions, you can also reference custom assemblies directly within a workflow rule. This feature drastically opens a wide array of extensibility possibilities.
Plug-in assemblies can accept values from a workflow rule and then return values back to the workflow logic to be used in other actions, or they can execute actions on their own. You define the workflow assemblies with a configuration file that the Workflow Manager uses to display the appropriate helper screens to the user.
Custom Assembly Development
Like you did with the callout, you will create a class library for your custom workflow assembly. However, unlike with the callout, you do not have to inherit from a specific base class. You simply create a class and add the methods that you need. The signature of the method should match the parameters that you set in your configuration file. Also, any method that you want to access from the workflow must be declared as public.
using System; using System.Reflection; using System.Runtime.CompilerServices; namespace WorkingWithCrm.Workflow { public class CustomAssembly { public string GetFullName(string FirstName, string LastName) { return FirstName + " " + LastName; } } }
Configuration File
Upon installation, Microsoft CRM creates a workflow configuration file (Workflow.config) in the <crm install drive>\Program Files\Microsoft CRM\server\bin\assembly directory.
Microsoft CRM includes three workflow plug-in assemblies (one of which isn't visible in the Workflow Manager), and you should not remove these assemblies. A default Workflow.config file is also installed. We recommend that when you develop a new workflow plug-in assembly, you should just add your customizations into the existing Workflow.config file and leave the default workflow assemblies alone.
The default Workflow.config file looks like Figure 9-10.
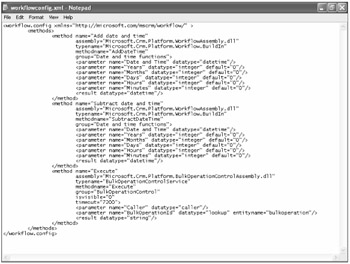
Figure 9-10: Default Workflow.config file
As you can see, you have multiple parameter and configuration options available within this file. Some of the key concepts related to configuring the workflow file include:
-
Use the Group attribute to create submenus in the Workflow Manager. You can then neatly categorize your custom assembly functions.
-
You can pass in parameters to your methods by using the <parameter /> element. The Workflow Manager will allow you to select values based on the datatype attribute.
-
You may also optionally return values from your methods back to the workflow rule.
-
Use the allowunsignedassemblies attribute if you want to deploy a .dll file that is not digitally signed, as shown here.
<workflow.config xmlns="http://microsoft.com/mscrm/workflow/ " allowunsignedassemblies="true">
-
Be sure to review the configuration schema located in the SDK. This schema is used by the workflow engine to validate your configuration file. If you are unsure of a location of an attribute or element, review this schema for the actual definition.
Deploying the Assembly
You deploy your custom workflow assembly just as you would a callout assembly. The workflow engine runs from a service on the Microsoft CRM Web server, so you must shut off the service named Microsoft CRM Workflow Service. You can then copy the assemblies and work-flow configuration file to the Microsoft CRM Web server in the <crm install drive>\Program Files\Microsoft CRM\server\bin\assembly directory.
Deploying a Workflow Plug-in Assembly
-
On the Microsoft CRM Web server, click Start, click Run, type cmd in the Open box, and click OK.
-
At the command prompt, run the following commands, pressing Enter after each command:
-
net stop mscrmworkflowservice
-
iisreset
-
-
Copy assembly and configuration files.
-
Back at the command prompt, run net start mscrmworkflowservice and press Enter.
We mentioned the concept of digitally signing an assembly when we discussed the configuration file. Digital signing creates a strong name for your assembly and will further strengthen its identity to the server. Microsoft CRM Workflow Manager assumes that assemblies will be signed unless you specify otherwise by setting the allowunsignedassemblies attribute to True. If you don't set this attribute to True in the Workflow.config file and you deploy an unsigned assembly, the Microsoft CRM workflow service will generate an error and will not process the request.
Review the Building Secure Assemblies section on MSDN for more information about digitally signing assemblies: http://msdn.microsoft.com/library/default.asp?url=/library/en-us/secmod/html/secmod80.asp
Creating a Workflow Assembly
Now that you know how to create, deploy, and configure a custom assembly in workflow, let's review a real-world example of using an assembly in workflow. Assume that your company uses a support queue that receives e-mail messages sent to support@example.com, and you configured Microsoft CRM to create E-mail activities for this queue. You want to automatically create a Case for every e-mail message sent to the support@example.com queue address, and using a workflow assembly is a great method to accomplish this.
Conceptually, we'll create a workflow rule for the Activity entity based on the create event. However, we can't use the native Microsoft CRM workflow actions to create a new Case. Therefore, we'll use our custom assembly to create the new Case record for us. We don't want a new Case record for every Activity created in Microsoft CRM; we just want a new Case for e-mails sent to the support queue address.
The sample will cover the following steps:
-
Creating a custom workflow assembly
-
Updating the Workflow.config file
-
Deploying the files to the server
-
Creating and configuring the workflow rule
Creating a Custom Workflow Assembly
First, we will create a custom workflow plug-in assembly that contains a method called CreateCaseFromEmail. The CreateCaseFromEmail method will accept an activity ID, a subject, an e-mail address, and a description.
Building a Workflow Assembly Project
-
Create a new C# Class Library project in Visual Studio .NET 2003 called WorkingWithCrm.Workflow.
-
Add a new Class file called Incident.
-
Be sure check for the System.Web.Services reference. If it doesn't exist, add a reference to the System.Web.Services namespace.
-
Add a Web Reference to the CrmService Web service, calling it CrmSdk.
-
Enter the code shown in Listing 9-3.
Listing 9-3: Incident Workflow Class

using System; using System.Reflection; using System.Runtime.CompilerServices; using WorkingWithCrm.Workflow.CrmSdk; namespace WorkingWithCrm.Workflow { public class Incident { public Incident() {} public void CreateCaseFromEmail(Guid ActivityId, string Subject, string EmailAddress, str ing Description) { // Set these default values in a configuration file. // defaultContactId will be the default customer for the case, if the e-mail is not matched in the system. Guid defaultContactId = new Guid(""); // defaultOwnerId will be used as the owner of the case. Guid defaultOwnerId = new Guid(""); // serviceUserId is a user that at least has the following privileges: // case: organization create & read; activity: organization write & read Guid serviceUserId = new Guid(""); CrmService service = new CrmService(); service.Credentials = System.Net.CredentialCache.DefaultCredentials; service.Url = "http://<crmserver>/mscrmservices/2006/crmservice.asmx"; service.CallerIdValue = new CallerId(); service.CallerIdValue.CallerGuid = serviceUserId; // Attempt to retrieve a contact record from the e-mail address, using the QueryByAttribute class. ColumnSet cols = new ColumnSet(); cols.Attributes = new string [] {"contactid"}; QueryByAttribute query = new QueryByAttribute(); query.ColumnSet = cols; query.EntityName = EntityName.contact.ToString(); // The query will retrieve all contacts who match this e-mail address. query.Attributes = new string [] {"emailaddress1"}; query.Values = new string [] {EmailAddress}; // Execute the retrieval. BusinessEntityCollection retrieved = service.RetrieveMultiple(query); // If we find a match, use the first one we find. Otherwise, leave the default. Guid contactId = defaultContactId; if (retrieved.BusinessEntities.Length > 0) { contact oContact = new contact(); oContact = (contact)retrieved.BusinessEntities[0]; contactId = oContact.contactid.Value; } incident oIncident = new incident(); oIncident.title = Subject; oIncident.description = Description; Customer customerId = new Customer(); customerId.Value = contactId; customerId.type = EntityName.contact.ToString(); oIncident.customerid = customerId; // Set the owner to be the passed-in queue. oIncident.ownerid = new Owner(); oIncident.ownerid.Value = defaultOwnerId; oIncident.ownerid.type = EntityName.systemuser.ToString(); try { // Create the case. Guid incidentId = service.Create(oIncident); // Set the regarding value of the E-mail activity to our new incident ID. email oEmail = new email(); Lookup regarding = new Lookup(); regarding.Value = incidentId; regarding.type = EntityName.incident.ToString(); oEmail.regardingobjectid = regarding; oEmail.activityid = new Key(); oEmail.activityid.Value = ActivityId; service.Update(oEmail); } catch (System.Web.Services.Protocols.SoapException ex) { // Handle error. } } } }
Updating the Workflow.Config File
Now we need to add a new method to the Workflow.config file to register our new assembly method. To better organize our assemblies in the Workflow Manager, we will add a value to the group attribute and name it Custom Assemblies. The isvisible and timeout attributes are optional, but we will go ahead and explicitly specify values for them. We will also configure the Workflow.config file to allow this unsigned assembly to execute by setting the allowunsignedassemblies attribute to True on the Workflow.config node.
To edit the Workflow.config file, we recommend that you copy it into your project file so that you can edit it without overwriting the existing values. Make the following additions to the file:
<workflow.config xmlns="http://microsoft.com/mscrm/workflow/" allowunsignedassemblies="true"> <methods> <method name="Create Case From Email" assembly="Sonoma.Crm.Book.Workflow.dll" typename="Sonoma.Crm.Book.Workflow.Incident" methodname="CreateCaseFromEmail" group="Custom Assemblies" isvisible="1" timeout="7200"> <parameter name="ActivityId" datatype="lookup" entityname="email" /> <parameter name="Subject" datatype="string" /> <parameter name="EmailAddress" datatype="string" /> <parameter name="Description" datatype="string" /> </method> ...existing method nodes... </methods> </workflow.config>
Deploying the Files to the Server
Now that you have the assembly file built and the configuration file updated, you must deploy them to your Web server. Perform the following steps on the Web server:
-
Log on to the Microsoft CRM Web server. Click Start, click Run, type cmd, and then press Enter.
-
At the command prompt, type net stop mscrmworkflowservice, and then press Enter.
-
At the command prompt, type iisreset, and then press Enter.
-
Copy the .dll file and Workflow.config file to <crm install drive>\Program Files\Microsoft CRM\server\bin\assembly.
-
At the command prompt, type net start mscrmworkflowservice, and then press Enter.
Creating and Configuring the Workflow Rule
Now that we've deployed our workflow assembly, we will create a workflow rule that takes advantage of the assembly's functionality. After you have deployed your assembly and restarted the workflow service, log on to the Microsoft CRM Web server and launch the Workflow Manager.
-
To open the Workflow Manager, click Start, point to All Programs, point to Microsoft CRM, and then click Workflow Manager.
-
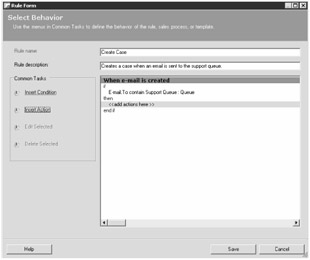
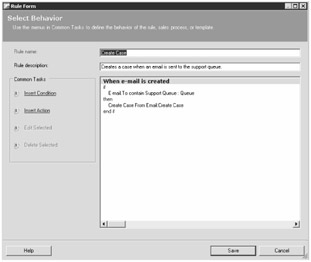
Select E-mail as the entity type and create a new rule for the Create event, calling it Create Case.
-
We will create a conditional that will first check to see if the To address is Support Queue. Click Insert Condition, and then click <<Check conditions>>. Click Insert Condition, and then select Check Entity Condition.
-
In the Check Entity Condition dialog box, leave E-mail selected as the entity. For the field, select To, then contain, and then click the ellipsis button (…).
-
In the Select Value dialog box, choose Static Value. Click the lookup button and choose Queue for the type. Then change the destination of the queue you set up to receive the incoming e-mails from Available to Selected. Our example uses Support Queue. Click OK three times.
-
Now create a new action that will call our custom assembly. Click <<add actions here>>. Then click Insert Action, point to Call assembly, point to Custom Assemblies, and then click Create Case From Email.
-
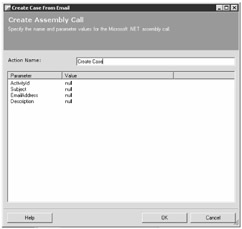
The following dialog box appears. In the Action Name box, type Create Case.
-
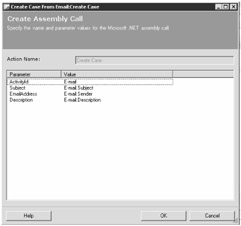
Double-click ActivityId and select Dynamic Value. Click OK.
-
Double-click Subject and select Dynamic Value. Leave Email for the entity, and choose Subject in the Field box. Click OK.
-
Double-click EmailAddress and select Dynamic Value. Leave Email for the entity, and choose Sender in the Field box. Click OK.
-
Double-click Description and select Dynamic Value. Leave Email for the entity, and choose Description in the Field box. Click OK.
-
Click OK, and then click Save.
-
Activate your new workflow rule.
Now send an e-mail message to your support queue. Microsoft CRM triggers the workflow rule when the E-mail activity is created in Microsoft CRM. The rule will run and create our case for us, as shown in Figure 9-11.
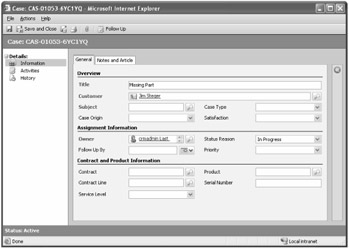
Figure 9-11: New Case record created from support e-mail message
Figure 9-12 shows that our e-mail activity is also properly associated with the case!
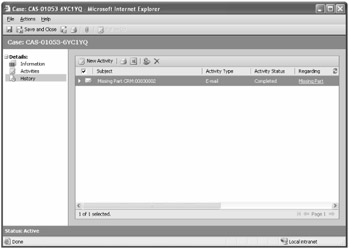
Figure 9-12: E-mail activity associated with new case record
You might find yourself wondering when you should use a pre- or post-callout versus when you should use a workflow rule. As you would expect, the answer depends on your situation. For instance, if you need to take an action before the data reaches the platform, you will have to use a callout (pre-callout in this case). If you would like the user to manually instantiate the action, a manual workflow rule would be used.
Remember that any action or event available in workflow can be done with the callout and the SDK. However, the reverse is not true. In general, keep your callout routines as simple and fast as possible. When processes become long, see whether you can transfer them to a workflow assembly for asynchronous processing.
We would recommend the following guidelines to help you decide when to use a callout versus a workflow assembly:
Use callouts
-
To alter data prior to submission to the platform.
-
To take action after an update to an entity. (Workflow does not provide an easy trigger mechanism for the update event.)
-
When you need a synchronous transaction and an immediate response.
-
To take action before or after the merging of two records or the deletion of a record.
-
When accessing custom entities that are organization-owned. Workflow can be used only on entities that have user ownership.
Use workflow
-
For all asynchronous actions—transactions that can be completed without having the user wait for their completion. A typical asynchronous action might be to send an e-mail message after some condition is met. The user usually wouldn't have to wait until the system created and sent the message.
-
For simple common tasks. The Workflow Manager has a list of actions, already built and available for use, that require no custom application development. Available actions include creating new records (such as Activities or Notes), sending e-mail messages, and updating values on related entities.
-
To allow more configuration options to the user who is creating the workflow logic. Because the user builds the workflow rule with the rule editor, he or she can also alter it without necessarily requiring programmatic interaction.
-
When you need a user to manually execute the necessary logic.
EAN: 2147483647
Pages: 120