Retouching to Remove Portions of an Image
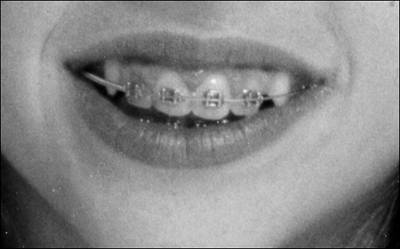
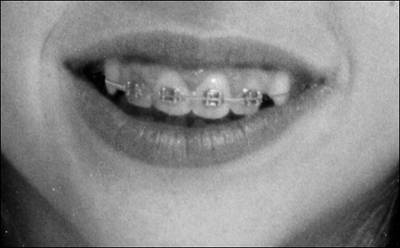
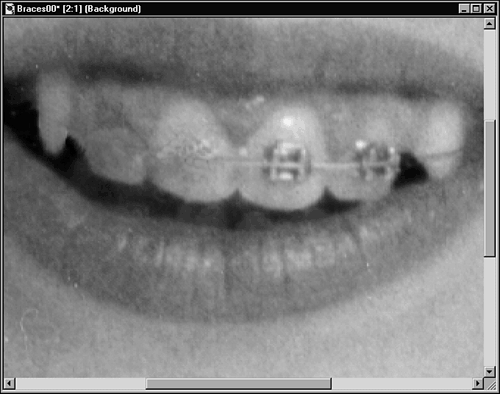
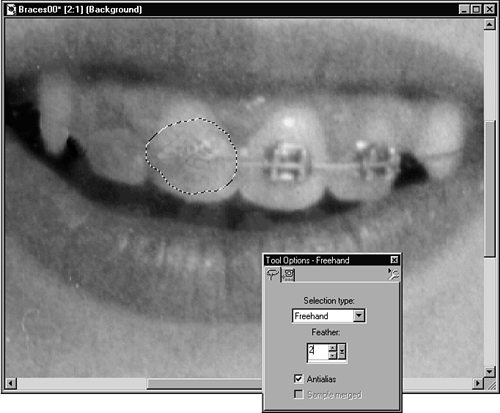
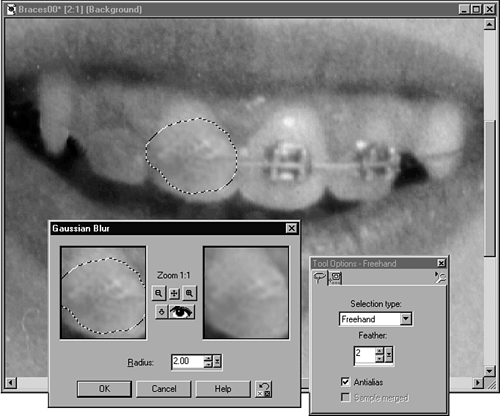
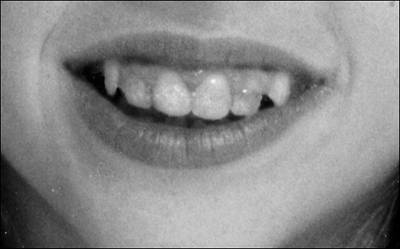
| Besides retouching older images, you might simply need to work on an area of a photograph to change some portion of the image. For example, you might want to remove someone's braces or make minor corrections to a person's complexion. Retouching tricks such as these are certainly possible with Paint Shop Pro. Figure 41.8 shows a close-up of a portrait in which the model is wearing braces. Figure 41.8. A portrait with the braces showing. You can correct this lovely smile by using some of the same techniques you used to retouch the old photo in the previous exercise. To remove some of the smaller offending areas, you can use the Dropper/Paint Brush technique. Remember to lower the opacity of the Paint Brush tool so that you gradually cover an area as you work, rather than trying to speed things up by painting quickly over an area. It is better to work an area over several times than to make too large an adjustment that glaringly shows that the image has been retouched. The whole idea is to do the retouching in a way that fools the viewer into believing that the image is in its pristine original condition. Use a "light hand," in the form of smaller, softer, more transparent brushes. Figure 41.9 shows the result of using the Dropper/Paint Brush technique to remove the braces on the bottom teeth and at the sides of the mouth. Figure 41.9. Initial retouching with the Dropper/Paint Brush technique removes some of the braces. I think that's about as far as the Dropper/Paint Brush technique will carry me, though. It's time for the Clone Brush tool. Using the Clone Brush tool, I can copy portions of the teeth where there are no braces over areas where the braces exist. Again, working with the Clone Brush tool, it's wise to make frequent backups . You'll also want to constantly change the area from which you're cloning, so that you don't just copy large areas over existing areas. Doing so would be a dead giveaway that the image had been retouched. Sometimes you'll unavoidably make a bit of a mess of an area with the Clone Brush tool. Don't panic, though. Here's a trick you can use to help fix some of those problem areas. Figure 41.10 shows one such area caused by overworking the Clone Brush tool. You can see how the front tooth that I've been working on is slightly speckled. Figure 41.10. A problem area caused by overworking the Clone Brush tool. To fix this area, select the Freehand tool and set the feathering value to 2 or so. Use the Freehand tool to select the offending area (see Figure 41.11). Figure 41.11. The problem area, selected with the Freehand tool. With the area selected, choose the Gaussian Blur filter (Image, Blur, Gaussian Blur) and turn on the Auto Proof option. Adjust the Radius setting until the area is corrected. What you're going for is the removal of the marks made with the Clone Brush tool while maintaining the same graininess and appearance as the surrounding image. Figure 41.12 shows the Gaussian Blur dialog box with the settings I used and the result of applying a Blur to the image. Figure 41.12. The problem area, corrected with the application of the Gaussian Blur filter. Figure 41.13 shows the image with the braces totally removed from the portrait. Figure 41.13. Braces totally removed from the portrait. A few problem areas remain . The retouching has left some of the areas of the teeth a little darker than they should be. Fortunately, this defect is easy to correct. To lighten up the areas that were darkened with the Clone Brush tool, I selected the Retouch tool (it resembles a small hand with one finger pointing downwards). Again, I set a soft brush with a low Opacity setting (these are in the Tool Options palette). I set the Tool controls to Lighten RGB and moved the brush around the offending area. The Retouch tool can be used to change areas of an image selectively. You can choose Lighten RGB, Darken RGB, Soften, Sharpen, Emboss, Smudge, Push, Dodge and Burn ( dodge and burn are photographic darkroom terms meaning lighten and darken), Saturation Up, Saturation Down, Lightness Up, Lightness Down, Hue Up, Hue Down, Saturation to Target, Lightness to Target, Hue to Target, and Color to Target. That's a lot of options! Once you've selected the Retouch tool and set the Retouch mode, you can adjust the Brush Tip, as I've done in this exercise, to retouch small areas of the image. As I worked, I changed the brush size and worked lightly over the areas I wanted to lighten. Figure 41.14 shows the final brace -less smile. Figure 41.14. Final retouched smile. Perfect! Work like this takes time and practice. Done properly, though, it's certainly worth the effort. |

EAN: 2147483647
Pages: 350