Why Use WithEvents?
| |
Simply put, WithEvents allows us to sink events for objects in classes of our choosing instead of just in form modules. All of a sudden we can create a class that provides our project with all of those advantages that classes give us - encapsulation of properties, methods , and behaviors (including object event sinks) - but apply them to forms, controls, and other objects as well!
For example, in a project for an insurance company, the client wanted a set of 5 checkboxes to record properties of a claim. It could be a worker's compensation claim, car-related (an accident), an illness , an accident / injury , or a maternity claim. That's what they wanted! Thinking about it and discussing it with the client it became obvious that certain rules had to be applied, that is, that these couldn't just be clicked willy-nilly without affecting other check boxes. Some of the rules were that if it was an illness it wasn't an accident (and vice versa), if it was maternity, it was listed as an illness and (therefore) wasn't an accident (don't go there!), if it was workers comp it wasn't an illness but was an accident, and so on. So when the auto- related checkbox was checked the accident had to be checked and the illness had to be unchecked. If maternity was checked, then the accident and auto had to be unchecked and illness checked, and so on. Using WithEvents (the click event) for all of the checkboxes, we were able to encapsulate the entire set of rules into a single class that was then used on several different forms (see frmChkBoxes in WithEvents.mdb ).
A form has its own class module, but even in this case you really don't want to place common functionality in each form's module. We can build a class to sink the form's events and have all form functionality that is common across all (or a set of) our forms encapsulated in that class. This makes it much easier to maintain, and one place to go to update the behaviors.
Controls on the other hand don't have a class of their own, which is one of the big drawbacks to Access controls! Suppose you wanted to have a common behavior for a combo's NotInList event. Perhaps you simply want the combo to inform the user that they can't edit the list, or perhaps you want to open a form that allows the user to edit the data behind the combo. Sure you can create functions that sit in a library to handle these things, but by wrapping them up in a class, you know exactly where to go to edit combo functionality, and of course you can move the class from project to project (or store it in a library!).
A couple of things to know about event sinks:
-
For physical objects (controls) on forms, you don't need the WithEvents keyword. To sink an object's events in any other class or even a non-control's events in a form's class module, you must use the WithEvents keyword.
-
If you have an event stub in a form class for a control event, that event stub will get control first, before your class.
-
It is possible to sink object events in multiple classes! You can literally sink an event for a control on form A over on form B! Or you can define a class that handles events for an object, and then create multiple instances of that class passing in a reference to the same object. Thus you can have one, five, ten, or a hundred instances of a class all sinking the click event for the same button, or the after update event of the same combo. This can actually be quite useful since your own classes can raise events and in fact we will show you an example of that later.
-
If you sink events in multiple instances, control passes to the classes in the order instantiated for Access 97, but in reverse order of instantiation for Access 2000 and Access 2002. What this means is that each class will eventually get control but the order that the classes gets control depends on the order that the classes are instantiated.
-
Visual Basic is a single-threaded language. Each event sink must finish processing before the next event sink can get control. If the code in the class sinking the event takes 30 seconds to do something, your program will appear to hang for thirty seconds before control passes on to the next event sink for that control's event. No other processing will occur anywhere in your program until the event handler finished its processing! This isn't a reason not to use events (or WithEvents ), but it is a warning to make sure event handlers - all event handlers everywhere - finish what they are doing as rapidly as possible. If they are going to take very long, let the user know or you will have users rebooting their machine because it's "hanging".
The Simple Combo Class
Enough theory, let's have some fun. In order to demonstrate just how simple WithEvents really is, we are going to build a very simple class that handles the AfterUpdate event of a combo box. Don't get too excited though; all this class will do for us is put up a message box when the after update fires, but that is enough to demonstrate the process. It also allows you to see exactly how simple this stuff really is. Once we understand what we are doing and how and why it works, we will then move on to a slightly more complex combo class that is truly useful - a combo record selector. Ok, let's get to work.
Try It Out-Creating the Simple Combo WithEvents Class
-
Open up the IceCream.mdb database and switch to the VBA IDE by hitting Alt+F11 .
-
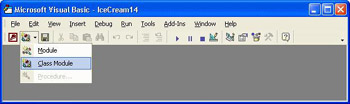
Insert a new class module. You can do this either by selecting Class Module from the Insert menu or by hitting the Insert Class Module button on the toolbar.
-
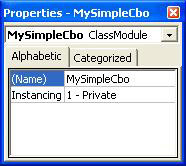
A new class called Class1 should now appear in the Project Explorer window. If the Properties window is not visible, make it so by hitting F4 and then change the name of the class to MySimpleCbo .
-
Now, in the code window, add the following code to the class module. Then save the class module.
Option Compare Database Option Explicit Dim WithEvents mcbo As ComboBox Public Function init(lcbo As ComboBox) Set mcbo = lcbo mcbo.AfterUpdate = "[Event Procedure]" End Function Private Sub mcbo_AfterUpdate() MsgBox "This is the combo After Update event" End Sub
-
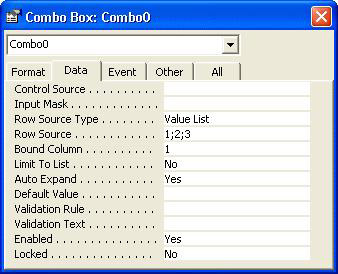
Next, switch to the database window and create a new blank form in design view. Add a combo control to the form. The default combo name will be Combo0 .
-
Now open the properties box for the combo, set the row source type to Value List , and set the row source to 1;2;3 . This will provide us some simple data for the combo, so that the AfterUpdate event can be generated.
-
Save the form as frmSimpleCombo . Open the module for the form and insert the following code:
Option Compare Database Option Explicit Dim fMySimpleCombo As MySimpleCbo Private Sub Form_Open(Cancel As Integer) Set fMySimpleCombo = New MySimpleCbo fMySimpleCombo.init Combo0 End Sub
-
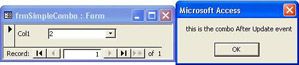
Close the form, and then reopen it. Drop down the combo and select one of the numbers . A message box will pop up saying "This is the combo After Update Event".
How It Works
That's all there is to WithEvents ! We built a simple class that dimensions a combo control WithEvents .
Dim WithEvents mcbo As ComboBox We built an Init function that we will use to initialize the class, which tells the class exactly which combo we want to respond to. This Init function stores the pointer (a pointer is a variable that holds a memory address that allows you direct access to the data held in that address) of the combo passed in to the combo variable that we declared using WithEvents in the class header. Remember we also said that simply setting the object's event property to [Event Procedure] causes the object to start sourcing the event, so in order to make sure that the combo is sourcing the AfterUpdate , we simply use code to set the control's AfterUpdate property to [Event Procedure] .
Public Function init(lcbo As ComboBox) Set mcbo = lcbo mcbo.AfterUpdate = "[Event Procedure]" End Function
Finally we build an event stub for the event we want to sink - the AfterUpdate in this case.
Private Sub mcbo_AfterUpdate() MsgBox "this is the combo After Update event" End Sub
In the form's class module we dimension a fMySimpleCombo class variable.
Dim fMySimpleCombo As MySimpleCbo Then in the form's Open event we set our class variable to be equal to a new instance and initialize the class instance.
Private Sub Form_Open(Cancel As Integer) Set fMySimpleCombo = New MySimpleCbo fMySimpleCombo.init Combo0 End Sub
We then saved the form, closed it and reopened it, so that when we select something from the combo the combo's AfterUpdate event fires. The biggest difference between what you already knew and what we have learned in this chapter is that the event is sunk in our own class - fMySimpleCombo instead of in the form's module as we would normally expect to happen. Notice that nowhere in the form's module is there any event sink for the combo, but we still get the event to perform work for us.
Think about this if we had another form (or simply another class), and we dimensioned the same class in that form, but we passed in the combo form's ( frmSimpleCombo ) Combo0 event what do you think would happen? That is correct, the class on that other form would sink the event for the combo on frmSimpleCombo . In effect you can spy on a control on a completely different form using this technique. We have no idea why you would want to do that but if you ever did, now you know how!
The Record Selector Class
Now that you have seen how simple it is to use WithEvents , it's time to build a class that is actually quite useful, amazingly simple, and yet clearly demonstrates the whole reusability thing.
The record selector class will take control of a combo's AfterUpdate event and use the event to find the primary key (PK) of a record, and use the PK to find and display that record in the form. In other words use a combo to select a record for display. Once we have this class working you will discover that we can then use the class on virtually any form that displays data from a table, such as frmIceCream , frmIngredients , frmCompany , and so on, as long as it uses a single field PK. From that we can clearly see the reusability and maintenance advantage of doing this in a class rather than with functions scattered in a library, or, even worse , in code scattered throughout your forms.
Try It Out-Creating the Simple Combo WithEvents Class
-
Open up the IceCream.mdb database and switch to the VBA IDE by hitting Alt+F11 . Insert a new class module.
-
Change the name of the class to MyRecordSelector using the properties window.
-
Now, in the code window, add the following code to the class module. Then save the class module
Option Compare Database Option Explicit Dim WithEvents mcboRecSel As ComboBox Dim mtxtRecID As TextBox Dim mfrm As Form Public Function init(lfrm As Form, lcboRecSel As ComboBox, ltxtRecID As TextBox) Set mfrm = lfrm Set mtxtRecID = ltxtRecID Set mcboRecSel = lcboRecSel mcboRecSel.AfterUpdate = "[Event Procedure]" End Function Private Sub Class_Terminate() 'clean up pointers to form and control objects Set mcboRecSel = Nothing Set mtxtRecID = Nothing Set mfrm = Nothing End Sub Sub mcboRecSel_AfterUpdate() Dim strSQL As String 'BUILD AN SQL STATEMENT strSQL = mtxtRecID.ControlSource & " = " & mcboRecSel With mfrm ' Find the record that matches the control. .RecordsetClone.FindFirst strSQL 'SET THE FORMS BOOKMARK TO THE RECORDSET CLONES BOOKMARK '("FIND" THE RECORD) .Bookmark = .RecordsetClone.Bookmark End With End Sub
-
Switch to the database window and open frmCompany in design view. Add a combo and a textbox to the form in the form header section.
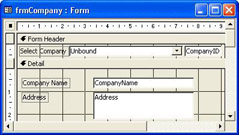
-
Open the properties sheet for the textbox and set the Name property to txtRecID . Then set the Control Source to CompanyID .
-
Select the label for the combo and change it to display Select Company . Then view the properties sheet for the combo box and change the Name property to cboRecSel . Set the Row Source property to:
SELECT tblCompany.CompanyID, tblCompany.CompanyName FROM tblCompany ORDER BY tblCompany.CompanyName; -
On the Format tab of the property sheet, set the Column Count property to 2 and the column widths to "0cm;1cm".
-
Open the form's code module and place the following code in the header:
Dim fMyRecordSelector As MyRecordSelector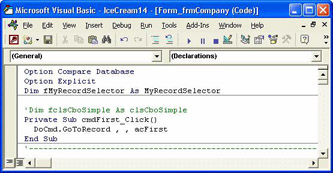
-
Next, go to the bottom of the form's code module and insert the following code into the form:
Private Sub Form_Close() Set fMyRecordSelector = Nothing End Sub Private Sub Form_Open(Cancel As Integer) Set fMyRecordSelector = New MyRecordSelector fMyRecordSelector.init Me, cboRecSel, txtRecID End Sub
-
Save the form, close it, and reopen the form.
-
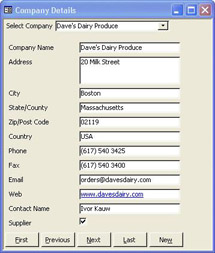
Select a company name in the record selector. The class module we just created will sink the combo box's AfterUpdate event. Using that event the class module will run code that causes the form to find and display the record for the company selected in the combo box.
How It Works
This time we pass into the class Init function a reference to the form, the combo, and the textbox. Notice that only the combo is dimensioned WithEvents . We will not be sinking any events for the form or the textbox; in fact the only event we will sink is the combo's AfterUpdate event.
Dim WithEvents mcboRecSel As ComboBox Dim mtxtRecID As TextBox Dim mfrm As Form Public Function init(lfrm As Form, lcboRecSel As ComboBox, ltxtRecID As TextBox) Set mfrm = lfrm Set mtxtRecID = ltxtRecID Set mcboRecSel = lcboRecSel mcboRecSel.AfterUpdate = "[Event Procedure]" End Function
Once again we save the object pointers passed into the class global variables for the corresponding objects. And of course, we set the mcboRecSel.AfterUpdate = [Event Procedure] so that we know that event sourcing is enabled by the record selector AfterUpdate event.
The terminate event cleans up the pointers to the objects.
Private Sub Class_Terminate() 'clean up pointers to form and control objects Set mcboRecSel = Nothing Set mtxtRecID = Nothing Set mfrm = Nothing End Sub
The combo box's AfterUpdate event sink is where all the action is. As you can see, however, it isn't complicated. Basically we build a SQL statement that we will use to find the record in the form. The control source of the txtRecSel control on the form tells us what the field name is for the PK of the table. The cboRecSel value will be the PK of the record selected. We use these two values to construct our SQL string.
Then with the mfrm object, we use the RecordsetClone.FindFirst method to find the record using the SQL statement we created in the step above. Having found the record, we now set the form's bookmark equal to the RecordsetClone 's bookmark. That step causes the form to display the record found.
Sub mcboRecSel_AfterUpdate() Dim strSQL As String 'BUILD A SQL STATEMENT strSQL = mtxtRecID.ControlSource & " = " & mcboRecSel With mfrm ' Find the record that matches the control. .RecordsetClone.FindFirst strSQL 'SET THE FORMS BOOKMARK TO THE RECORDSET CLONES BOOKMARK ("FIND" THE 'RECORD) .Bookmark = .RecordsetClone.Bookmark End With End Sub
All in all the process is remarkably simple. The nice part though is that you can now add this record selector functionality to any form simply by copying the two controls into any form that displays records from a table or query and which has an AutoNumber PK. Set the SQL statement of the combo to use data from the new form's RecordSource (table / query) and bind txtRecID to the PK field of the RecordSource . Dim the class in the form's header, initialize the class in the form's Open event, and destroy the class in the form's Close event. It is very quick and easy to add this functionality to the next form that you want to have a record selector.
| |
EAN: 2147483647
Pages: 256