Maintaining Build Rules
|
| < Free Open Study > |
|
The Project Object
Visual Studio .NET projects are used as containers to help you organize and manipulate the items that you are developing to build your application. The projects exist within a solution to manage, debug, and build the items that make up your application. A Visual Studio .NET project can contain many more types of items than you would normally find in a VB 6.0 project. In addition to the normal types of files, such as classes, forms, and modules, you may now find bitmaps, icons, and other graphic files, along with other items.
You can make a project as simple or as complex as you need to perform the task of building your application. A project can be made as simple as containing one form for a Windows application or a class for a DLL. You can also build complex projects that include many forms, modules, and classes, plus database scripts, stored procedures, and so forth.
All languages in the Visual Studio .NET environment provide several predefined project templates. With a project template, you can create a basic project container and an initial set of items that you would need to develop an application of the type specified by the template. You have already used a project template in this chapter to programmatically create a Visual Basic Windows application. There are also templates available to do the same thing in Visual C++ and Visual C#.
In addition to the templates that create a project, there are templates that allow you to add additional items to your project. Project templates allow you to concentrate on the "business" functionality that you want to develop rather than concern yourself with the housekeeping tasks that would have been associated with earlier development environments.
Listing ProjectItems Programmatically
Items within the project are called ProjectItems. The ProjectItems collection represents all of the classes, forms, documents, and any other type of item that is included in the project. The collection may be a simple, flat list of items or a hierarchical structure of ProjectItems collections. You can reference the collection by using Solution.Item(n).ProjectItems. Because the ProjectItems object is a collection, it follows that the items within the collection are ProjectItem objects, each of which may itself be a collection. Listing 9-4 shows the code for listing the items in the ProjectItem collection. This listing includes two macro commands (Subs). I have done this in order to make the second macro, ShowOneProjectItemCollection, a recursive procedure. This allows the macro to call itself when it determines that one of the ProjectItems is itself a collection. When you run the first macro, it calls the second.
Listing 9-4: Listing the ProjectItems Collection
Sub ShowProjectItems() Dim prj As Project = DTE.ActiveSolutionProjects(0) ShowOneProjectItemCollection(prj.ProjectItems(), 0) End Sub Sub ShowOneProjectItemCollection(ByVal PrjItems AsProjectItems,
ByVal CallLevel As Integer) Dim prjItem As ProjectItem ' object For Each prjItem In PrjItems If prjItem.Collection Is PrjItems Then MsgBox("Item Name = " & prjItem.Name & Chr(10) & _ "Item Level = " & CallLevel.ToString & _ Chr(10) & _ "Item Count = " & _ prjItem.Collection.Count.ToString, _ MsgBoxStyle.OKOnly, ) ' call me if this item has subitems... Dim prjItems2 As ProjectItems prjItems2 = prjItem.ProjectItems Dim bColl As Boolean = Not (prjItems2 Is Nothing) If bColl Then ShowOneProjectItemCollection(prjItems2, _ CallLevel + 1) End If End If Next End Sub
When the second macro encounters a form file, you will see that it displays a message for Form1.vb and then recourses to display a message for Form1.resx. Figure 9-3 shows the message box display for Form1.vb.
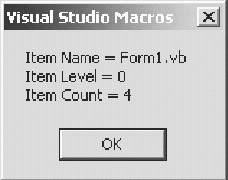
Figure 9-3: ProjectItem for Form1.vb
The message box displays the item name, the call level, and the number of items in the current collection. While the level number is 0, the ProjectItem collection is at the top level. When the level number is 1 or greater, the ProjectItem collection is a child of the top or parent level. Figure 9-4 shows the message box display for Form1.resx, which is a child item of Form1.vb.
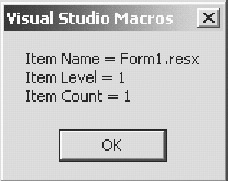
Figure 9-4: ProjectItem for Form1.resx
Adding New Items to the Project
I showed you earlier how to use a template to create a Windows application project for use with the Visual Basic language. There are templates provided for Visual C++ and Visual C#. You can use them in an add-in written in Visual Basic to create projects for the other languages and vice versa.
In addition to templates for the creation of projects, there are also templates provided for adding the standard file items to the project, such as classes, forms, and modules. Listing 9-5 shows the code for adding a module, form, and class to the project previously created by the code in Listing 9-1, which is the CreateSolution1 macro command.
Listing 9-5: Adding Items to the Project
01 Sub AddItemToSolution() 02 Dim sln As Solution 03 Dim prj As Project 04 Dim bas As Object 05 Dim frm As Object 06 'Create a reference to the solution. 07 sln = DTE.Solution 08 09 ' Open the solution just created. 10 sln.Open("c:\vsProjs\Chap9 Solution1\MyNewSolution.sln") 11 12 MsgBox("Solution has been reopened;  13 new form will be added.") 14 15 ' get pointer to the project 16 prj = sln.Projects.Item(1) 17 bas = prj.ProjectItems.AddFromTemplate(
  18 "C:\Program Files\Microsoft
  19 Visual Studio .NET\Vb7\VBProjectItems\
  20 module.vsz", "Module1.vb") 21 22 MsgBox("Module1 has been added to the project.") 23 24 frm = prj.ProjectItems.AddFromTemplate(
  25 "C:\Program Files\Microsoft
  26 Visual Studio .NET\Vb7\VBProjectItems\
  27 winform.vsz", "Form2.vb") 28 29 MsgBox("Form2 has been added to the project.") 30 31 frm = prj.ProjectItems.AddFromTemplate(
  32 "C:\Program Files\Microsoft
  33 Visual Studio .NET\Vb7\VBProjectItems\
  34 Class.vsz", "Class1.vb") 35 36 MsgBox("Class1 has been added to the project.") 37 End Sub
 | Note | If you have not run the CreateSolution1 macro from Listing 9-1, the project is included with the code for this chapter. Also, be aware that the various macros developed thus far in the chapter will modify the original solution created by the CreateSolution1 macro. If you run all of them in sequence, you will delete the project from the solution. If that is the case, you should delete the solution and then rerun CreateSolution1. At that point, you should have the project needed to run this macro. |
Figure 9-5 displays the project just after the Module1.vb object has been added to the project. Line 17 in Listing 9-5 uses the AddFromTemplate method of the ProjectItems object to add the module. The AddFromTemplate method requires two parameters. The first is the path and file name of the desired template. The path to the templates is the same for all three items being added, but the template file name is changed. The second parameter is the name of the object being added. It is used by the object method to name the new module.
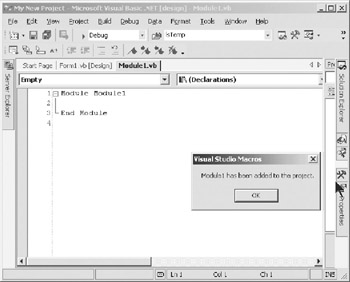
Figure 9-5: Module1 added to the project
Figure 9-6 displays the project just after the Form2.vb object has been added to the project. Line 24 in Listing 9-5 is the same as line 17, except that the file name of the template has been changed to point to the WinForm.vsz template. Additionally, the parameter supplying the name has been changed.
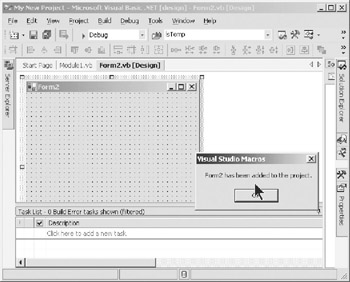
Figure 9-6: Form2 added to the project
| Caution | You will not be able to run this macro twice in a row without first deleting the solution and then recreating it by using the CreateSolution1 macro. Otherwise, the modules would already be in the project and could not be added again. This implies that if you are writing an add-in that is adding items, you will have to loop through the ProjectItems collection enumerating the names of the type of item that you want to add to the project. This will ensure that you are not adding an item that is already in the project. |
Figure 9-7 displays the project just after the Class1.vb object has been added to the project. Again, the name of the template has changed to Class.vsz. Also, the name parameter has been changed to reflect the name of the new class.
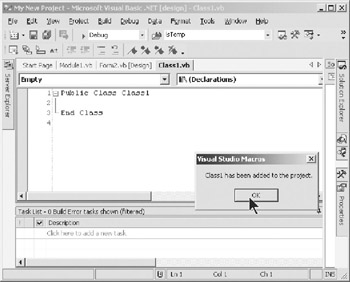
Figure 9-7: Class1 added to the project
|
| < Free Open Study > |
|
EAN: 2147483647
Pages: 172