WORKING WITH PLACED GRAPHICS
| Although Illustrator can open and edit Photoshop documentsas well as accept raster (and vector) objects copied from Photoshop or InDesign and pasted into Illustratorto work with a raster image as a single, flat object in an Illustrator document, you must place the file. Placing GraphicsOn the File menu is the Place command, which opens a dialog very similar to the one displayed with the File, Open command (see Figure 20.1). Instead of opening a file, however, the Place dialog inserts the external file on the current document's artboard. Placed files, even other Illustrator documents, are not directly editable when inserted via the Place command. In other words, constituent objects in the placed graphic cannot be manipulated independently of the whole. Figure 20.1. The Place dialog. In the Place dialog are three options:
Illustrator can place the following file formats into an active document; in the case of textual documents (text, Rich Text Format, and Microsoft Word), the text of the file is placed as editable type within a selected text object or as a new type area if no object is selected:
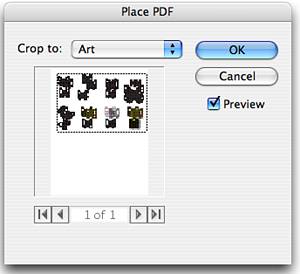
When placing some of these formats, an additional options dialog appears (see Figure 20.2). In some caseswith PDF and Illustrator files, for examplethe dialog asks where to crop the artwork or, if the original is a multipage document, which page to place. In such cases, only one page may be placed at a time, although the same file may be placed multiple times, with each instance displaying a different page. Figure 20.2. When placing a PDF or Illustrator file, the Place PDF dialog appears, with Crop To box and page navigation features.
In addition to the Place command, supported graphic and text file formats may be placed as linked assets into the Illustrator document by dragging and dropping one or multiple files from
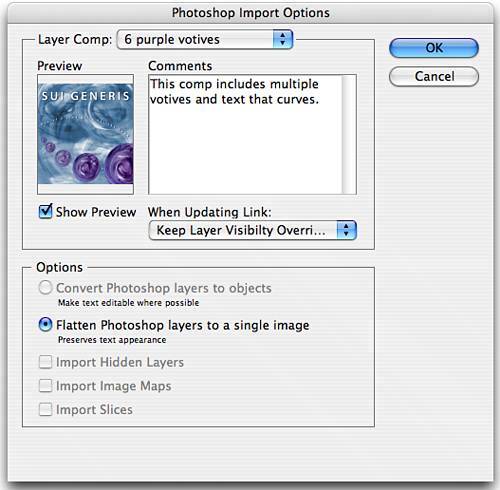
Using Photoshop Layer CompsIn Photoshop CS and CS2, layers are augmented by the addition of the Layer Comps feature. Layer comps are snapshots of the state of layers in a documentwhich image, vector, type, and adjustment layers are turned on or off, as well as certain layer transformations (see the section on layer comps in Chapter 6, "Working with Layers in Photoshop"). Saved in Photoshop documents, layer comps may be taken advantage of when such Photoshop documents are placed into Illustrator (or InDesign). When placing a Photoshop document that includes layer comps, the Photoshop Import Options dialog appears after you finish with the Place dialog (see Figure 20.3). Figure 20.3. The Photoshop Import Options dialog displaying a document with layer comps.
At the top of the Photoshop Import Options dialog is a pop-up menu of layer comps saved in the Photoshop document. Below that is a preview of the selected layer comp (the Show Preview option is unchecked by default), as well as any comments written into the layer comp in Photoshop. The When Updating Link pop-up menu includes two options: Keep Layer Visibility Overrides, which tells Illustrator to preserve the layer comp as chosen regardless of any layer and layer comp changes made in the original document in Photoshop, and Use Photoshop's Layer Visibility, which ignores the chosen layer comp settings and updates the asset in the Illustrator document if changes are made in Photoshop. The options, which affect only how the Photoshop document is handled inside Illustrator and not the original asset in any way, include
Try this exercise:
The only way to change the active layer comp for a placed Photoshop document is to relink it:
The commands on the Control palette's (unofficially named) Linked File menu are also available on the Links palette menu, and some also appear as buttons on the Links palette (see "Linking and Embedding Placed Images," later in this chapter). Linking and Embedding Placed ImagesPlaced images may be either linked or embedded, with advantages and drawbacks to both. Linking merely stores a reference to the placed graphic in the Illustrator document, not the placed graphic itself. Changes made to the original graphic file outside of Illustrator prompt Illustrator to ask whether you want to update the placed reference. In this way, a common image asset like a logo or photograph used in multiple projects may be changed across all documents simultaneously. Another pro is that the asset's file size is not added to the Illustrator document. One drawback to linking is that, when transporting the Illustrator document, all image assets must be transported as well (or the document cannot print with high quality) and editing is severely restricted. Additionally, many effects and filters (Drop Shadow, for example) may be applied only to embedded images; applying them to linked images has no visible effect. Linked placed graphics appear on the artboard with an X through them (see Figure 20.4). Figure 20.4. This placed graphic is linked, as denoted by the X across the picture.
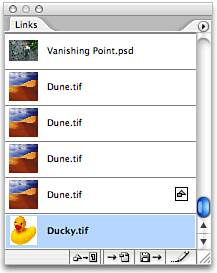
Embedding stores the placed copy of the original image directly within the Illustrator document and disassociates it with the external file. Embedding has two major advantages: A greater range of filters and effects are available for application to the embedded graphic, and additional assets need not be located and transported when moving the Illustrator document. If an asset is embedded in the Illustrator document, changes to the original file do not affect the placed copy, and Illustrator is totally unaware of changes made to the original. Additionally, the entire original asset is embedded in the Illustrator document, increasing the latter's file size on disk accordingly. The Links palette (choose Window, Links to display the palette) tracks and manages linked and embedded assets (see Figure 20.5). Each linked asset has an entry on the Links palette, and various icons appear beside the entry's name to communicate important information:
Figure 20.5. The Links palette.
Embed images in one of three ways: by clicking the Embed button that appears on the Control palette when the image is selected, by unchecking the Link box in the Place dialog, or by selecting a linked asset entry on the Links palette and then Embed Image from the Links palette menu. At the bottom of the Links palette are four buttons that become active depending on the highlighted asset in the Links palette:
Working with Live TraceNew in Illustrator CS2 is Live Trace, an automated utility to vectorize or trace raster images into vector objects (see Figure 20.6). Figure 20.6. Raster image before tracing (left) and the same image after Live Trace with different tracing presets. From left to right: Grayscale, Color 6, and Photo High Fidelity.
When a raster image is selected in the Illustrator document, the Control palette displays the Live Trace button. Clicking the Live Trace button instantly traces the image with the last used or default Live Trace options. The down-pointing black arrow beside the Live Trace button is the Tracing Presets and Options menu. On the menu are all the default and user-created tracing presets, as well as the last item, Tracing Options. In the Tracing Options dialog, default and user-created presets appear in a menu at the top. Often, a preset provides exactly the right settings for a particular tracing. When it doesn't, the options in the Adjustments and Trace Settings sections provide precise tracing control (see Figure 20.7). Figure 20.7. The Tracing Options dialog.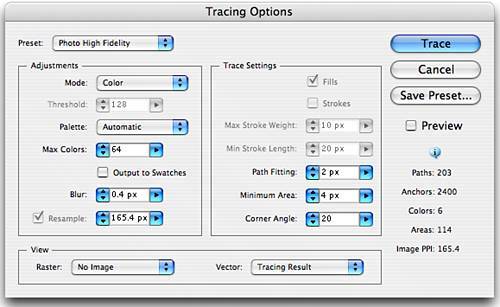 The Adjustments section contains various options that are enabled or disabled by the choice of Mode:
Also dependent on the Mode, the Trace Settings options control to the fidelity of the tracing result:
The View section controls whether and how the raster image and vector tracing results are displayed in the Live Trace object. Also in the Tracing Options dialog, on the right side, are counts of the number of paths, anchors, colors, and areas of the tracing result; the pixels per inch of the raster image; and the Save Preset button, which creates new presets for the Preset menu from the current settings. Try this:
As the name implies, Live Trace is a live effect. Tracing settings can be tweaked at any time. Unless and until the Live Trace object is expanded, the tracing is always tied to the raster image and the level of detail, colors, and fidelity may be altered in real time. Although Live Trace is a marvelous tool capable of stellar results, it isn't perfect. For example, when tracing an image with a white or even transparent background, Live Trace draws the background as white-filled paths. If the desired result is to have the traced object placed atop other objects that show through the negative space, those extraneous background paths must be deleted. Moreover, Live Trace is not always the last step in working with traced objects. To answer both (and other) scenarios in which the paths resulting from a trace must be accessed directly, you must expand the Live Trace object. With a Live Trace object selected, the Control palette displays the Expand button. Clicking it converts the object into a grouped collection of paths. From there, ungroup using the Object, Ungroup command to access each of the individual paths Live Trace drew and work with them as with any other path object. After a placed image has been converted to a Live Trace object, modify it with the Object, Live Trace submenu, which enables a return to the Tracing Options dialog, as well as the following:
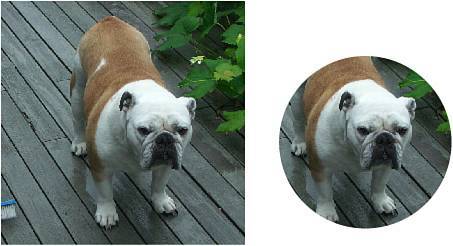
Working with Clipping MasksIllustrator does not have the capability of erasing parts of a raster image like Photoshop, nor does it need that capability. It has clipping masks. Clipping masks hide portions of images, text, paths, shapes, or groups without changing them. To create a clipping mask, place or draw the artwork to mask. Using any of the shape or drawing tools, draw a closed path in the shape of, and on top of, the portion of the artwork to remain visible. Select both the artwork and the mask object, and choose Object, Clipping Mask, Make. The mask object disappears, clipping away all areas of the artwork falling outside it (see Figure 20.8). Figure 20.8. Before masking (left) and after masking (right).
Try this:
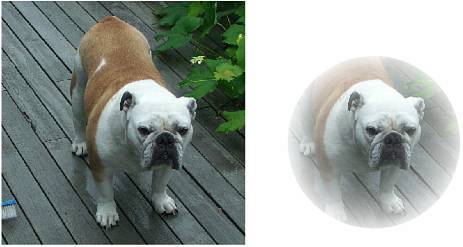
When an object or objects are contained within a clipping mask, any transformation made to the clipping mask object equally transforms the mask and the object(s) within. To transform just the contents without affecting the clipping mask, deselect the object, then select it with the Direct Selection tool. To release a clipping mask, choose Object, Clipping Mask, Release. Both the artwork and the mask object are restored and separated, though the mask object returns as an unfilled, unstroked path. Working with Opacity MasksClipping masks are all or nothingthe masked artwork either shows fully or not at all. When you want a semitransparent statea soft-edged vignette, for exampleuse opacity masks (see Figure 20.9). Figure 20.9. Before opacity mask (left) and after (right). The mask object was a gradient-filled circle.
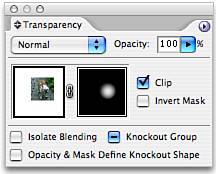
Create an opacity mask in the same way as a clipping mask, with existing artwork and a mask shape. The difference is in the fill. Whereas the fill is irrelevant to a clipping mask, it is the basis for an opacity mask. Fill the mask object with shades of gray to define transparency; black is completely transparent, white completely opaque. Set the opacity percentage or blending mode for the final masked artwork on the mask object. Select both the mask and the artwork, and choose Make Opacity Mask from the Transparency palette menu. The thumbnail preview of the artwork is joined by, and linked to, an opacity thumbnail resembling the mask object (see Figure 20.10). Figure 20.10. An opacity mask shows two thumbnails in the Transparency palette, the masked artwork and the mask object.
On the Transparency palette, the Clip option turns any areas of the artwork that appear outside the mask object to black (invisible). In other words, if a circle is used to mask a square, the corners of the square not overlapped by the circle are rendered invisible by the Clip option. Disable the Clip option for special effects like creating a window through artwork. The Invert Mask option flips the black and white points, making what was completely invisible opaque and vice versa. Try this:
In addition to making opacity masks from the Transparency palette menu, you can also choose the following options:
|


EAN: 2147483647
Pages: 426