UNDERSTANDING TYPE OBJECTS
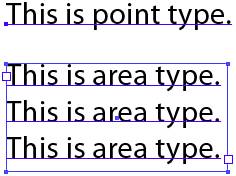
| Almost as often as it's used for illustration, Illustrator is called upon to create type-heavy documents like flyers, menus, labels, and packaging. There are four kinds of type objects: Point Type, Area Type, Type on a Path, and Legacy Type. Point Type and Area Type ObjectsOf all the methods for entering type, Point Type is the simplest to work with. It is so named because it begins with a single end point and no path segments (see Figure 19.1). Figure 19.1. Point type (top) is click-and-type from a single point. Area type (bottom) is text flowing within an area.
To create point type, choose the Type tool from the Tools palette, click and release on the artboard, and begin typing. Text flows from the inception point outwardeither left, right, or to both sides, depending on the alignment set in the Paragraph palette. Point type does not wrap, or automatically break and flow to the next line, as does area type. To create a new line of text in the same point type object, press Return or Enter. Try this:
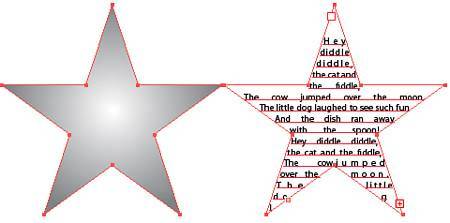
In point type, the type is the object. Area type is contained within an area, creating a container-content relationship. To create area type, click with the Type tool and drag to define the area for the type. This area becomes what InDesign calls a text frame. Area type may also be created from a preexisting shapefor instance, a starand text flows in the shape of a star (see Figure 19.2). Figure 19.2. The star shape (left) converted (right) to a type area (with forced justification).
Try this:
Either the Type or Area Type tool (or Vertical Type or Vertical Area Type tool) may be used to convert a shape or path to area type. A major difference between point type and area type is the way each relates to the bounding box. Clicking on either object with the Selection tools reveals its bounding box. In area type, changing the shape of the bounding box changes the area into which type flowsmaking more or less room for text to flow; using the control points to change the bounding box on point type distorts the text itself. To edit existing type of any kind, choose the Type tool and click along the baseline, the bottom line, of text. There are six type tools (click and hold on the Type tool to find the other tools):
Type AreasIn addition to the features shared with point type, area type offers some special functions of its own. Among them are your ability to create multiple columns in a type area, include insets, and flow text between multiple, otherwise independent, areas. With a type area selected, choosing Type, Area Type Options accesses the Area Type Options dialog:
Type that does not fit entirely in a given type area is called overset, and overset text is invisible. A red plus sign in the lower-right corner of a type area (or at the end of point or path type) indicates the presence of overset text. There are several ways to resolve the situation of overset text:
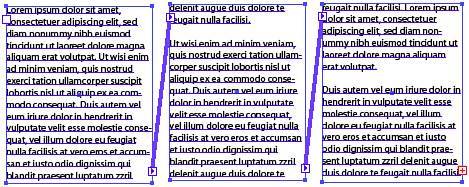
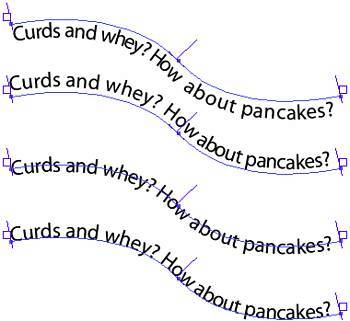
Threading is the process of linking one text area to another so that text flows freely between themtext that does not fit in one area moves automatically and dynamically to the next, the one beyond that, and so on (see Figure 19.3). Threading may be created between one type area and another empty type area, a closed path that is converted to a type area, and another type area drawn and threaded in one step. Figure 19.3. Threaded text areas, connected by the threading indicators.
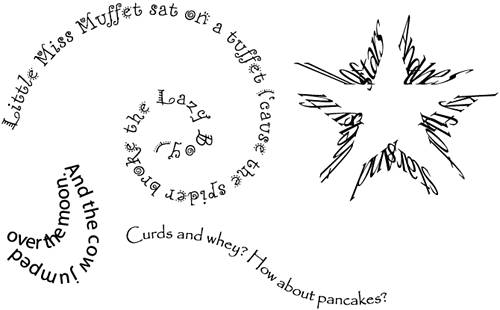
To thread text into an existing object, either another type area or a closed path, click the red plus sign in the lower-right corner (this plus sign is located within the out port), of the first type area. The cursor changes to a loaded cursor, which, when clicked somewhere inside the destination area, threads the two areas and enables the overset text from the first to flow into the second. Threading may occur between text areas of any shape and size as well as to type on a path. To thread text into a new type area that does not yet exist, click the red plus sign in the out port of the first type area. With the loaded cursor, click and drag to define the shape of the destination type area. Upon releasing the mouse button, the new area is created and threaded with the first, and overset text flows into the new area. Create additional text areas as needed. Selecting any text area in a thread indicates the direction in which text is threaded by displaying lines connecting the out port(s) of source areas to the upper left in ports of destination areas. The threading indicators may be hidden by selecting View, Hide Text Threads. To disable threading and return text to an overset status, delete the second or subsequent text areas; the text itself is not deleted. Type on a Path ObjectsUsed primarily for short passages of text and special effects, type on a path is the third of four types of text objects. Point type flows outward on a straight plane. Area type fills a specific volume. Type on a path follows a path, causing text to flow in whatever direction a path might take, including around corner points, through the curves of smooth points, and all the way around shapes (see Figure 19.4). Figure 19.4. Examples of type on a path objects.
Begin creating type on a path by creating the paththe path may be opened, closed, or a shape. Draw the path and click on it with the Type tool or Type on a Path tool. For vertical type, where each subsequent glyph appears below the prior glyph, use either the Vertical Type tool or the Vertical Type on a Path tool. Clicking a path with any of these tools causes three things to happen: the object is converted to a type on a path object; the original fill, stroke, and any other appearance attributes are removed; and the I-beam text cursor is inserted at the point of click, ready for you to type.
Clicking on a closed path with the Type or Vertical Type tool turns it into a type area. Use the Type on a Path or Vertical Type on a Path tool to convert a closed path to a type on a path object. Any of the four may be used on open paths. Typing (or pasting text from the Clipboard) causes text to follow along the path until it reaches the end of the path, at which point it oversets (see the previous section on Type Areas for a definition of overset text and how to work with it). Try creating type on a path:
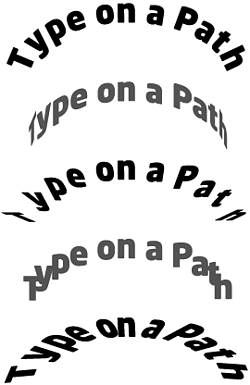
Select the text with one of the Type tools, or select the entire object with the Selection tool, and apply the desired styling. Type on a path may be styled with the Character, OpenType, Color, and Swatches palette like any other text object (see the sections on the Character palette and the OpenType palette in this chapter). Most of the options on the Paragraph palette are also applicable, but because type on a path does not allow carriage returns, the Space Before and Space After a Paragraph options have no effect (see the sections on the Paragraph palette in this chapter). The alignment buttons along the top of the Paragraph palette are especially useful when working with type on a path because they affect where the text begins its journey around the path. To raise or lower type relative to the pathfor example, to put type inside the path area rather than its default exterioruse the Baseline Shift option on the Character palette. Alternatively, choose Type, Type On a Path, Type On a Path Options. The same options are also available by double-clicking the Type on a Path tool in the Tools palette. The Type On a Path Options dialog includes four Align to Path options (see Figure 19.5):
Figure 19.5. Align to Path options (from top to bottom): Ascender, Descender, Center, and Baseline.
Also in the Type on a Path Options dialog are the following options:
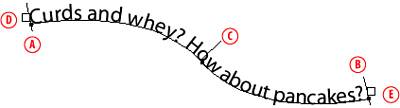
When a type on a path object is selected with the Selection tool, additional, otherwise invisible, structures appear. Specifically, brackets appear at either end of the path, a center point bar appears in the middle, and in and out ports similar to area type show on the ends (see Figure 19.7). Figure 19.7. End brackets (A and B), the center point bar (C), and in and out ports (D and E) appear when the object is selected with the Selection tool.
End brackets control the beginning and end of the type line. Drag either or both to indent the text. The center point bar is exceptionally useful. Not only does dragging it change the center point of the text, moving the text to a different place on the path, but it can also flip type to the other side of the path. Click on and drag the center point bar to the opposite side of the path to flip typewhich has the same effect as the Flip check box in the Type on a Path Options dialog.
A common question is whether type on a path can be converted to point type or area typeor vice versa. Strictly speaking, no. However, text may be copied from and pasted into and between any of the three editable type objects. Just as with type areas, type on a path may be threaded. If text oversets on a single type on a path object, you can thread it to another or even between type areas and type paths. Click the overset red plus sign in one or the other object's out port, and then click in another object's in port or use the loaded cursor to initiate a new type on a path (from a preexisting path) or area type object. Despite the fact that the path is unfilled and unstroked, type on a path is still on a path. It has anchor points and path segments like any other path, and it may be edited like any other path with the Bézier, drawing, and Direct Selection tools. Any changes to the path instantly affect the flow of type. Legacy Text ObjectsIn Illustrator CS the way type is handled in the application changed dramatically. Text created in Illustrator 10 or earlier is not the same kind of object as it is in CS or CS2. This older type is called legacy text. Legacy text can be identified on the artboard as having an X through its bounding box, much like the way placed and linked images appear. Legacy text does print, contrary to popular misconception. It can even be moved. However, to edit the text or apply live effects, it must be updated to the newer type format pioneered with Illustrator CS. There are a few ways to update legacy text:
The Type, Legacy Text menu command is grayed out and disabled if the document does not contain any instances of legacy text. Because type handling has completely changed in recent versions of Illustrator, converting from legacy text introduces a risk of text composition differences. Glyphs in all type objects (point, area, and path type) may change how they relate to one another with respect to kerning, tracking, and other compositional aspects. Changes are usually most obvious, however, in area type where Illustrator's new paragraph composer may change the way lines of type hyphenate and wrap in paragraphs, resulting in the possible introduction of extra space at the bottom of the area, or even in oversetting of type that previously fit within the area. |
EAN: 2147483647
Pages: 426