ILLUSTRATOR PREFERENCES
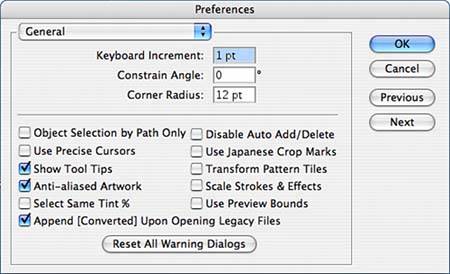
| Before you start working in any application, give some thought to setting up your preferences. Each Adobe application gives you numerous preference options that control the way the application performs specific actions or reacts in specific situations. Access the Illustrator Preferences window by selecting Edit, Preferences in Windows environments, and Illustrator, Preferences on your Mac. The Preferences window contains several panes. You can select a specific pane from the Preferences submenu, or use the pop-up menu at the top of the Preferences window to choose the set of preferences you want to see. Use the Next and Previous buttons to move from set to set. In the following sections, you explore the different options in the Preferences window. In many cases you may choose to stay with Illustrator's default preferences, but it's good to become familiar with these because there might be certain options that are very meaningful to you and the way you work. General PreferencesFigure 13.6 shows the General pane of the Illustrator Preferences window. The following options are available:
Figure 13.6. Illustrator's General Preferences.
The following check box options enable you to turn the features on or off:
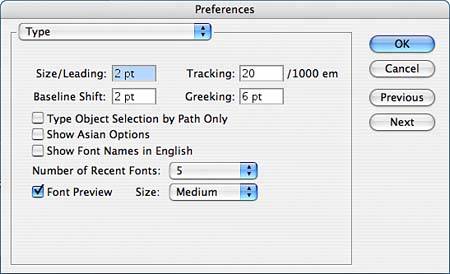
Click the Reset All Warning Dialogs button to reset any warning dialogs you might have turned off or changed in the application. Type PreferencesFigure 13.7 shows the Type pane of the Illustrator Preferences window. Figure 13.7. Illustrator's Type Preferences.
Keyboard shortcuts exist to help you automatically enlarge or reduce type and type characteristics incrementally. The numbers in the Size/Leading, Tracking, and Baseline Shift fields are the default increments when you use these keyboard shortcuts. The Greeking field refers to the size type has to be to avoid being greeked, or displayed as a gray bar, when you are looking at your artboard. The point size is relative to the zoom level of the artboard. For example, with the default setting, type below 6 points is greeked at 100%. With that same setting, type below 12 points is greeked at 50% zoom. The following options are available:
When the Font Preview option is checked, fonts will be displayed with previews in the Type menu and all other places where fonts are selected. You can also choose a general size at which the font should display. Units & Display Performance PreferencesFigure 13.8 shows the Units & Display Performance pane of the Illustrator Preferences window. Figure 13.8. Units & Display Performance Preferences.
The Units pop-up menus enable you to select the units of measurement in which general items (page objects, tabs and rulers), strokes, type, and Asian type (if you selected Show Asian Options in the Type Preferences pane) are displayed. The following options are available:
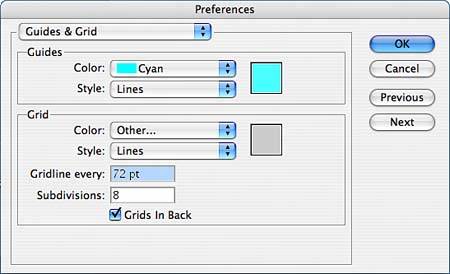
Guides & Grid PreferencesThe Guides & Grid pane of the Preferences window enables you to set the style and color of grids and guides on your artboard (see Figure 13.9). Enter a number to indicate how often a gridline should appear when grids are turned on and how many subdivisions are between each gridline. For example, if you were working in picas (a unit of measurement common in printing) and wanted a gridline every inch, you would put a gridline every 6p0 (6 picas equal 1 inch), with six subdivisions to represent the individual picas. The check box enables you to place grids behind page objects. Figure 13.9. Guides & Grid Preferences.
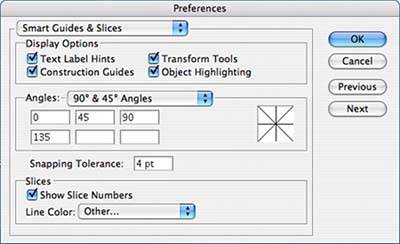
Smart Guides & Slices PreferencesFigure 13.10 shows the Smart Guides & Slices pane of the Illustrator Preferences window. The following options are available:
Figure 13.10. Smart Guides & Slices Preferences.
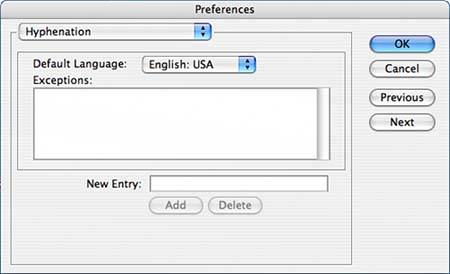
The Angles area enables you to set how Smart Guides appear to help you position other objects near existing objects. Choose from the predefined angles in the pop-up menu or enter your own angles, which automatically changes the default to Custom. The preview square shows how the Smart Guide angles display. The Snapping Tolerance option refers to the number of points within which an object automatically snaps to a Smart Guide. The Slices options define the boundaries of elements on a web page based on object type. In these preferences, you can set to show the slice number on the page and what color the boundary line for the slice should be. Hyphenation PreferencesChoose your default language for hyphenation on the Hyphenation pane of the Preferences window (see Figure 13.11). If there are words you do not want to hyphenate automatically, like company names or proper names, enter them in the New Entry field and click Add to include them in the Exceptions list. You can also delete from the Exceptions list here. Figure 13.11. Hyphenation Preferences.
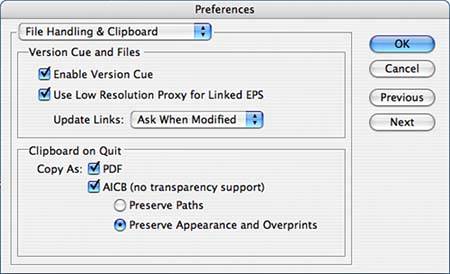
Plug-ins & Scratch Disks PreferencesIf you are using Illustrator plug-ins, you can choose their default location on the Plug-ins & Scratch Disks pane of the Preferences window (see Figure 13.12). Use this pane if you want all plug-ins to be stored in a certain location. Figure 13.12. Plug-ins & Scratch Disk Preferences.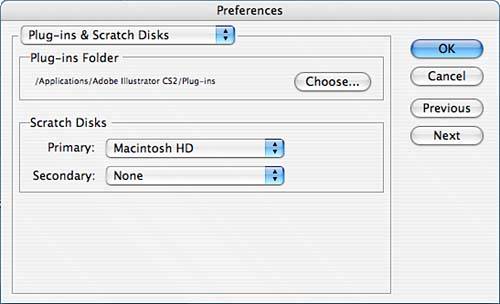 Certain Adobe programs ask you to specify a scratch disk to help handle the memory requirements of the program. When you are working with certain types of effects, Illustrator needs to store a lot of temporary information about the effects. If you have a partitioned drive or other hard drives you can use for the temporary storage of this information, choose your primary and secondary scratch disks here if necessary. File Handling & Clipboard PreferencesFigure 13.13 shows the File Handling & Clipboard pane of the Illustrator Preferences window. The following options are available:
Figure 13.13. File Handling & Clipboard Preferences.
Appearance of Black PreferencesThe Appearance of Black pane in the Preferences window (see Figure 13.14) enables you to set how Rich Black and Pure Black (K = 100) appear onscreen and when they are printed/exported to RGB and Grayscale devices. Pure black tends to appear onscreen as a dark gray; rich black displays as more of a true black. If you select the Output All Blacks Accurately option, files that are printed on RGB or grayscale devices print blacks as they are defined. If all blacks are not created in the same way, you could have a difference between black elements on your page. If you select the Output All Blacks as Rich Black option, files that are printed on RGB or grayscale devices print the black as 100K, so it appears as dark as possible. Figure 13.14. Appearance of Black Preferences.
|


EAN: 2147483647
Pages: 426