Section 4.8. Programming Examples


4.8. Programming Examples

In this section, we will look at examples of programming in the Open Firmware environment. While doing so, we will also come across several device support extensions implemented by Apple's version of Open Firmware. These device-specific extensions allow programs to access the keyboard, mouse, real-time clock (RTC), NVRAM, and so on.

4.8.1. Dumping NVRAM Contents

In the example shown in Figure 44, we dump the entire contentsin a raw formatof the NVRAM device. The following relevant methods are provided by the NVRAM device:

size ( -- <size in bytes> ) seek ( position.low position.high -- <boolean status> ) read ( <buffer address> <bytes to read> -- <bytes read> )


Figure 44. Dumping NVRAM contents

0 > 0 value mynvram  ok 0 > " nvram" open-dev to mynvram ok 0 > " size" mynvram $call-method ok 1 > . 2000  ok 0 > 2000 buffer: mybuffer  ok 0 >  0 0 " seek" mynvram $call-method  ok 1 > . fffffff  ok 0 > mybuffer 2000 " read" mynvram $call-method  ok 1 >  . 2000 ok 0 > mybuffer 2000 dump ffbba000: 5a 82 00 02 6e 76 72 61 6d 00 00 00 00 00 00 00 |Z...nvram.......| ffbba010: bb f1 64 59 00 00 03 3c 00 00 00 00 00 00 00 00 |..dY...<........| ffbba020: 5f 45 00 3e 73 79 73 74 65 6d 00 00 00 00 00 00 |_E.>system......| ffbba030: 00 02 00 00 64 61 79 74 00 06 00 00 00 00 00 00 |....dayt........| ... ffbba400: 70 bd 00 c1 63 6f 6d 6d 6f 6e 00 00 00 00 00 00 |p...common......| ffbba410: 6c 69 74 74 6c 65 2d 65 6e 64 69 61 6e 3f 3d 66 |little-endian?=f| ffbba420: 61 6c 73 65 00 72 65 61 6c 2d 6d 6f 64 65 3f 3d |alse.real-mode?=| ffbba430: 66 61 6c 73 65 00 61 75 74 6f 2d 62 6f 6f 74 3f |false.auto-boot?| ffbba440: 3d 74 72 75 65 00 64 69 61 67 2d 73 77 69 74 63 |=true.diag-switc| ffbba450: 68 3f 3d 66 61 6c 73 65 00 66 63 6f 64 65 2d 64 |h?=false.fcode-d| ffbba460: 65 62 75 67 3f 3d 66 61 6c 73 65 00 6f 65 6d 2d |ebug?=false.oem-| ffbba470: 62 61 6e 6e 65 72 3f 3d 66 61 6c 73 65 00 6f 65 |banner?=false.oe| ffbba480: 6d 2d 6c 6f 67 6f 3f 3d 66 61 6c 73 65 00 75 73 |m-logo?=false.us| ffbba490: 65 2d 6e 76 72 61 6d 72 63 3f 3d 66 61 6c 73 65 |e-nvramrc?=false| ffbba4a0: 00 75 73 65 2d 67 65 6e 65 72 69 63 3f 3d 66 61 |.use-generic?=fa| ffbba4b0: 6c 73 65 00 64 65 66 61 75 6c 74 2d 6d 61 63 2d |lse.default-mac-| ffbba4c0: 61 64 64 72 65 73 73 3f 3d 66 61 6c 73 65 00 73 |address?=false.s| ffbba4d0: 6b 69 70 2d 6e 65 74 62 6f 6f 74 3f 3d 66 61 6c |kip-netboot?=fal| ffbba4e0: 73 65 00 72 65 61 6c 2d 62 61 73 65 3d 2d 31 00 |se.real-base=-1.| ffbba4f0: 72 65 61 6c 2d 73 69 7a 65 3d 2d 31 00 6c 6f 61 |real-size=-1.loa| ffbba500: 64 2d 62 61 73 65 3d 30 78 38 30 30 30 30 30 00 |d-base=0x800000.| ffbba510: 76 69 72 74 2d 62 61 73 65 3d 2d 31 00 76 69 72 |virt-base=-1.vir| ffbba520: 74 2d 73 69 7a 65 3d 2d 31 00 6c 6f 67 67 65 72 |t-size=-1.logger| ffbba530: 2d 62 61 73 65 3d 2d 31 00 6c 6f 67 67 65 72 2d |-base=-1.logger-| ...

We first open the NVRAM device and query its size, which is reported to be 8KB (0x2000 bytes). We allocate an 8KB buffer to pass to the read method. Before we read from the device, we seek to its beginning. We use the dump word to display the contents of the buffer in a meaningful format. Among the NVRAM's contents, you can see the computer's serial number and the various Open Firmware variables.

4.8.2. Determining Screen Dimensions

In this example, we call the dimensions method of the screen device to retrieve the horizontal and vertical pixel counts of the display associated with the device. Alternatively, the screen-width and screen-height words can be used to query this information.

0 > showstack  ok -> <- Empty 0 value myscreen  ok -> <- Empty " screen" open-dev to myscreen  ok -> <- Empty " dimensions" myscreen $call-method  ok -> 1280 854 <- Top 2drop  ok -> <- Empty


4.8.3. Working with Colors

In Open Firmware's default (8-bit) graphics model, each pixel is represented by an 8-bit value that defines the pixel's color. This valuethe color numbermaps to one of 256 colors according to entries in a color lookup table (CLUT). Each entry is a triplet of red, green, and blue (RGB) values. For example, the default CLUT defines color number 0 to be blackcorresponding to the (0, 0, 0) RGB tripletand defines color number 255 to be whitecorresponding to the (255, 255, 255) RGB triplet. The color! and color@ methods of the display device allow individual CLUT entries to be set and retrieved, respectively.

color@     ( color# -- red blue green ) color!     ( red blue green color# -- ) get-colors ( clut-dest-address starting# count -- ) set-colors ( clut-src-address starting# count -- )


get-colors and set-colors, respectively, can be used to retrieve or set a range of consecutive colors, including an entire CLUT.

0 > showstack   ok -> <- Empty 0 value myscreen  ok -> <- Empty " screen" open-dev to myscreen  ok -> <- Empty 0 " color@" myscreen $call-method  ok -> 0 0 0 <- Top 3drop  ok -> <- Empty 255 " color@" myscreen $call-method  ok -> 255 255 255 <- Top 3drop  ok -> <- Empty foreground-color  ok -> 0 <- Top drop  ok -> <- Empty background-color  ok -> 15 <- Top " color@" myscreen $call-method  ok -> 255 255 255 <- Top 3drop  ok -> <- Empty 256 3 * buffer: myclut  ok -> <- Empty myclut 0 256 " get-colors" myscreen $call-method  ok -> <- Empty myclut 256 3 * dump ffbbc000: 00 00 00 00 aa 00 aa 00 00 ... ... ffbbd2e0: d5 fd 68 ... ff ff ff -> <- Empty


The foreground-color and background-color words, respectively, fetch the color numbers of the foreground colorsdefined to be 0 (black)and background colorsdefined to be 15 (white). Note that color number 15 also maps to the white color in the default CLUT. This is in accordance with Open Firmware's 16-color text extension, which states that the display driver shall initialize the first 16 colors per a predefined list.

4.8.4. Drawing a Color-Filled Rectangle

Open Firmware's graphics extension standard provides a method to draw a color-filled rectangle (fill-rectangle), a method to draw a rectangle using a specified pixel map (draw-rectangle), and a method to read a rectangular pixel map from the display buffer (read-rectangle). Using these methods as primitives, more sophisticated drawing routines can be constructed.

draw-rectangle ( src-pixmap x y width height -- ) fill-rectangle ( color# x y width height -- ) read-rectangle ( dest-pixmap x y width height -- )


The following program draws a black rectangle that is 100 pixels wide and 100 pixels tall, with its top-left corner at the center of the screen.

\ fill-rectangle-demo \ fill-rectangle usage example 0 value myscreen " screen" open-dev to myscreen 0 value mycolor \ color x y width height mycolor screen-width 2 / screen-height 2 / 100 100         " fill-rectangle" myscreen $call-method


Running the fill-rectangle-demo program, say, by "booting" it using the TFTP method, should draw the desired black rectangle. Note that the screen's origin, that is, position (0, 0), is located at the top left of the physical display.

4.8.5. Creating an Animated Solution to the "Towers of Hanoi" Problem

Given the ability to draw a rectangle at a specified location on the screen, let us look at a more complex example: an animated solution to the Towers of Hanoi problem.[13] We will use the ms word, which sleeps for a specified number of milliseconds, to control the rate of animation. Figure 45 shows the layout and relative dimensions of the objects we will draw on the screen.

[13] There are three towers arranged left to right. The leftmost tower contains some number of unequally sized disks, arranged such that a smaller disk is never below a larger disk. The objective is to move all the disks to the rightmost tower, one at a time, while using the middle tower as temporary storage. At no time during the transfer may a larger disk be on top of a smaller one.

Figure 45. The Towers of Hanoi: layout and relative dimensions of on-screen objects


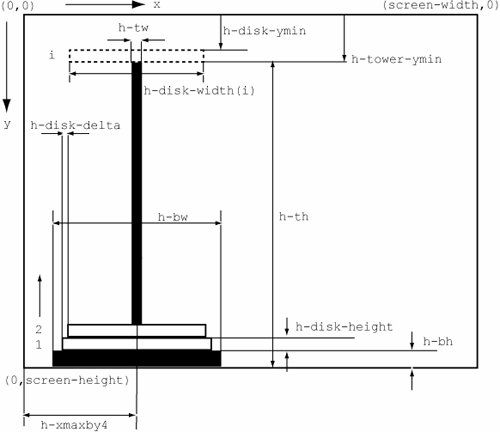
The code for the program can be conveniently divided into two parts: the code for animating and the code for generating moves for the Towers of Hanoi problem. We will use the stack-based algorithm shown as pseudocode in Figure 46 for solving an N-disk Towers of Hanoi problem.

Figure 46. The Towers of Hanoi: simulating recursion using a stack

stack = (); /* empty */ push(stack, N, 1, 3, 0); while (notempty(stack)) {     processed = pop(stack);     to = pop(stack);     from = pop(stack);     n = pop(stack);     left = 6 - from - to;     if (processed == 0) {         if (n == 1)             movedisk(from, to);         else             push(stack, n, from, to, 1, n - 1, from, left, 0);     } else {         movedisk(from, to);         push(stack, n - 1, left, to, 0);     } }

The movedisk function in Figure 46 is required to graphically move a disk from one tower to another. It could be broken down into distinct steps from an animation standpoint, corresponding to the horizontal and vertical motion of the disk. For example, moving a disk from the left tower to the right tower requires us to first move the disk up on the source tower, move it to the right so that it reaches the destination tower, and finally move it down until it comes to rest in its appropriate position on the destination tower. The code shown in Figure 47 is the first part of the program that provides the following key functionality:

  • Initializes and draws all static graphical objects on the screenthat is, the tower bases, the tower poles, and the specified number of disks on the source tower (hanoi-init)

  • Implements a function to animate the upward motion of a disk (hanoi-disk-move-up)

  • Implements a function to animate the horizontal (left or rightbased on a function argument) motion of a disk (hanoi-disk-move-lr)

  • Implements a function to animate the downward motion of a disk (hanoi-disk-move-down)

Figure 47. The Towers of Hanoi: Forth code for animation

\ Towers of Hanoi Demo \ Commentary required for "booting" this program. \ Configurable values variable h-delay 1 h-delay ! variable h-maxdisks 8 h-maxdisks ! : hanoi-about ( -- ) cr ." The Towers of Hanoi in Open Firmware" cr ; : hanoi-usage ( -- ) cr ." usage: n hanoi, 1 <= n <= " h-maxdisks @  . cr ; decimal \ Switch base to decimal \ Open primary display 0 value myscreen " screen" open-dev to myscreen \ Convenience wrapper function : hanoi-fillrect ( color x y w h -- ) " fill-rectangle" myscreen $call-method ; \ Calculate display constants screen-height 100 / 3 *      value h-bh          \ 3% of screen height screen-width 100 / 12 *      value h-bw          \ 12% of screen width screen-width 4 /             value h-xmaxby4     \ 25% of screen width screen-height 100 / 75 *     value h-th          \ 75% of screen height h-bh 2 /                     value h-tw screen-height h-th h-bh + -  value h-tower-ymin screen-height 100 / 2 *      value h-disk-height \ 2% of screen height screen-width 100 / 1 *       value h-disk-delta h-tower-ymin h-disk-height - value h-disk-ymin \ Colors 2  value h-color-base 15 value h-color-bg 50 value h-color-disk 4  value h-color-tower \ Miscellaneous variables variable h-dx \ A disk's x-coordinate variable h-dy \ A disk's y-coordinate variable h-dw \ A disk's width variable h-dh \ A disk's height variable h-tx \ A tower's x-coordinate variable h-N  \ Number of disks to solve for variable h-dcolor variable h-delta 3 buffer: h-tower-disks : hanoi-draw-tower-base ( n -- )     h-color-base swap     h-xmaxby4 * h-bw -     screen-height h-bh -     h-bw 2 *     h-bh     hanoi-fillrect ; : hanoi-draw-tower-pole ( tid -- )     dup 1 - 0 swap h-tower-disks + c!     h-color-tower swap     h-xmaxby4 * h-tw -     screen-height h-th h-bh + -     h-tw 2 *     h-th     hanoi-fillrect ; : hanoi-disk-width ( did -- cdw )     h-bw swap h-disk-delta * - ; : hanoi-disk-x         ( tid did -- x )     hanoi-disk-width   ( tid cdw )     swap               ( cdw tid )     h-xmaxby4 * swap   ( [tid * h-xmaxby4] cdw )     -                  ( [tid * h-xmaxby4] - cdw ) ; : hanoi-disk-y ( tn -- y )     screen-height swap ( screen-height tn )     1 +                ( screen-height [tn + 1] )     h-disk-height *    ( screen-height [[tn + 1] * h-disk-height] )     h-bh +             ( screen-height [[[tn + 1] * h-disk-height] + h-bh] )     -                  ( screen-height - [[[tn + 1] * h-disk-height] + h-bh] ) ; : hanoi-tower-disks-inc    ( tid -- tn )     dup                    ( tid tid )     1 - h-tower-disks + c@ \ fetch cn, current number of disks     dup                    ( tid cn cn )     1 +                    ( tid cn [cn + 1] )     rot                    ( cn [cn + 1] tid )     1 - h-tower-disks + c! ; : hanoi-tower-disks-dec    ( tid -- tn )     dup                    ( tid tid )     1 - h-tower-disks + c@ \ fetch cn, current number of disks     dup                    ( tid cn cn )     1 -                    ( tid cn [cn - 1] )     rot                    ( cn [cn + 1] tid )     1 - h-tower-disks + c! ; : hanoi-tower-disk-add     ( tid did -- )     h-color-disk           ( tid did color )     -rot                   ( color tid did )     2dup                   ( color tid did tid did )     hanoi-disk-x           ( color tid did x )     -rot                   ( color x tid did )     over                   ( color x tid did tid )     hanoi-tower-disks-inc  ( color x tid did tn )     hanoi-disk-y           ( color x tid did y )     -rot                   ( color x y tid did )     hanoi-disk-width 2 *   ( color x y tid w )     swap                   ( color x y w tid )     drop                   ( color x y w )     h-disk-height          ( color x y w h )     hanoi-fillrect ; : hanoi-init ( n -- )     \ Initialize variables     0 h-dx !     0 h-dy !     0 h-tower-disks c!     0 h-tower-disks 1 + c!     0 h-tower-disks 2 + c!     \ Draw tower bases     1 hanoi-draw-tower-base     2 hanoi-draw-tower-base     3 hanoi-draw-tower-base     \ Draw tower poles     1 hanoi-draw-tower-pole     2 hanoi-draw-tower-pole     3 hanoi-draw-tower-pole     \ Add disks to source tower     1 +     1     do         1 i hanoi-tower-disk-add     loop ; : hanoi-sleep ( msec -- )     ms ; : hanoi-drawloop-up ( limit start -- ) do      h-color-bg      h-dx @      h-dy @ i - h-dh @ + 1 -      h-dw @      1      hanoi-fillrect      h-color-disk      h-dx @      h-dy @ i - 1 -      h-dw @      1      hanoi-fillrect      h-dy @ i - h-disk-ymin >      if          h-color-tower          h-tx @          h-dy @ i - h-dh @ + 1 -          h-tw 2 *          1          hanoi-fillrect      then      h-delay @ hanoi-sleep loop ; : hanoi-drawloop-down ( limit start -- ) do      h-color-bg      h-dx @      h-disk-ymin i +      h-dw @      1      hanoi-fillrect      h-color-disk      h-dx @      h-disk-ymin i + 1 + h-dh @ +      h-dw @      1      hanoi-fillrect      i h-dh @ >      if          h-color-tower          h-tx @          h-disk-ymin i +          h-tw 2 *          1          hanoi-fillrect      then      h-delay @ hanoi-sleep loop ; : hanoi-drawloop-lr ( limit start -- ) do      h-color-bg      h-dx @ i +      h-disk-ymin      h-dw @      h-dh @      hanoi-fillrect      h-color-disk      h-dx @ i + h-delta @ +      h-disk-ymin      h-dw @      h-dh @      hanoi-fillrect      h-delay @ hanoi-sleep h-delta @ +loop ; : hanoi-disk-move-up      ( tid did -- )     h-color-disk          ( tid did color )     -rot                  ( color tid did )     2dup                  ( color tid did tid did )     hanoi-disk-x          ( color tid did x )     -rot                  ( color x tid did )     over                  ( color x tid did tid )     hanoi-tower-disks-dec ( color x tid did tn )     1 -                   ( color x tid tid [tn - 1] )     hanoi-disk-y          ( color x tid did y )     -rot                  ( color x y tid did )     hanoi-disk-width      ( color x y tid w )     swap                  ( color x y w tid )     drop                  ( color x y w )     h-disk-height         ( color x y w h )     h-dh !     2 * h-dw !     h-dy !     h-dx !     h-dcolor !     h-dx @ h-dw @ 2 / + h-tw - h-tx !     h-dy @ h-disk-ymin -     0     hanoi-drawloop-up ; : hanoi-disk-move-down    ( tid did -- )     h-color-disK          ( tid did color )     -rot                  ( color tid did )     2dup                  ( color tid did tid did )     hanoi-disk-x          ( color tid did x )     -rot                  ( color x tid did )     over                  ( color x tid did tid )     hanoi-tower-disks-inc ( color x tid did tn )     hanoi-disk-y          ( color x tid did y )     -rot                  ( color x y tid did )     hanoi-disk-width 2 *  ( color x y tid w )     swap                  ( color x y w tid )     drop                  ( color x y w )     h-disk-height         ( color x y w h )     h-dh !     h-dw !     h-dy !     h-dx !     h-dcolor !     h-dx @ h-dw @ 2 / + h-tw - h-tx !     h-dy @ h-disk-ymin -     0     hanoi-drawloop-down ; : hanoi-disk-move-lr ( tto tfrom -- )     2dup <     if         \ We are moving left         1 negate h-delta !         - h-xmaxby4 * h-delta @ -         0     else         \ We are moving right         1 h-delta !         - h-xmaxby4 *         0     then     hanoi-drawloop-lr ; : hanoi-disk-move ( totid fromtid did -- )     h-N @ 1 + swap -     1 pick 1 pick hanoi-disk-move-up     2 pick 2 pick hanoi-disk-move-lr     2 pick 1 pick hanoi-disk-move-down     3drop ;

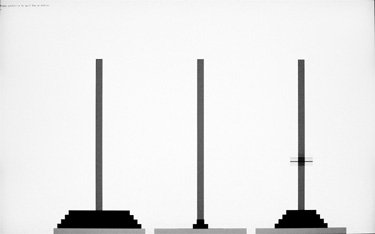
The functions are subdivided into smaller functions. The hanoi-disk-move function is a harness function that is equivalent to movedisk in Figure 46.

Now that we have an implementation of movedisk, we can implement the algorithm in Figure 46, which will give us a complete implementation. Figure 48 shows the remaining part of the overall program. Note that we will provide the end user with a simple Forth word called hanoi, which requires one argumentthe number of diskson the stack. Figure 49 shows a screenshot of the running program.

Figure 48. The Towers of Hanoi: Forth code for the program's core logic

: hanoi-solve begin depth     0 >     while         6 3 pick 3 pick + -     ( n from to processed left )         1 pick         0 =         if             4 pick             1 =             if                 2 pick                 4 pick                 6 pick                 hanoi-disk-move                 2drop 2drop drop             else                                 ( n from to processed left )                 1 -rot          ( n from to 1 processed left )                 swap drop       ( n from to 1 left )                 4 pick 1 - swap ( n from to 1 [n - 1] left )                 4 pick swap 0   ( n from to 1 [n - 1] from left 0 )             then         else                                 ( n from to processed left )             swap drop           ( n from to left )             1 pick             3 pick             5 pick             hanoi-disk-move                                 ( n from to left )             swap                ( n from left to )             rot drop            ( n left to )             rot 1 -             ( left to [n - 1] )             -rot 0              ( [n - 1] left to 0 )         then     repeat ; : hanoi-validate ( n -- n true|false )     depth     1 < \ assert that the stack has exactly one value     if         cr ." usage: n hanoi, where 1 <= n <= " h-maxdisks @ . cr         false     else         dup 1 h-maxdisks @ between         if             true         else             cr ." usage: n hanoi, where 1 <= n <= " h-maxdisks @ . cr             drop             false         then     then ; : hanoi ( n -- )     hanoi-validate     if         erase-screen cr         ." Press control-z to quit the animation." cr         dup h-N !         dup hanoi-init         1 3 0 hanoi-solve     then ;

Figure 49. Actual photo of the Towers of Hanoi program in Open Firmware


4.8.6. Fabricating and Using a Mouse Pointer

In this example, we will write a program to move a "pointer"one that we will fabricateon the screen using the mouse. Moreover, clicking a mouse button will print the coordinates of the click on the screen. We will use the fill-rectangle method to draw, erase, and redraw the pointer, which will be a small square. Opening the mouse device gives us access to its get-event method.

get-event ( ms -- pos.x pos.y buttons true|false )


get-event is called with one argument: the time in milliseconds to wait for an event before returning failure. It returns four values: the coordinates of the mouse event, a bit mask containing information about any buttons pressed, and a Boolean value indicating whether an event happened in that interval. An interval of zero milliseconds causes get-event to wait until an event occurs.

The event coordinates returned by get-event may be absolute (for a device such as a tablet), or they may be relative to the last event, as in the case of a mouse. This implies that the pos.x and pos.y values should be treated as signed or unsigned depending on the type of device. This may be programmatically determined by checking for the presence of the absolute-position property.

The mouse demonstration program is shown in Figure 410. It starts by drawing a pointer at position (0, 0) and then goes into an infinite loop, waiting for get-event to return. Note that this programand Open Firmware programs in generalcan be interrupted by typing control-z.

Figure 410. Fabricating and using a mouse pointer in Open Firmware

\ Mouse Pointer Demo \ Commentary required for "booting" this program. decimal \ Our mouse pointer's dimensions in pixels 8 value m-ptrwidth 8 value m-ptrheight \ Colors foreground-color value m-color-ptr background-color value m-color-bg \ Variables for saving pointer position variable m-oldx 0 m-oldx ! variable m-oldy 0 m-oldy ! 0 value myscreen " screen" open-dev to myscreen 0 value mymouse " mouse" open-dev to mymouse : mouse-fillrect ( color x y w h -- )     " fill-rectangle" myscreen $call-method ; : mouse-get-event ( ms -- pos.x pos.y buttons true|false )     " get-event" mymouse $call-method ; : mouse-demo ( -- )     cr ." Press control-z to quit the mouse demo." cr begin     0     mouse-get-event     if         \ Check for button presses         0 =            ( pos.x pos.y buttons 0 = )         if                        \ no buttons pressed         else                        ( pos.x pos.y )             2dup m-oldy @ + swap m-oldx @ +             ." button pressed ( " . ." , " . ." )" cr         then         m-color-bg     ( pos.x pos.y m-color-bg )         m-oldx @       ( pos.x pos.y m-color-bg m-oldx )         m-oldy @       ( pos.x pos.y m-color-bg m-oldx m-oldy )         m-ptrwidth     ( pos.x pos.y m-color-bg m-oldx m-oldy )         m-ptrheight    ( pos.x pos.y m-color-bg m-oldx m-oldy )         mouse-fillrect ( pos.x pos.y )         m-color-ptr    ( pos.x pos.y m-color-ptr )         -rot           ( m-color-ptr pos.x pos.y )         m-oldy @       ( m-color-ptr pos.x pos.y m-oldy )         +              ( m_color pos.x newy )         swap           ( m-color-ptr newy pos.x )         m-oldx @       ( m-color-ptr newy pos.x m-oldx )         +              ( m-color-ptr newy newx )         swap           ( m-color-ptr newx newy )         2dup           ( m-color-ptr newx newy newx newy )         m-oldy !       ( m-color-ptr newx newy newx )         m-oldx !       ( m-color-ptr newx newy )         m-ptrwidth     ( m-color-ptr newx newy m-ptrwidth )         m-ptrheight    ( m-color-ptr newx newy m-ptrwidth )         mouse-fillrect     then again ;

Because we are using a mouse, get-event will give us the new position relative to the old one. Therefore, we need to remember the old coordinates. Once we get the new position, we will erase the old pointer and draw one in the new position. For the sake of simplicity, we will not handle the case when the pointer is moved "outside" one of the edges of the screen. Moreover, our mouse pointer is essentially an eraser in the drawing sense too: Since we will not save the region under the pointer, anything that the pointer moves over will be erased as we will simply redraw the newly uncovered region using the background color.

We can also create an arbitrarily shaped mouse pointer, including a familiar arrow-shaped one that is partially transparent, by using a well-known masking technique. Suppose we wish to create a 5x5 pointer in the shape of an X. If C is the pointer's color and S is the screen background color, then the 5x5 square containing the pointer would look like the following when displayed on the screen:

C S S S C S C S C S S S C S S S C S C S C S S S C


We can achieve this effect by having two masks: an AND mask and an XOR mask, as shown in Figure 411.

Figure 411. AND and XOR masks for an X-shaped pointer

0 1 1 1 0        C 0 0 0 C        S S S S S 1 0 1 0 1        0 C 0 C 0        S S S S S 1 1 0 1 1        0 0 C 0 0        S S S S S 1 0 1 0 1        0 C 0 C 0        S S S S S 0 1 1 1 0        C 0 0 0 C        S S S S S AND mask (A)     XOR mask (X)     Screen (S)

While displaying the cursor on the screen, we use the following sequence of operations, which yields the desired 5x5 square:

Snew = (Scurrent AND A) XOR X


We now need to maintain in-memory bitmaps for the pointer and the region underneath it. Before drawing the contents of the pointer's bitmap on the screen (using draw-rectangle instead of fill-rectangle), we need to perform the masking operation, which will give us the desired partially transparent mouse pointer.

4.8.7. Stealing a Font

Apple's Open Firmware includes the terminal-emulator support package, which presents a display framebuffer device as a cursor-addressable text terminal. Another support package, fb8, provides generic framebuffer routines that can be used by display device drivers to perform low-level operations. Thus, there are several ways to display characters on the screen in Open Firmware. We shall devise yet anotherrather contrivedway in this example.

We will create a function called font-print that takes an input ASCII string and draws it on the screen, starting at a specified pixel location. To achieve this, we will use the display device's draw-rectangle method, which requires a memory address containing data for the rectangle to be drawn. We can consider each character in a font to be contained in an imaginary rectangle. Our program will perform the following operations.

  • Create a font containing ASCII characters.

  • Allocate a font buffer.

  • For each character in the font, store its font data in the font buffer at an offset that either is the same as or is a function of the character's ASCII code.

  • For each character in the input string, calculate the address of its font data in the font buffer and call draw-rectangle to draw the character at an appropriate position on the screen.

Although these steps appear straightforward, the first step of creating a font is rather arduousat least in our context. We will bypass this step in our example by stealing Open Firmware's default font.

As our program is booted by Open Firmware, we will output on the screen a template string containing all ASCII characters of interest. Open Firmware provides Forth words to determine the height and width of a character: char-height and char-width, respectively. Since we have a priori knowledge that our string will appear on the first line of the screen, we know the position and dimensions of the screen region containing the template string that we print. We will simply copy this region using read-rectangle, which will give us a ready-made font buffer. Figure 412 shows the implementation of the font-print word.

Figure 412. Pixel-addressable printing in Open Firmware made possible by stealing a font

\ Font Demo \ Commentary required for "booting" this program. decimal 0 value myscreen " screen" open-dev to myscreen : font-drawrect ( adr x y w h -- )   " draw-rectangle" myscreen $call-method ; : font-readrect ( adr x y w h -- )   " read-rectangle" myscreen $call-method ; \ Starts from (x, y) = (4 * 6, 6 + 6 + 11) = (24, 23) \ = \ _ok \ = \ 0_>_0123... \ \ ASCII 32 (space) to 126 (~) decimal \ ."  ! #$%&'()*+,-./0123456789:;<=>?@ABCDEFGHIJKLMNOPQRSTUVWXYZ[\]^_`abcdefghijklmno pqrstuvwxyz{|}~" cr cr 32  value f-ascii-min 126 value f-ascii-max f-ascii-max f-ascii-min - 1 + value f-nchars char-height char-width * value f-size \ Steal the default font variable f-buffer f-nchars f-size * alloc-mem f-buffer ! f-nchars 0 do     f-buffer @ f-size i * +     i char-width *     4     char-width     char-height     font-readrect loop erase-screen variable f-string variable f-x variable f-y \ If character is not within the supported range, replace it : font-validate-char ( char -- char )     dup     f-ascii-min f-ascii-max between     if         \ ok     else         drop         f-ascii-min     then ; \ Print a string starting at a specified position : font-print ( string x y -- )     f-y !     f-x !     0     rot     f-string !     do         f-string @ i + c@         font-validate-char         f-ascii-min -         f-size *         f-buffer @ +         f-x @ i char-width * +         f-y @         char-width         char-height         font-drawrect     loop ;

4.8.8. Implementing a Clock

Given the functionality of font-print from Figure 412, we can make a clock appear, say, in a corner of the screen. We will use two additional functions for this: one to retrieve the current time and another that will allow us to update the clock every second.

Open Firmware provides the get-time function, which retrieves the current time. Calling the function results in six items being pushed on the stack:

0 > decimal get-time .s -> 32 16 12 20 3 2004 <- Top  ok


The items are (from the bottom to the top on the stack): seconds, minutes, hours, day of the month, month, and year. For our clock, we will discard the date-related items.

The alarm function allows us to periodically invoke another function. Thus, we can arrange for a clock-drawing function to be invoked every second. alarm takes two arguments: an execution token of the function to be periodically invoked and the period in milliseconds.

The method to be periodically invoked through alarm must neither consume any stack items nor leave any items on the stack once it has finished. In other words, this function's stack notation must be ( -- ).


A function's execution token is its identification. ['] returns the execution token of the function name that follows it, as shown by the following example:

0 > : myhello ( -- ) ." Hello!" ;  ok 0 > myhello Hello ok 0 > ['] myhello . ff9d0a30  ok 0 > ff9d0a30 execute Hello ok


Given an execution token of a function, the execute word can be used to execute the corresponding function. Note that retrieving a function's execution token is context-specific: ['] is not a valid way to get a method's execution token inside a word definition, for example.

The code shown in Figure 413 creates a clock that updates every second. It is displayed at the top-right corner of the screen. Note that (u.) converts an unsigned number into a text string, which is what font-print requires as one of the arguments.

Figure 413. A clock implemented in the Open Firmware environment

: mytime ( -- )     get-time ( seconds minutes hour day month year )     3drop    ( seconds minutes hour )     swap     ( seconds hour minutes )     rot      ( hour minutes seconds )     (u.) screen-width 2 char-width * - 0 font-print     " :" screen-width 3 char-width * - 0 font-print     (u.) screen-width 5 char-width * - 0 font-print     " :" screen-width 6 char-width * - 0 font-print     (u.) screen-width 8 char-width * - 0 font-print ; ' mytime 1000 alarm

4.8.9. Drawing Images

In this example, let us examine how to draw images in Open Firmware. In fact, we have already encountered all the functionality required to do so: The draw-rectangle function can draw a memory buffer's contents to screen. The buffer requires the image data to be in an appropriate format. We can make the task easier by choosing to draw the Apple logo drawn during booting, since we can find the corresponding data in the correct format in the bootloader's source code.

Drawing the Apple logoor any image in generalwill require the logo data and the custom CLUT (if one is needed) to be in memory. The Apple logo data can be found in a C header file called appleboot.h in BootX's source (bootx.tproj/sl.subproj/appleboot.h). The custom CLUT can be found in another header fileclut.hin the same directory as appleboot.h. Both files contain byte arrays that can be readily used with Open Firmware. For example, the CLUT data can be simply passed to set-colors. Thus, we can draw the Apple logo using the following steps.

  • Open the screen device.

  • Call set-colors to set up the custom CLUT.

  • Load the logo data in memory.

  • Call draw-rectangle to draw the logo at the desired position.

If you wish to draw an arbitrary image, you could do so by converting the image to a format that makes it easy to view the RGB values for each pixel. The ASCII-based portable pixmap (PPM) is such a format. Given a PPM file, we could write a script that reads the file and generates Forth versions of both the CLUT and the image data. Consider the example of a 4x4-pixel image, whose PPM file looks like the one in Figure 414.

Figure 414. PPM image data for a 4x4-pixel image

P3 4 4 15 0  0  0    0  0  0    0  0  0   15  0 15 0  0  0    0 15  7    0  0  0    0  0  0 0  0  0    0  0  0    0 15  7    0  0  0 15 0 15    0  0  0    0  0  0    0  0  0

The first line shown in Figure 414 is a magic number.[14] The second line contains the image's width and height. The value 15 on the third line specifies the maximum decimal value that a color component has. The last four lines contain RGB values for each of the 16 pixels of the image. Since this image has only three distinct RGB triplets, our custom CLUT needs only three entries:

[14] A constant entity (often a number) used to identify some aspect of another entity. For example, the byte sequence 0xcafebabe, which is used as the beginning of a Universal Binary file, serves as a magic number identifying the file's type.

decimal 0 0 0 0 color!   \ CLUT entry with index 0 15 0 15 1 color! \ CLUT entry with index 1 0 15 7 2 color!  \ CLUT entry with index 2


Since Open Firmware's 8-bits-per-pixel model means a CLUT can have at most 256 entries, you may need to reduce the number of colors in an image before you draw it using the approach described in this example.


4.8.10. Creating Windows

Given the various examples discussed so far, we are now in a position to create a window that can be dragged around using the mouse. Doing so may be a worth-while exercise for those interested in learning how to create graphical environments from scratch. We could combine multiple techniques in the following way.

  • Create a "true" mouse pointer using the AND/XOR mask technique.

  • Create a window with a title bar. This is tantamount to creating a related set of rectangles and lines, along with some textual or perhaps graphical window content.

  • Create backing stores for repairing damage to the portions of the screen under the window and the pointer.

  • Move the window, if necessary, in the mouse event handler function.

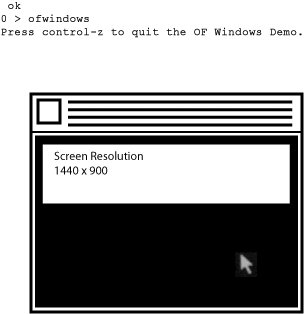
Figure 415 shows a rudimentary implementation in Open Firmware of a window that can be dragged.[15]

[15] The source code for the implementation pictured here is available on this book's accompanying web site (www.osxbook.com).

Figure 415. A window created using Open Firmware primitives


Open Firmware provides various other types of functionality that is beyond the scope of this book. For example, you can "talk" to IDE, SATA, and SCSI drives directly in Open Firmware, thus allowing you to fabricate your own command packets to such devices and perform I/O.


Mac OS X Internals. A Systems Approach
Mac OS X Internals: A Systems Approach
ISBN: 0321278542
EAN: 2147483647
Year: 2006
Pages: 161
Authors: Amit Singh

flylib.com © 2008-2017.
If you may any questions please contact us: flylib@qtcs.net