Chapter 4: Customizing the Appearance of the Windows Interface
In the last few chapters, you customized various parts of the operating system, starting with the boot screen. Then you moved on to customizing the Logon screen. After customizing the Start menu and the taskbar, you spent some time customizing the desktop, too. This chapter shows you how to customize what the entire user interface looks like by changing the theme or visual style and fine-tuning settings of both.
In the sections that follow, you learn how to make major alterations in the way your computer looks (much more than you've learned so far). First, I go over the differences between a theme and a visual style, to clear up any possible confusion that you might have. Then you will dive in and create a theme. Finally, I show you how to tweak the new Aero Glass look in Windows Vista. The chapter ends with an easy way to give Windows Vista a completely different look with a third-party skinning utility called WindowBlinds.
Working with Themes
Themes have been a part of Windows for a long time. Ever since Windows 95 was released, themes made it possible to save the configuration of the fonts, colors, visual style, wallpaper, mouse cursors, and even the sounds that are used. Throughout the years, not a lot has changed in the theme world. Originally, you had to have Microsoft Plus to use themes, but now the ability to use themes is included in all the latest Microsoft operating systems. In addition, when themes were first developed, they did not keep track of visual styles (because they didn't exist). Now the theme format has expanded to allow for the new Windows features such as audio and cursor themes.
Why are themes still important to talk about even though they have been around so long? Because they provide a unique way to save all your computer visual settings and audio settings so that you can easily change all of them simultaneously. You don't have to customize each of the different elements such as the font and colors every time you use them. Themes make your life easier. The next few sections explain how you can use themes and make your own so that you, too, can benefit from the convenience they offer.
Changing the current theme
When you install Windows Vista, Microsoft includes two themes: Windows Vista and Windows Classic. By changing the themes, you can turn on and off the new Windows Vista look. Also, remember that you can make your own themes, which I get to in the next section, and you can easily switch between your own theme sets. After you spend some time customizing the look of Vista (for instance, making changes to window metrics, sounds, visual style, cursors, wallpaper, and so on), you can save your changes in a theme file so that you never lose them.
Changing themes is actually very simple. Just follow these steps:
-
Right-click the desktop and select Personalize.
-
On the Personalization screen, select Theme from the list.
-
Expand the drop-down box under Theme, as shown in Figure 4-1, and select the theme that you want to use.
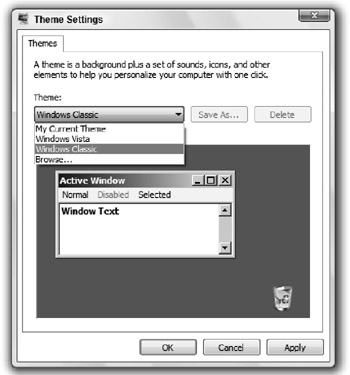
Figure 4-1: Changing the active theme -
When you have selected the theme that you want to use, press OK to save your changes.
After you press OK, the new theme is applied. This process may take a few seconds while the changes are being made.
Now that you know how to change a theme, it's time to make your own.
Making your own theme
Making your own theme enables you to easily back up your visual changes to Windows Vista so that you can distribute your settings to other computers or on the Internet. Making your own theme is actually just like changing the theme. The most difficult part of the process is customizing all the little aspects of the visual elements that make up the user interface. The next few sections walk you through the process of fine-tuning the user interface and then show how you can save your changes and make your own theme file.
Modifying window metrics and fonts
What the heck are window metrics? Well, it is the fancy way of talking about how big everything is. There is a lot that you can adjust that will affect the size of the user interface elements, such as the title bar of a window and other window elements such as buttons. Almost everything on a window has an adjustable size. This section explains how you can alter how your visual style or classic Windows interface looks by fine-tuning the different components of the window.
Another possibility is to fine-tune the fonts used. You can change the size of the font displayed, the style, and even the actual font that is used.
To get started, use Appearance Settings to make the changes:
-
Right-click the desktop and select Personalize.
-
Click Window color and appearance.
-
Select Open classic appearance properties for more color options.
-
When Appearance Settings loads, click the Advanced button.
-
The Advanced Appearance window opens. From here, you can change the size and the font for all the different aspects of a window. You can make changes in two different ways. The first way is to use the Item drop-down box. Just expand it and select the item that you want to modify. The other way is to click the object that you want to customize on the Preview picture. This click automatically selects the item from the Item drop-down box for you. Either way, select an item that you want to change. For the purpose of demonstration, I suggest that you click or select Active Title Bar.
-
After you have selected an object that you want to change, use the Size, Font, and Color settings to customize your window, as shown in Figure 4-2. Keep in mind that most of the color settings here will apply only to the classic Windows interface. If you are running Aero Glass or the non-Glass visual style, the color settings will not affect you.
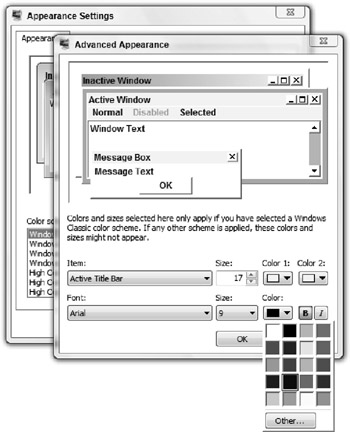
Figure 4-2: Customizing the sizes and fonts of the user interface -
When you have finished customizing your window metrics, press OK to save your changes.
-
Press OK once more to activate your changes and close the Appearance Settings window.
You have now finished customizing your window metrics. Next you customize the system sounds.
Modifying system sounds
You can attach sounds to many events such as logging on, logging off, minimizing a window, and maximizing a window. Because I am taking you through all the different things that a theme file will save the settings for, I also go over how to change the settings for the sounds that Windows uses so that you can customize this aspect of your computer, too.
Changing the event sounds is simple. Just follow these steps to launch and configure the sound properties:
-
Click the Start button, type mmsys.cpl in the box, and press Enter to launch the system Sound properties.
-
After the Sound properties loads, click the Sounds tab.
-
To adjust the sound clip for a specific event, click the event that you want to modify by navigating through the Program list, as shown in Figure 4-3.
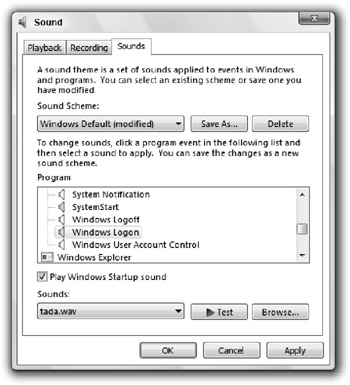
Figure 4-3: Modifying the sound for the logon event -
When you have an event selected, the Sounds drop-down list becomes enabled, and you can select the sound clip that you want to use. You can select (None) from the top of the list if you do not want to use a sound for a specific program event. If you cannot find a sound that you like on the list, you can use the Browse button to pick a specific sound file on your computer to use.
-
Here you can also enable or disable the Windows startup sound by clearing the Play Windows Startup sound box.
-
When you have finished with your changes, just press OK to save your work.
You have now finished customizing the sound events on your computer. The next step is to customize the cursors of the mouse so that they, too, are included in your theme file.
Customizing mouse cursors
The mouse cursors are yet another item saved in the theme file. Many different pointer schemes are included with Windows Vista. Although not all of them are the nicest-looking cursors, they can really help out in some situations. In addition, Windows Vista includes special large mouse cursors so that the cursors will be easier on the eyes.
To get your cursors set perfectly for your theme file, follow these steps:
-
Click the Start button, type main.cpl, and press Enter to open Mouse Properties.
-
Click the Pointers tab.
-
You have two options to customize the cursors: You can use the drop-down Scheme box to change all the pointers simultaneously to different styles, by selecting a different cursor scheme from the list, as shown in Figure 4-4. When you select the different schemes, all the cursors change automatically. Alternatively, if you do not like the cursor schemes, you can individually select a cursor from the Customize list by scrolling through the list and selecting the cursor you want to change. Then press the Browse button to change it.
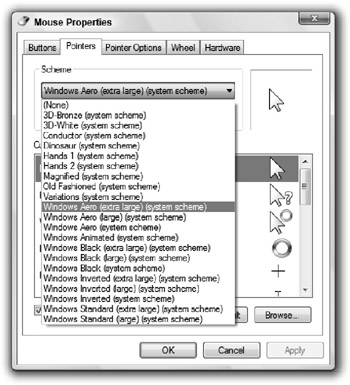
Figure 4-4: Changing the pointer scheme -
When you have finished customizing your cursors, just press OK, and you are finished.
Now you are ready to move on to customizing the visual style that the theme will use.
Selecting the theme's visual style
Windows Vista builds on top of the existing Windows XP visual styles, with the addition of support for the new 3D surface-based desktop powered by the Desktop Window Manager (DWM). Visual styles are basically a skin file for the user interface that allows Microsoft to easily change the look of the entire operating system with just one file. Windows Vista includes only two visual styles: Windows Aero (Vista Glass) and Windows Vista Basic. As you might already know, Vista Glass works only on specific supported hardware; those who do not have the correct hardware can use Windows Vista Basic only. Depending on your personal preferences, you might like the new Windows Vista Basic.
Now that you know the fundamentals of the visual style, it's time to tweak the visual style settings so that when you make your theme file in the next sections it will be included with your sound and mouse settings:
-
Right-click the desktop and select Personalize to bring up the Personalization screen.
-
Click Windows Colors and Appearance.
-
On the next screen, click Open classic appearance properties for more color options. The Appearance Settings window opens.
-
At the bottom of the window, you will see a Color schemes list, as shown in Figure 4-5.
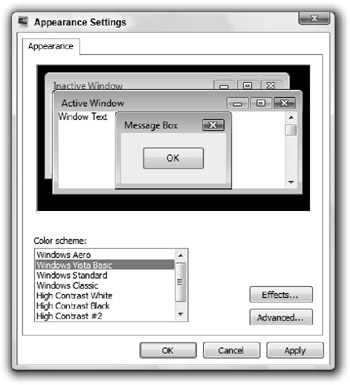
Figure 4-5: Adjusting the window style -
When you have finished selecting the visual style you want to use, press OK to save your changes.
Configuring Windows Aero (Vista Glass) settings
If you have a computer that supports Vista Glass, you can also customize the color and transparency of the Aero window interface. These settings are also saved in your theme file, so it is a good idea to customize these settings, too. With these settings, you can change the color tint of your windows and adjust the transparency of the glass. Some users have found that the interface works a lot better for them if they disable transparency completely because it makes it easier to see and performs better on their hardware.
Customizing the Windows Aero settings is one of the easiest things to do because these settings are set using Microsoft's new-settings window format. Just follow these steps to customize Glass your way:
-
Right-click the desktop and select Personalize.
-
On the Personalization screen, click Window Color and Appearance.
-
You have a couple of approaches you can take to change the color tint. You can select one of eight preset color tints. Alternatively, you can come up with your own by expanding Show Color Mixer and then adjusting the Hue, Saturation, and Brightness sliders, as shown in Figure 4-6.
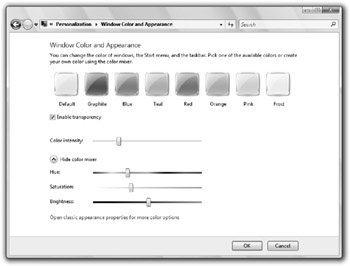
Figure 4-6: Adjusting Aero Glass color settings -
You can also disable transparency completely by removing the check in the Enable transparency box.
-
After you have your color picked, you can fine-tune your selection by adjusting the Color intensity slider.
-
When you're finished, press OK to save your changes.
Setting the wallpaper
Most people know how to change wallpaper on their desktop (right-click the desktop, select Personalize, and then select Change Wallpaper), so I'm going to show you a cool little trick to change your wallpaper even faster. This process also allows you to change the wallpaper on multiple computers without having to go to Personalize on each computer.
The trick? Just create a Registry file that you can import into the Registry that will overwrite your current wallpaper information. Doing so is actually easy. Just follow these steps to create your own file:
-
Open Notepad. (Click the Start button, type notepad, and press Enter.)
-
Type the following code:
Windows Registry Editor Version 5.00 [HKEY_CURRENT_USER\Control Panel\Desktop] "Wallpaper"="C:\\windows\\MyWallpaper.bmp" "WallpaperStyle"="1"
-
Replace c:\\window\\… with the path and filename to the bitmap that you want to use. Note that in the path, wherever there is a backslash (\), you have to put two of them in the Registry file you are creating because the Registry Editor requires all paths to be in that format. You can change the WallpaperStyle property that will allow you to control how the bitmap image displays on your computer. Setting the value equal to 0 centers the image onscreen. Setting the value to 1 displays the image as if it were tiled or repeated across the entire screen. Setting the value to 2 stretches the image to fit the entire screen.
-
When you have the text in Notepad looking like the code in Step 2 but with your changes included, you are ready to save the file. Go to the File menu item and select Save As. Then select Save As Type. In the File Name box, enter wallpaper.reg. Keep in mind that you need to have the .reg at the end of the filename so that your computer knows to import the file into your Registry using the Registry Editor.
-
After you save the file, just go to the location where you saved it and double-click the file. A screen will come up asking whether you want to import the file into the Registry. Click Yes. Then you are presented with a confirmation screen informing you whether the update was successful.
You must log off and back on if you want to see your changes take effect.
Saving your theme to a file
You have now customized all the aspects that the theme file will keep track of. You are ready to create your own theme file that you can use as backup or give to other people so that they can replicate your changes.
Before I go any further, I want to make it clear what exactly the theme file saves. The theme file saves the configuration of all the different parts of Windows Vista that you just modified; however, it does not save the actual files that you used. For example, if you decide to change the sounds of a program event on your computer, you also have to provide that sound clip to anyone or any computer that you want to apply the theme file that you made. A theme file just saves the settings, nothing else.
Now that you understand what the theme file format is, you are ready to get started. Making your own theme file is just as easy as changing one. To do so, follow these steps:
-
Right-click the desktop and select Personalize.
-
Click theme.
-
On the Theme Settings page, click Save As.
-
Enter the name that you want to save the theme file as and the destination.
You have now created a backup of your theme so that you can easily change back to it when you customize the user interface in the future. Now it's time for you to explore more Aero Glass tweaks.
EAN: 2147483647
Pages: 105