Using Disk Tools
|
|
Windows XP Professional provides a few built-in tools that can help you manage hard disks and data and solve problems that might come your way. Windows XP also gives you a Backup or Restore Wizard.
| Note | Windows XP Professional provides the backup utility as a part of System Tools. Oddly enough, Windows XP Home edition does not provide this tool. However, you can find the backup utility lurking on the Windows XP Home edition installation CD-ROM, from which you can install and use it. If you browse the installation CD-ROM, you’ll find the backup tool in \valueadd\msft\ntbackup. |
Using Error Checking and Disk Defragmenter
The error-checking and Disk Defragmenter tools are found on the Tools tab of the disk’s Properties dialog box. You’ll also find Disk Defragmenter in Start | All Programs | Accessories | System Tools. The error-checking tool is a simple tool that can scan the hard disk and fix basic problems that it finds. These include file system errors and recovery of bad disk sectors. As a general rule, you do not need to run the error-checking tool unless you are experiencing disk problems, or if you needed to invoke a hard reboot of the system (by pressing CTRL-ALT-DEL). If you need to run error checking, just click the Error Checking button on the Tools tab. You’ll see a simple dialog box where you can start the scan.
The next tool that you can use is Disk Defragmenter. Over time, fragmentation occurs in file systems. Fragmentation is a normal part of disk use and occurs when files are not written contiguously on the hard disk. As more and more files are fragmented, Windows XP requires more time to read and write data to the hard disk. As a general rule, you should get in the habit of running Disk Defragmenter every few months to reduce fragmentation. The telltale sign that a disk is heavily fragmented is simply slow data reading and writing.
The good news is that Windows XP’s Disk Defragmenter can analyze a disk for you and perform the defragmentation if necessary. Simply open the disk defragmenter, as shown in Figure 7-4, and use the interface to analyze and defragment the disk. Note that disk defragmentation can take some time to perform—up to several hours—and you should close all programs (including any antivirus programs) because the tool needs exclusive access to the disk in order to work correctly.

Figure 7-4: Disk Defragmenter
| Note | There is also a Disk Cleanup tool found in Start | All Programs | Accessories | System Tools. The Disk Cleanup tool simply helps you locate unneeded or unused files so you can delete them. A wizard guides you through the cleanup process. |
Using the Backup or Restore Wizard
Windows XP Professional supports the same backup and restore features that were first introduced in Windows 2000 Professional. As you can read in most technical books, the importance of an effective backup plan cannot be understated. By effectively backing up data and following an effective backup plan, you can recover a failed operating system without losing any data.
It is important to understand the different kinds of backup and restore features that are available and how to back up and restore data on a Windows XP Professional computer. The following sections explore the issues and skills you need concerning backup and restore operations.
Windows XP Professional supports several different types of backups, all of which can be performed on NTFS and FAT drives.
-
Normal A normal backup backs up all selected files and marks them has having been backed up. All files you select are backed up, regardless of their previous backup state. You use this type of backup, also known as a Full backup, to perform the initial backup of your data.
-
Incremental An incremental backup backs up all selected files that have changed since the last backup. Commonly, a normal backup is performed, followed by several incremental backups, which only back up the changes. This backup strategy reduces overall backup time and storage space.
-
Differential A differential backup is the same as an incremental backup, but the files backed up are not marked as having been backed up. The result is that a differential backup may re-backup files that have not changed because they are not being marked. The difference between an incremental backup and a differential backup is recovery. A differential backup takes longer than an incremental back up, but in the event of a failure, you only need to run the normal backup job for recovery with the differential backup. If you were using an incremental backup job, you would have to recover the normal backup and every incremental backup that was created since the last normal backup.
-
Copy A copy backup backs up selected files without marking them as having been backed up. This option is useful when you want to back up certain files between normal and incremental backups without altering the incremental backup jobs.
-
Daily This backup backs up all selected files that have changed during the day without marking them as having been backed up.
When you are ready to back up data, you can do so easily with Windows XP Professional’s Backup or Restore Wizard. The following steps walk you through the process.
Creating a Backup Job
Troubleshooting: Using the Right Backup
The different types of backup can certainly cause some confusion and give you backup jobs that you really don't want, if you are not careful. The trick is to make sure you understand the different types of backup and how they are used when you restore data—case in point: incremental and differential backups.
Incremental and differential backups can be confusing, but they are really about time. Incremental backups are faster, but it takes more time to restore data fully in the event of a failure because you may have to run several different incremental backup jobs. Differential backups are slower to create, but faster when recovery is needed because you only have to run the single differential backup, along with the normal backup. So, it is simply a time trade-off: You can make backups faster, but recovery slower, or you can make recovery faster, but backups slower—it's just a matter of choice.
-
Click Start | All Programs | Accessories | System Tools | Backup.
-
The Backup or Restore Wizard appears. Click Next on the Welcome screen.
-
In the Backup or Restore window, choose the Back Up Files and Settings radio button and click Next.
-
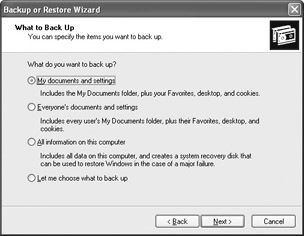
In the What to Back Up window, shown here, you can choose a category to back up, or you can choose the custom option. Make a selection and click Next.
-
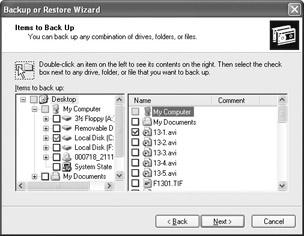
If you choose what to back up, the Items to Back Up window appears, as shown here. In this Explorer-based window, browse in the left pane, then select the files that you want to back up in the right pane. Click Next.
-
In the Backup Type, Destination, and Name window, choose a backup location and give the backup job a name. Click Next.
-
In the Completion window, click the Advanced button instead of clicking Finish.
-
In the Type of Backup window, use the drop-down menu and choose either a Normal, Incremental, Differential, Copy, or Daily backup.
-
In the How to Back Up window, you can choose to verify data after backup, use hardware compression (if available), and disable volume shadow copy (which allows a backup to occur, even if the file is currently being written to). Click Next.
-
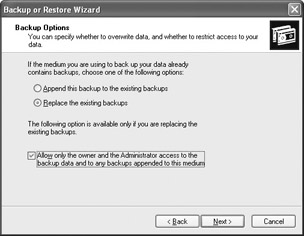
In the Backup Options window, shown here, you can choose to append this backup job to an existing backup job or replace an older backup job. Also note that you can allow only the owner and administrator to have access to the backup (if you are overwriting an older job). Make your selection, then click Next.
-
In the When to Back Up window, you can choose to run the backup job now or at a scheduled time. Make any desired selections and click Next.
-
Click Finish. The backup job completes. Click Close when the job is complete.
As you see in the Backup or Restore Wizard, you have basic options to back up everything on your computer, or you can back up selected files and folders. If you simply want to back up user data, choose the My Documents and Settings option or the Everyone’s Documents and Settings option, or the Let Me Choose What to Back Up option in the wizard’s What to Back Up window. However, you can also back up everything on the computer, including system state data, by choosing the All Information on This Computer option. System state data refers to a collection of operating system data, which includes the Registry, COM+ Class Registrations, system boot files, and related operating system data. To back up specific user data or system state data, you can simply select the Let Me Choose What to Back Up option in the wizard, and then choose the user data or select system state data. However, you may find it easier to make the desired selections manually instead of using the Backup or Restore Wizard.
Manually Creating a Backup Job
-
Click Start | All Programs | Accessories | System Tools | Backup.
-
In the Backup Utility dialog box, click the Backup tab, shown in Figure 7-5. In the left pane, select the System State check box. Note the Backup Destination and Backup Media or File Name fields at the bottom of the screen. You can change these values if desired. Click the Start Backup button.
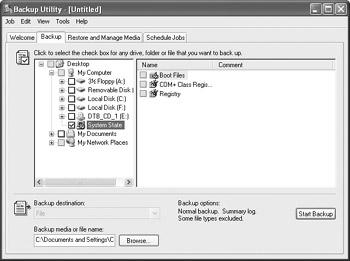
Figure 7-5: Backup tab -
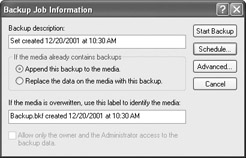
In the Backup Job Information dialog box, you’ll see the option to enter a backup description and append or replace former backup jobs, as shown here. Make any desired changes.
-
If you click the Schedule button, you can create a schedule specifying when the backup should start. Also note that you can click the Advanced button to display the Advanced Backup Options dialog box shown here. Here you can choose the advanced backup options, such as verification and backup type, that you saw when using the wizard. Make any desired changes and click OK.

-
Click the Start Backup button to begin the backup job.
Restoring Data
In the event of user data, system state data, or a complete operating system failure, you can use the backup jobs that you have created to restore the data to the computer. In the event of a disk failure or operating system failure, you can reinstall Windows XP, and then use your backup jobs to restore the data or the complete operating system that has been saved in your backup jobs. As with backing up data, you can also restore data with the help of a wizard.
When you restore data, you choose the backup file that you want to restore using the Restore Wizard (or you can simply use the Restore and Manage Media tab on the Backup Utility dialog box). You can choose to restore the data to its original location or you can choose a different location.
|
|
EAN: N/A
Pages: 164