Configuring Folder Views and Toolbars
|
|
Once you make some decisions about how you want your folders to appear using the Folder Options, you can also make some decisions about your folder views and toolbars. When you open a folder, you see a View menu, shown in Figure 3-3.
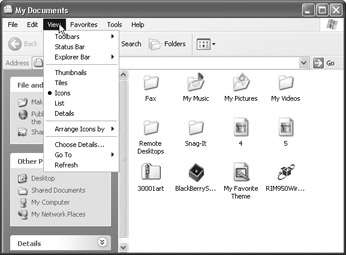
Figure 3-3: Use the View menu to make changes to your window’s appearance
Most of the options you see on this menu are self-explanatory, and you can try the different setting options to determine what you like best. The following sections explore your major options.
Toolbars
When you hold your mouse over the Toolbars item, a submenu pops up. This submenu allows you to select the toolbar items you would like to use. Some of these are enabled by default, but you can enable or disable then by just clicking them with your mouse. You have these options:
-
Standard Buttons Enabled by default, this option provides you with the standard toolbar buttons, such as Back, Forward, Up One Level, Search, and so forth. You need these, so keep this option enabled.
-
Address Bar Enabled by default, this gives you the address bar so you can move to different areas of your computer or even the Internet. For example, you could access a folder on your computer by simply typing the path to the folder (such as C:\My Documents) or an Internet address.
-
Links This option, which is enabled by default, gives you a Links button on your toolbar so you can add links, which are resource locations that you commonly access.
Aside from these standard options, you can also lock the toolbars and you can click Customize. This option opens a Customization toolbar, as shown in Figure 3-4, which is a window in which you can add and remove various toolbar buttons and options. To create a customized toolbar, use the following steps.

Figure 3-4: Use the Customization options to create custom toolbars
Create a Customized Toolbar
-
In a desired folder, click View, point to Toolbars, then click Customize.
-
In the Customization Toolbar window, select any item in the left portion of the window that you want to add to your toolbar, then click the Add button. Continue this process until you have moved all options that you want.
-
In the right portion of the window, select any item that you do not want to use on your toolbar, then click Remove. Continue this process until you have removed any options you do not want.
-
In the right portion of the window, select a desired option and use the Move Up or Move Down buttons to adjust the order of the toolbar as desired.
-
Click Close when you are done.
Status Bar
The status bar is the small bar that runs along the bottom of your window. It tells you about the connection status when you are trying to use or connect to other resources. This bar works just like the status bar in Internet Explorer, and you can choose to use it or not by clicking Status on the View menu.
Explorer Bar
This option has an additional pop-out menu that lists various Internet Explorer items you can select, such as Search, Favorites, and so forth. If you select one of these items, an additional pane appears in your window to provide the Explorer option. For example, if you select the Search option, the window provides a search section. You can experiment with these settings to find ones that are useful to you.
Icon Appearance
The remainder of the View menu contains a number of different icon and list options to configure the display of a folder’s contents. For example, you can use tiles, thumbnails, icons, list, and so forth. Just click these options to experiment with them until you find the appearance that you like best.
|
|
EAN: N/A
Pages: 164